Building Editable Pages in AEM from HTML Mockups
In the previous article, Improving AEM Front-End Development Workflow, we explored how to bundle and deliver front-end assets into AEM using Webpack — aligning your styles and scripts with AEM Cloud Manager’s standards.
This time, we will take the next step: transforming your static HTML mockup into a fully editable AEM page using templates, policies, and core components.
By the end of this guide, you will be able to:
- Map static layouts from
ui.frontendto AEM’s page structure - Configure editable templates and page policies
- Extend Core Components with custom header and footer elements
- Introduce Experience Fragments for reusable design blocks
Let us start by connecting your static index.html to a new editable template in AEM.
Preview Your Static HTML Before AEM Integration
Before bringing your design into AEM, make sure your static layout renders correctly on its own.
This helps you confirm that styles, scripts, and images are working as expected.
In the ui.frontend module, start your local server:
npm startThen open http://localhost:8081/index.html to preview your page.
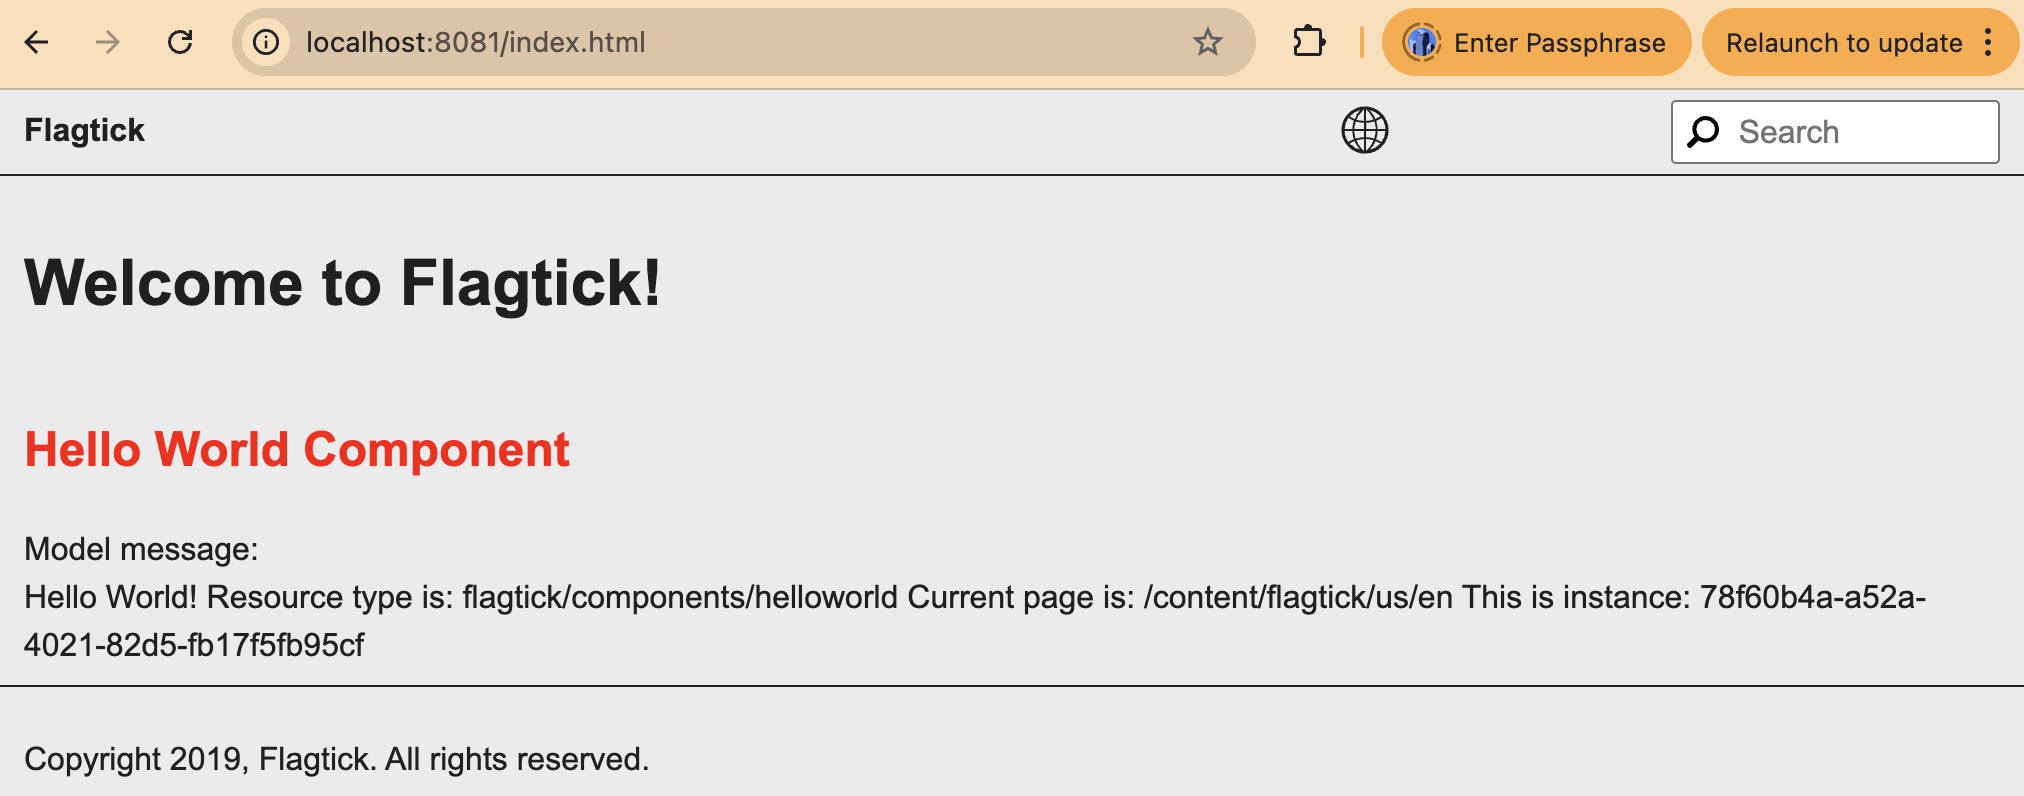
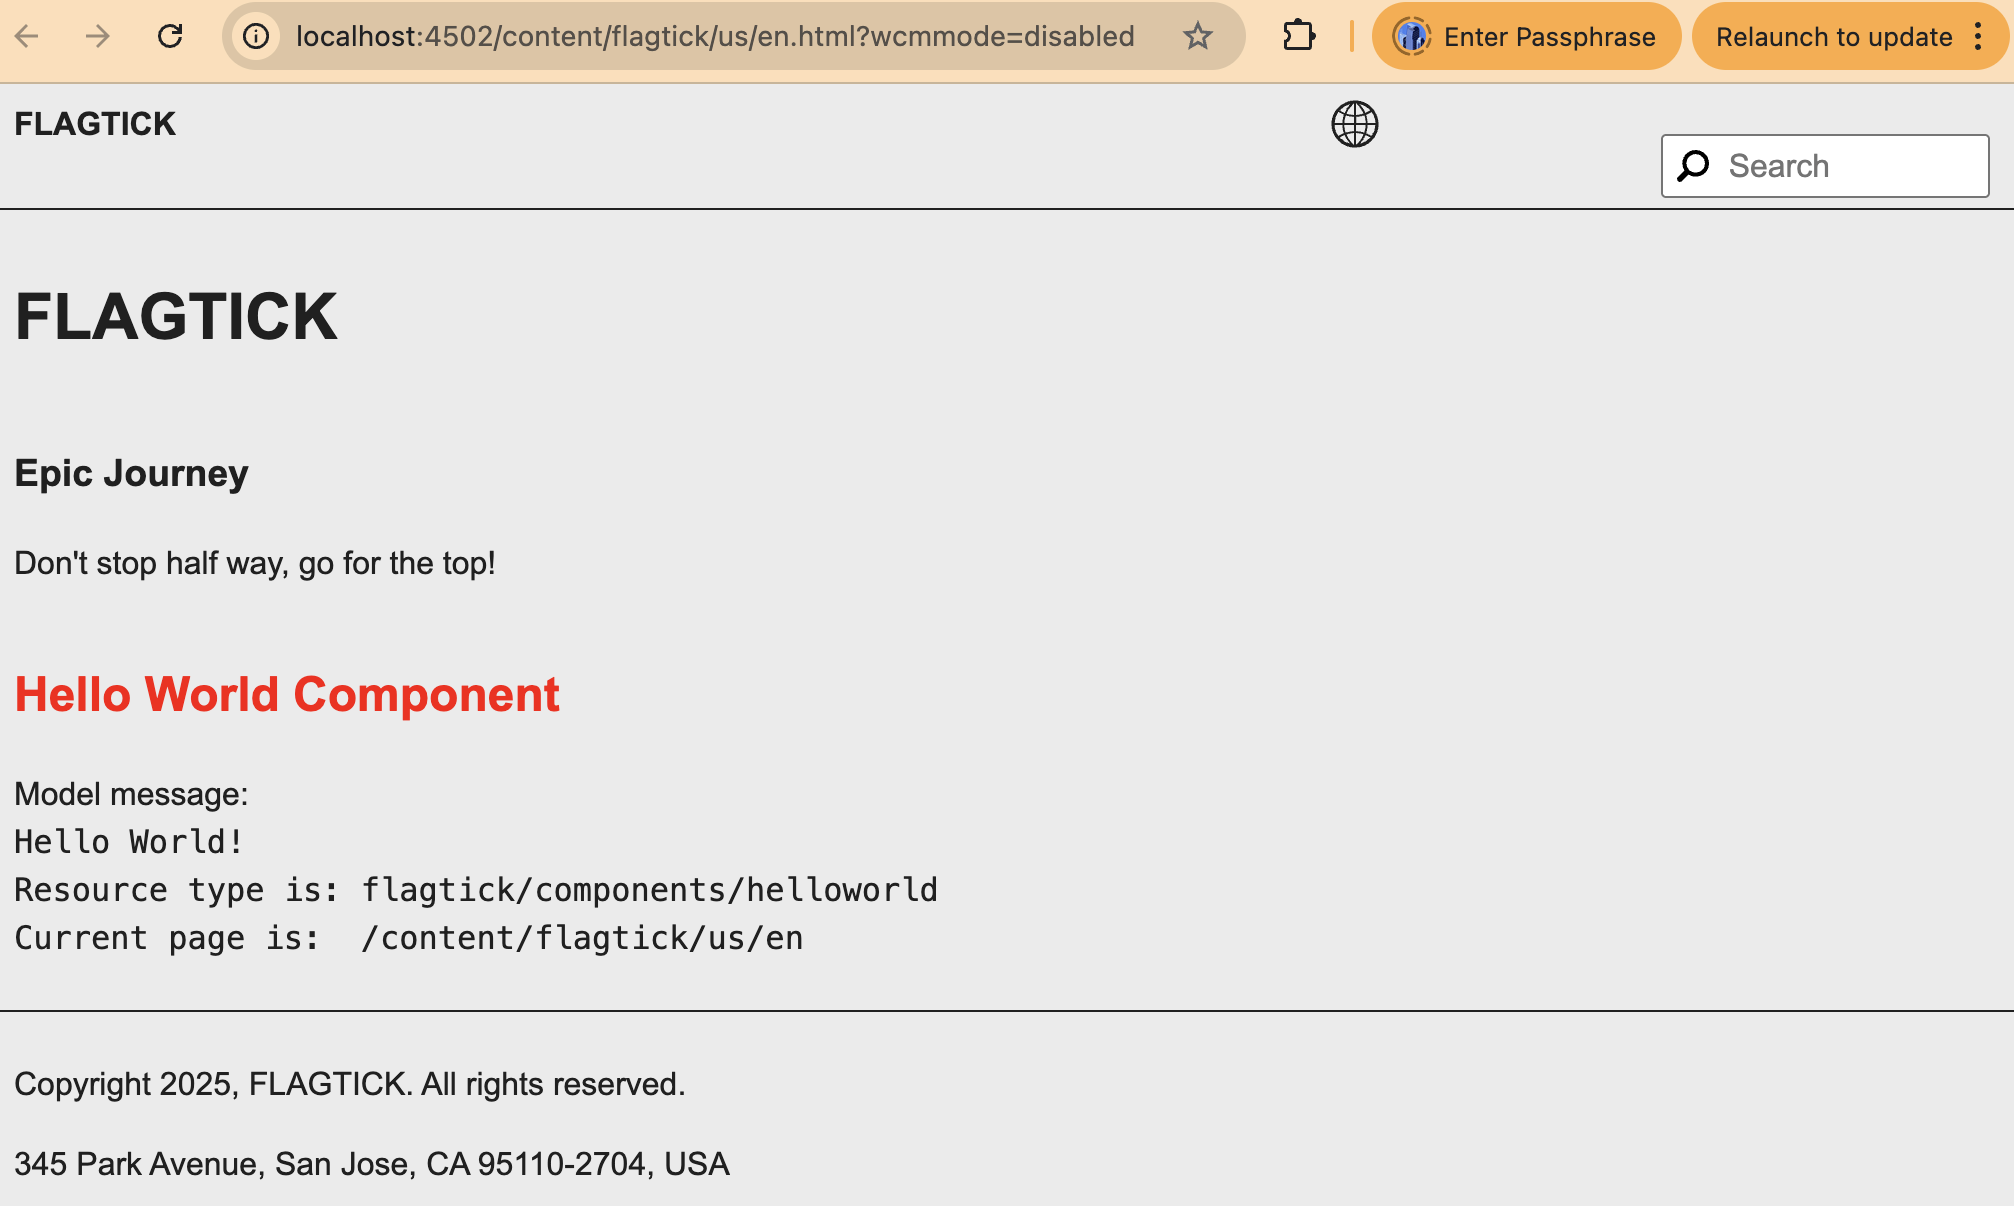
Next, use this static page as a reference when creating a new AEM page at:
http://localhost:4502/content/flagtick/us/en.html?wcmmode=disabledConfirm that your AEM-rendered page matches your static preview in layout and styling.
When no cq:allowedTemplates are configured under/conf/<project> or /content/<site>,
AEM falls back to its default Core Page Template located at:
/libs/wcm/foundation/components/pageThis default mapping typically points to the Core Content Page template:
Next, open Page Properties → Advanced, and locate the Template Settings section.
Here, you can define which templates are available for new pages — keeping your site structure consistent and manageable.
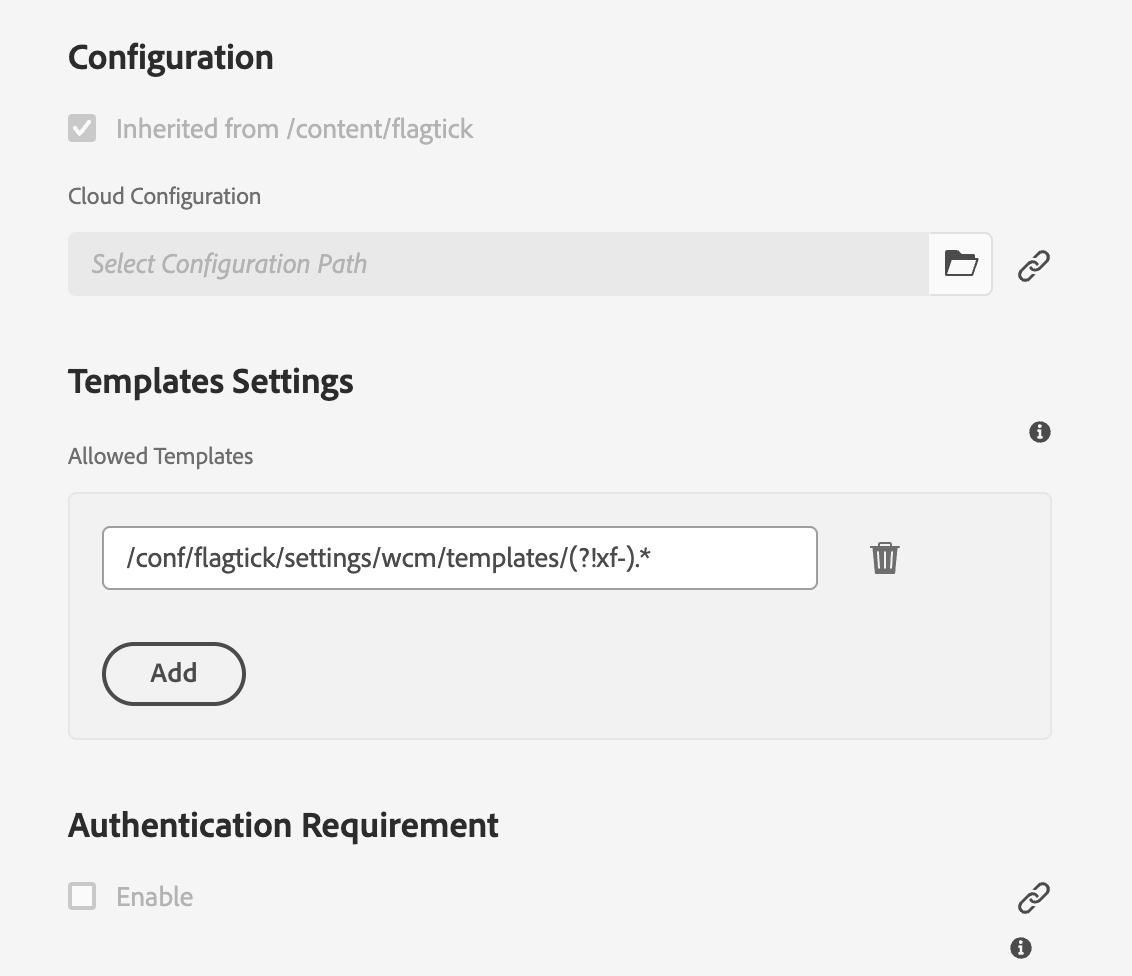
AEM filters out Experience Fragment templates in Template Settings, keeping only standard page templates available for authors.
Templates act as blueprints for pages — defining layout, components, and design behavior. Now, let’s create one for your site.
Create Your Editable Page Template
Now that your template settings are configured, let’s create an editable page template for your site.
Templates define how AEM pages are structured — what components they include and which design policies apply.
This step connects your front-end layout to a reusable foundation in AEM.
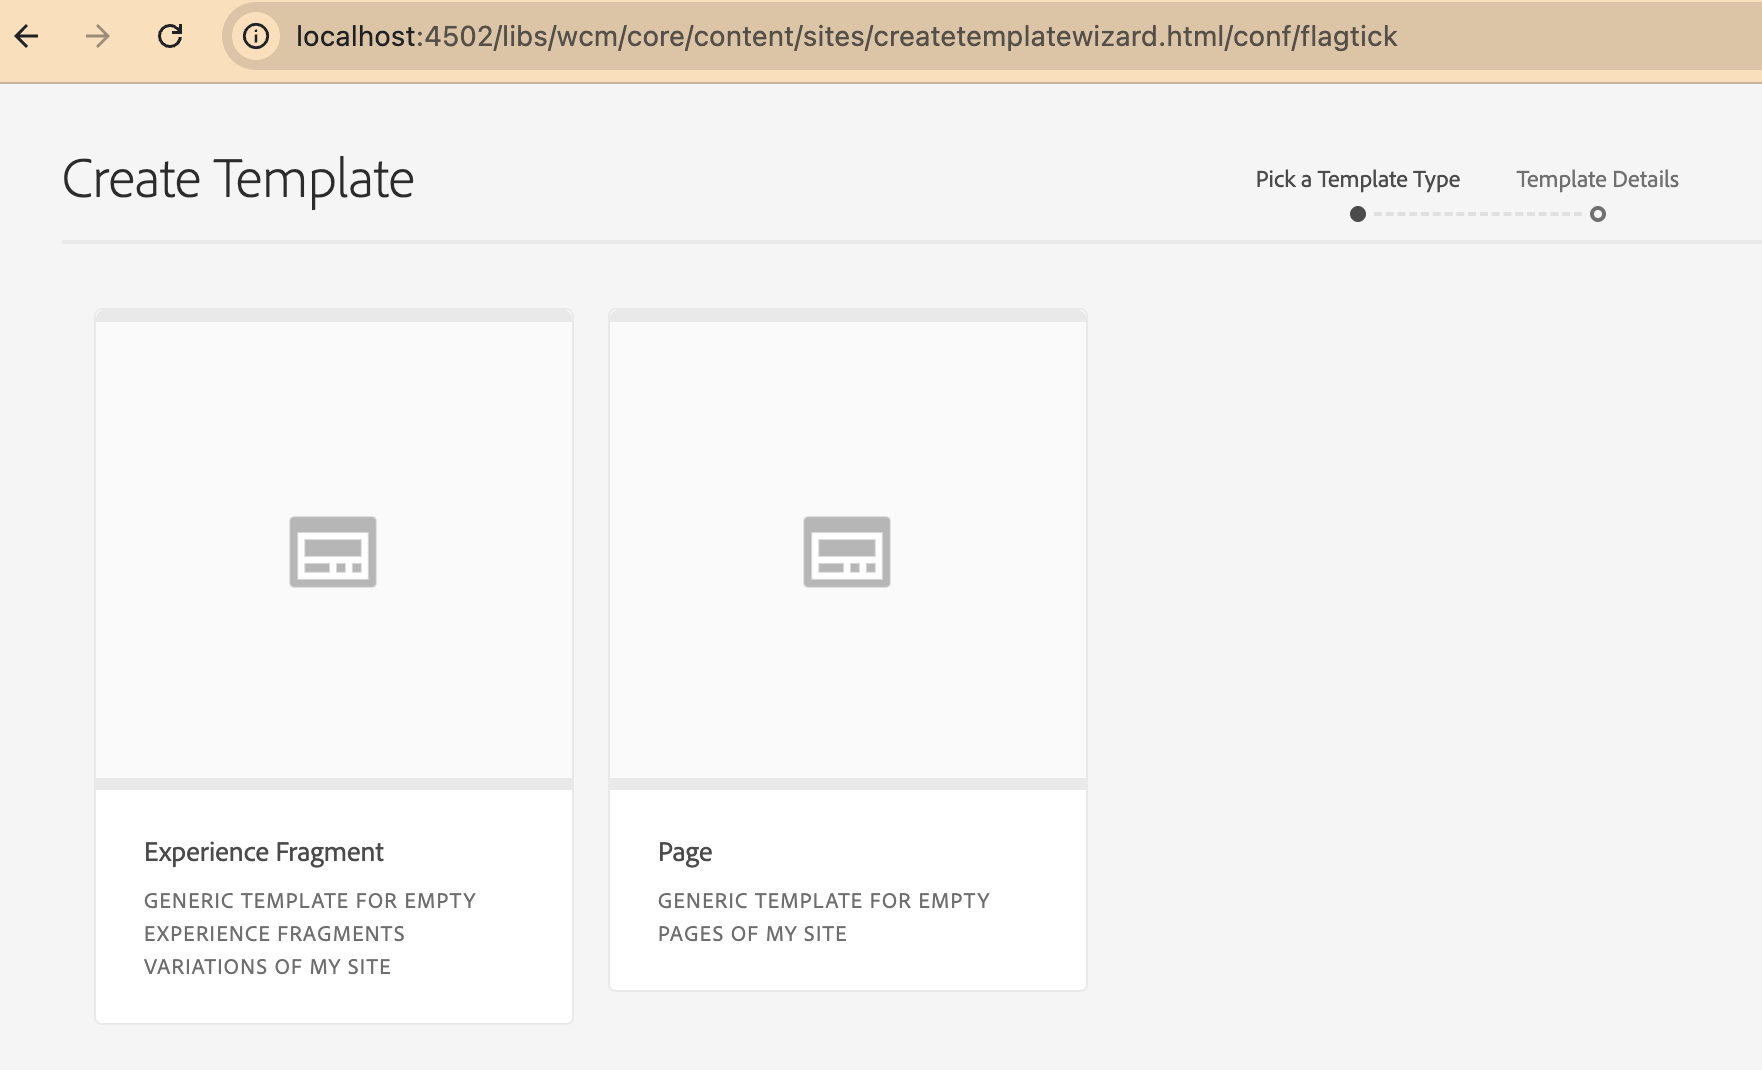
- Go to AEM Start → Tools → General → Templates.
- In the list of configurations, select your project folder (for example, conf/flagtick or conf/flagticktemplate).
- Click Create to open the Template Wizard.
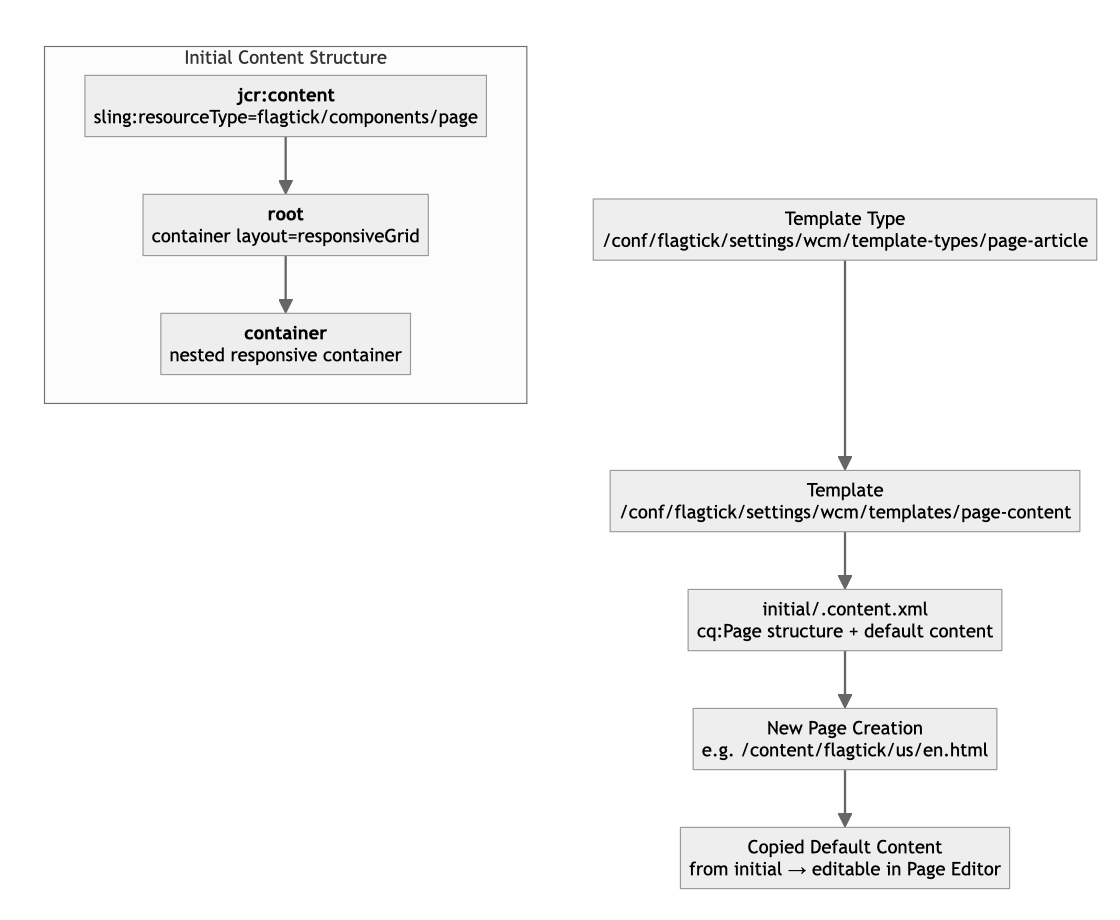
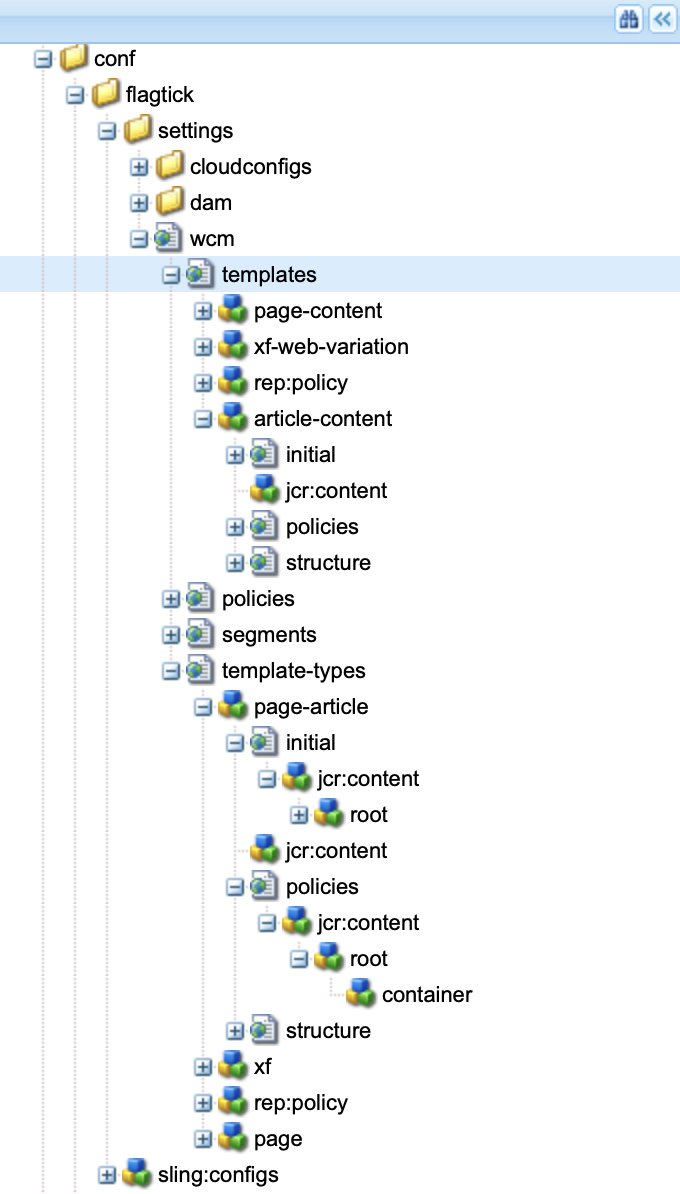
When you create a new template type, AEM stores it under:
/conf/<project>/settings/wcm/template-typesEach type — such as page or xf — contains initial, structure, and policies nodes that define how the template behaves and what authors can edit.
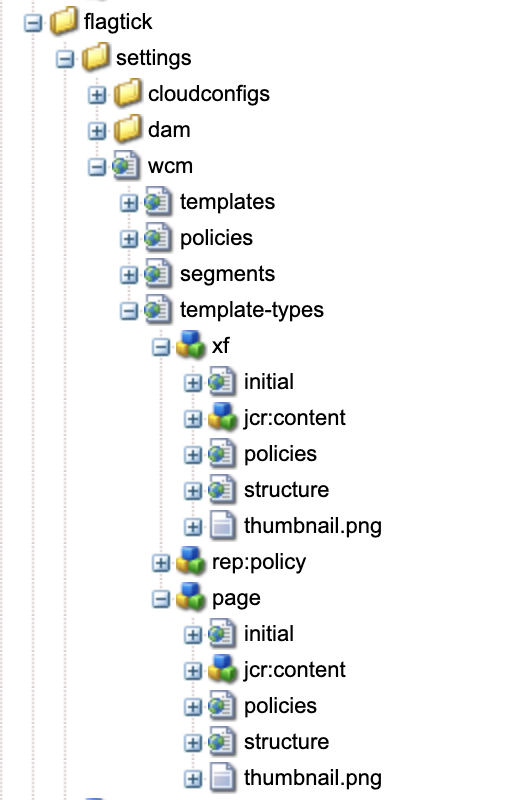
When you create a new template type, AEM generates a folder structure under /conf/<project>/settings/wcm, containing all template and policy configurations:
/conf/flagtick/
 └── settings/
      └── wcm/
           ├── templates/
           ├── template-types/
└── policies/...AEM automatically creates subfolders when options like Editable Templates are enabled — generating /conf/flagtick/draft-template-types for draft templates.
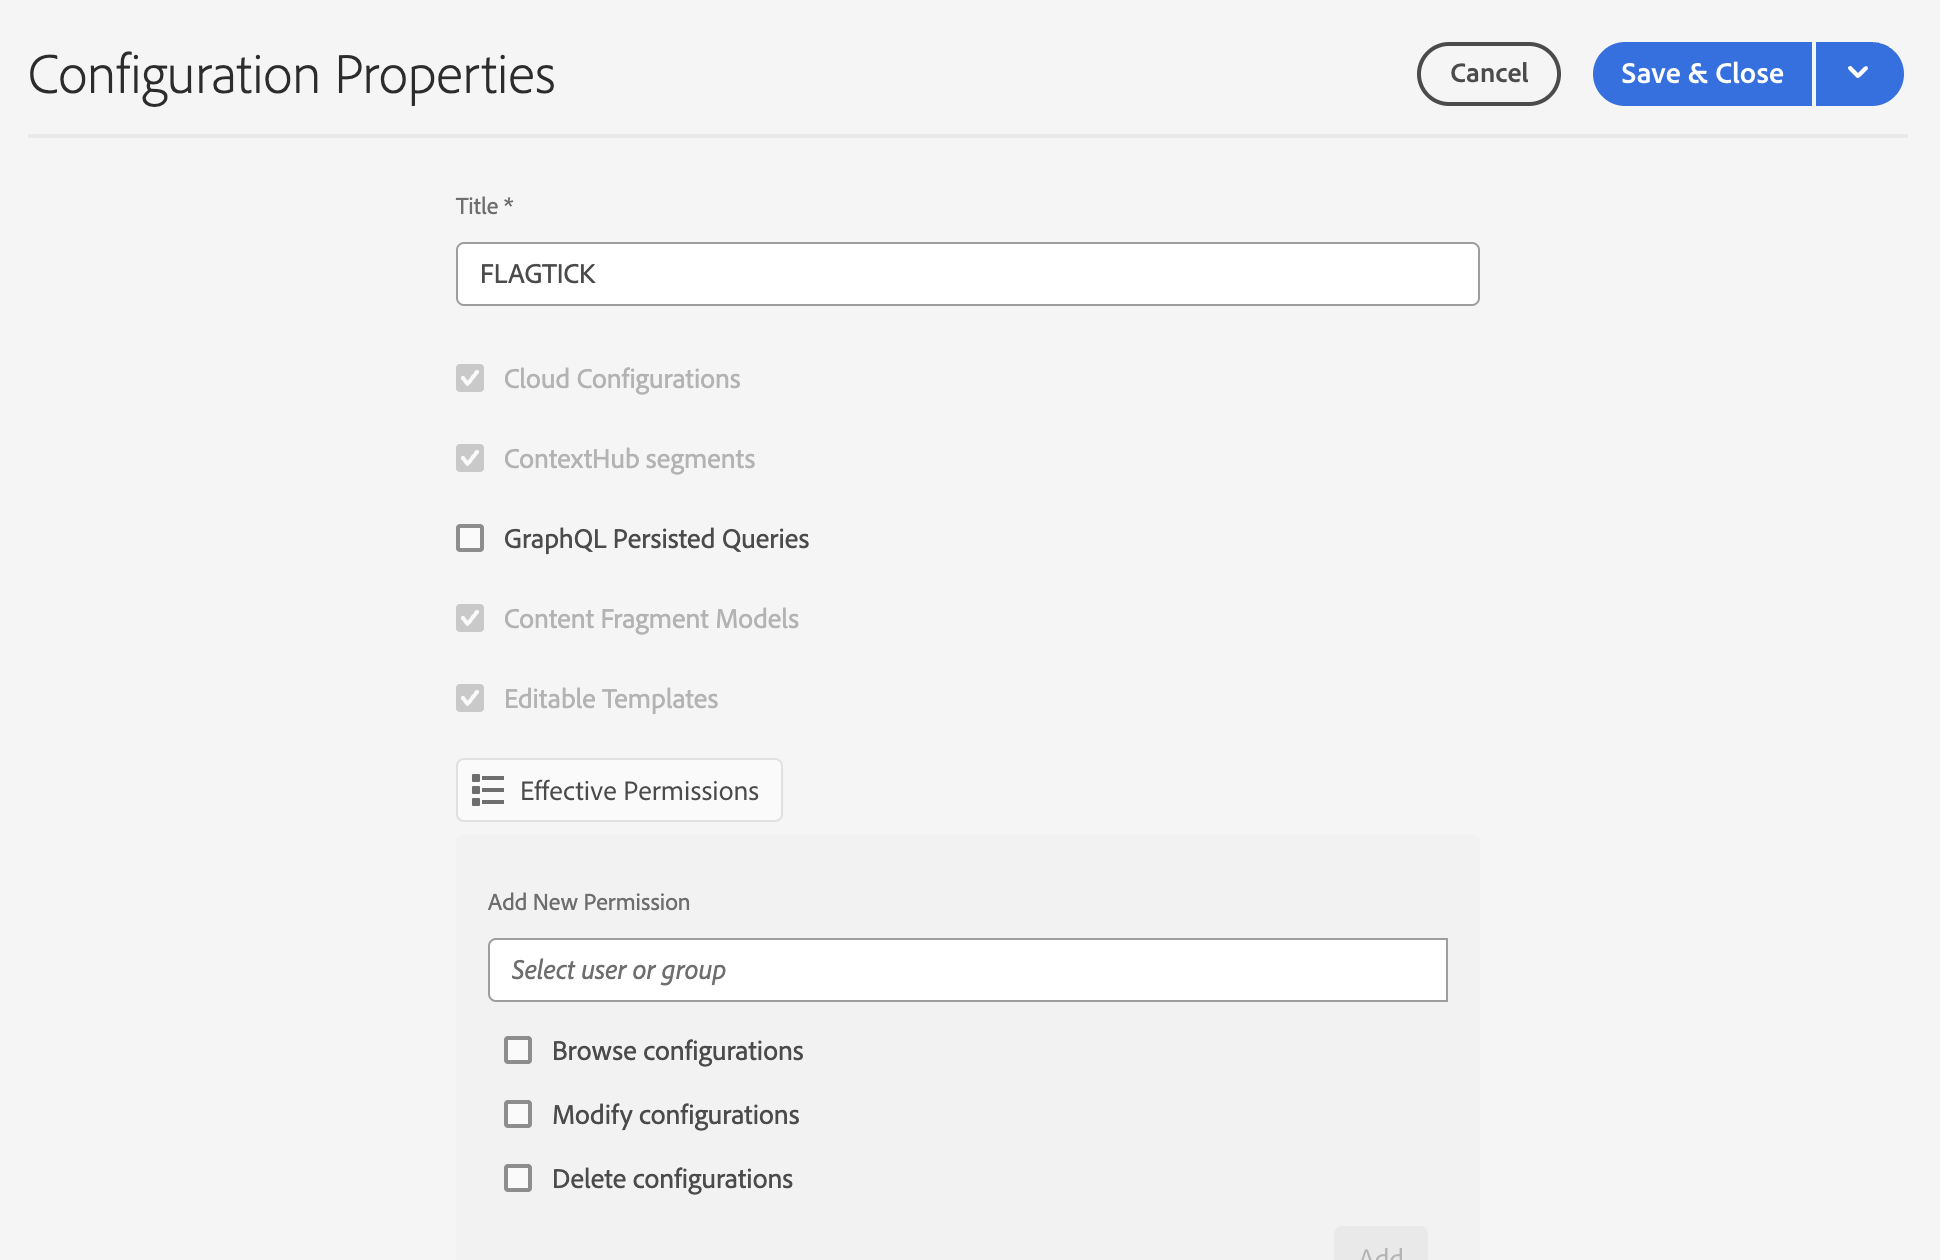
You can also enable other options like Content Fragment Models while creating or editing a configuration.
The screenshot below shows how enabling Editable Templates generates the draft folder structure in /conf/flagtick/.
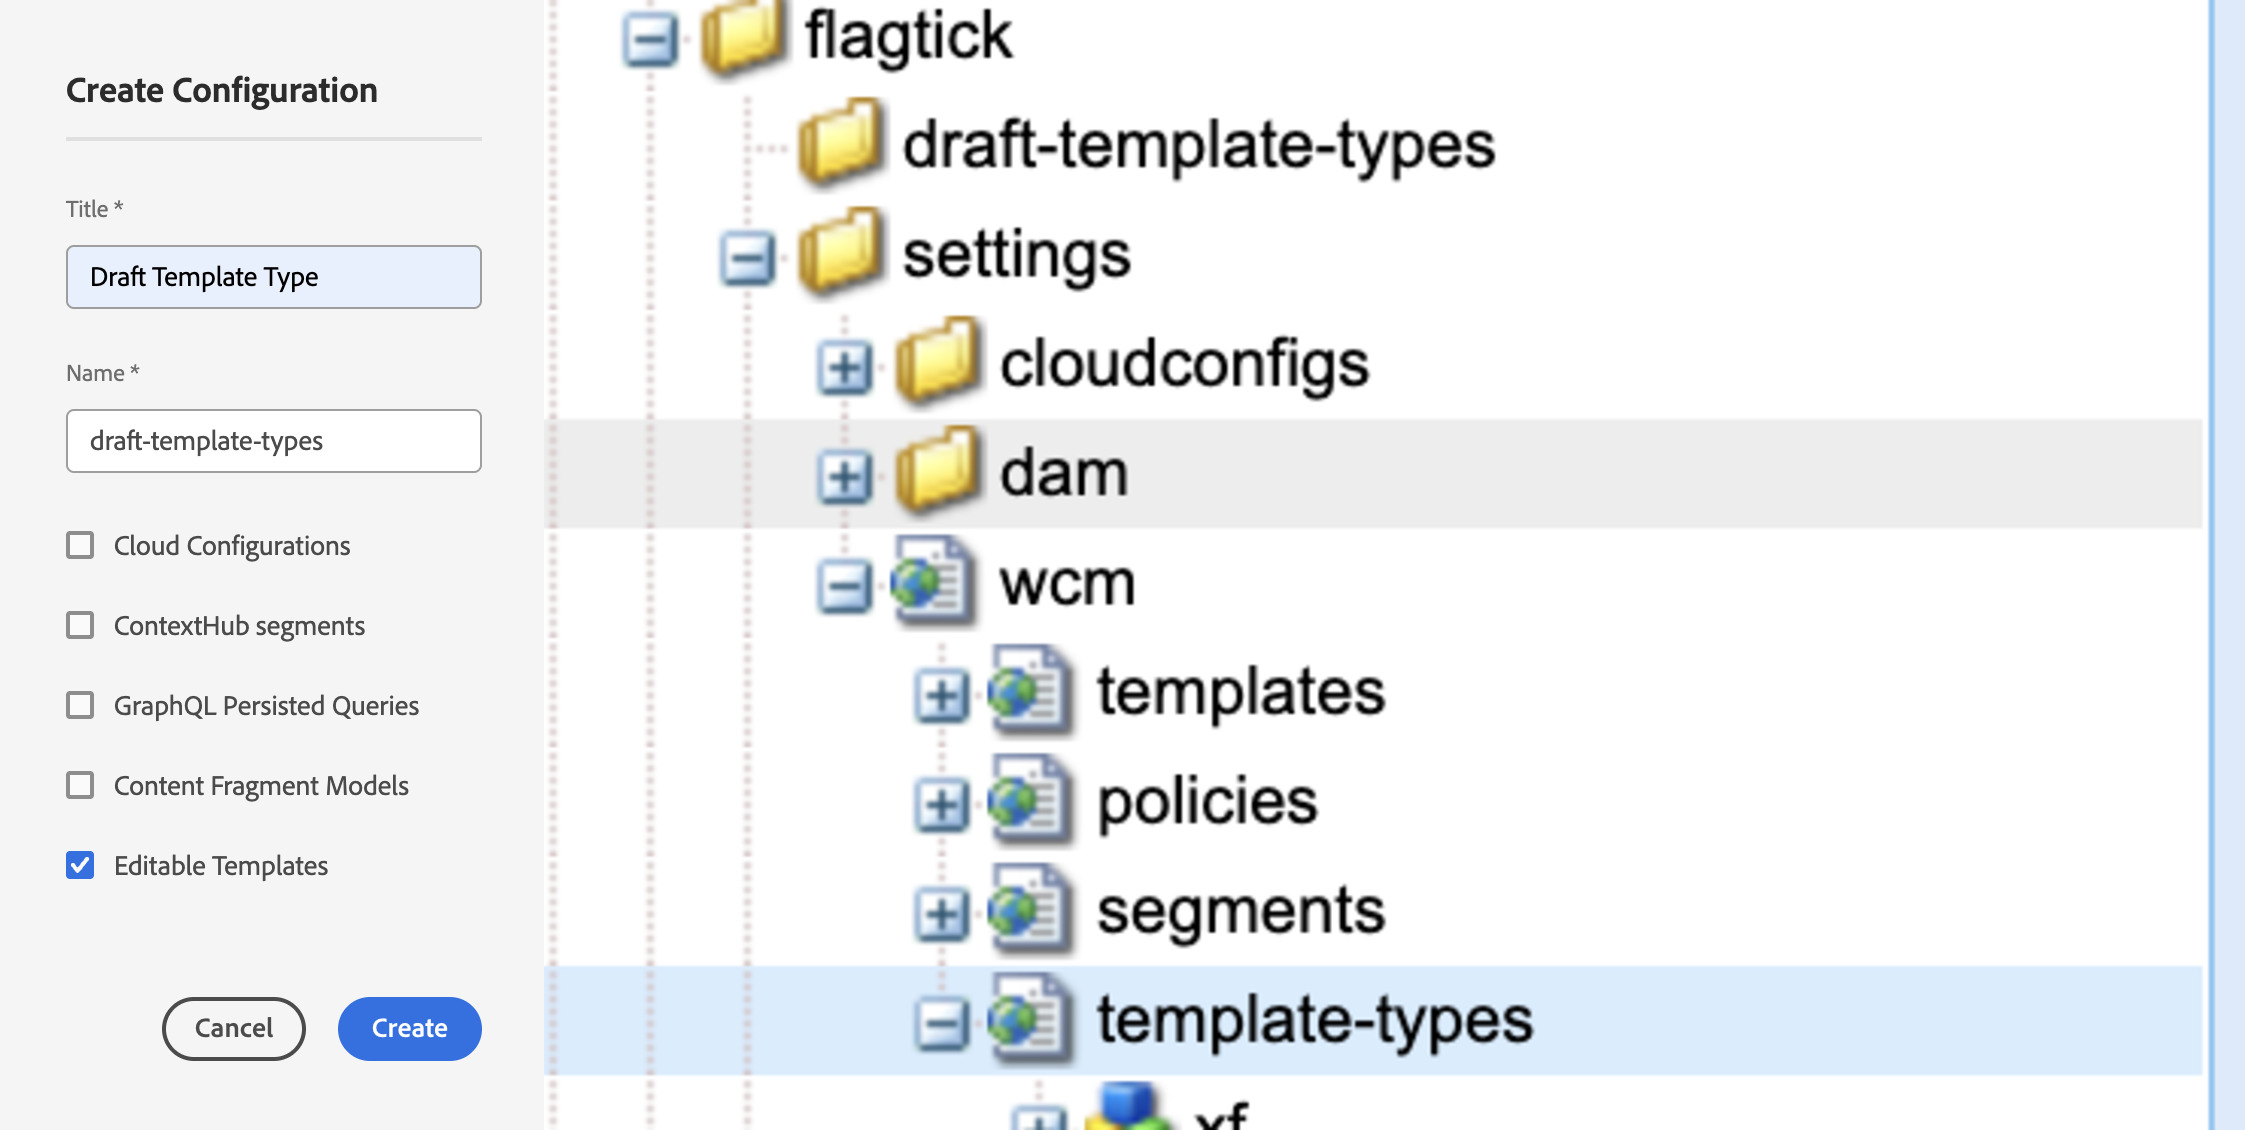
Once you have got the setup done, you can define your template types right in your project’s codebase. You can also add them manually through CRXDE Lite if you’re just testing things out locally.
In your Maven project (for example, ui.content):
/apps/flagtick/
├── conf/
│   └── flagtick/
│       └── settings/
│           └── wcm/
│               └── template-types/
│                   └── page-article/
│                       ├── initial/
│                       ├── structure/
│                       ├── policies/
│                       ├── thumbnail.png
│ └── .content.xmlExample page-article/.content.xml:
<?xml version="1.0" encoding="UTF-8"?>
<jcr:root xmlns:jcr="http://www.jcp.org/jcr/1.0" xmlns:cq="http://www.day.com/jcr/cq/1.0"
          jcr:primaryType="cq:Template">
    <jcr:content
            jcr:description="Generic template type for page article "
            jcr:primaryType="cq:PageContent"
            jcr:title="Page Article Template Type"/>
</jcr:root>Every template type has its own content.xml — that is where the metadata and page structure live. The initial/.content.xml is basically the blueprint AEM clones each time you make a new page.
Expected DOM output based on the initial/.content.xml structure:
<!-- Root layout container -->
<div class="root container responsivegrid">

  <!-- Nested container defined in initial/.content.xml -->
  <div id="generated-id" class="cmp-container">

    <!-- Author-editable grid area -->
    <div class="aem-Grid aem-Grid--12 aem-Grid--default--12">

    </div>
  </div>
</div>Whenever you create a page using a template, AEM:
- Copies the locked layout from
/structure/.content.xml(template definition). - Merges any content from
/initial/.content.xml(default editable content). - Creates a new node under
/content/.../pagename/jcr:contentwith both combined.
The big takeaway here: AEM builds pages from templates, not from where they sit in the site structure.
Whether it’s a parent or child page, AEM applies the same initial content rules every time.
/template-types/page-article/initial
  └─ jcr:content
      ├─ cq:template = /conf/flagtick/settings/wcm/templates/page-content
      ├─ sling:resourceType = flagtick/components/page
      └─ root
└─ containerIn that same template folder, the structure/.content.xml file controls how the layout gets locked and reused. See how the container has editable=”true”? That is what makes it possible for authors to add components inside the locked structure.
<jcr:content
    cq:deviceGroups="[mobile/groups/responsive]"
    cq:template="/conf/flagtick/settings/wcm/templates/page-content"
    jcr:primaryType="cq:PageContent"
    sling:resourceType="flagtick/components/page">
    <root
        jcr:primaryType="nt:unstructured"
        sling:resourceType="flagtick/components/container"
        layout="responsiveGrid">
        <experiencefragment-header
            jcr:primaryType="nt:unstructured"
            sling:resourceType="flagtick/components/experiencefragment"
            fragmentVariationPath="/content/experience-fragments/flagtick/language-masters/en/site/header/master"/>
        <container
            jcr:primaryType="nt:unstructured"
            sling:resourceType="flagtick/components/container"
            editable="{Boolean}true"
            layout="responsiveGrid"/>
    </root>
    <cq:responsive jcr:primaryType="nt:unstructured">
        <breakpoints jcr:primaryType="nt:unstructured">
            <phone
                jcr:primaryType="nt:unstructured"
                title="Smaller Screen"
                width="{Long}768"/>
            <tablet
                jcr:primaryType="nt:unstructured"
                title="Tablet"
                width="{Long}1200"/>
        </breakpoints>
    </cq:responsive>
</jcr:content>Here, the root and experiencefragment-header come from the structure and stay locked. The container is part of that structure too, so AEM keeps it and just merges any extra nodes from the initial file.
Since the initial container’s empty, the final page only has the header and an editable container ready for authors to use.
/template-types/page-article/structure
└── jcr:content
    ├── cq:template = /conf/flagtick/settings/wcm/templates/page-content
    ├── sling:resourceType = flagtick/components/page
    ├── cq:deviceGroups = [mobile/groups/responsive]
    ├── cq:responsive
    │    └── breakpoints (phone, tablet)
    └── root (from structure)
         ├── experiencefragment-header (locked)
         └── container (editable)
└── [initial content merged here if not duplicate]In this setup, /structure handles the locked layout (like root and experiencefragment-header), while editable content lives in the container node.
AEM stores design rules and component settings in the policies/.content.xml file, which maps components to their allowed configurations:
<?xml version="1.0" encoding="UTF-8"?>
<jcr:root xmlns:sling="http://sling.apache.org/jcr/sling/1.0"
          xmlns:cq="http://www.day.com/jcr/cq/1.0"
          xmlns:jcr="http://www.jcp.org/jcr/1.0"
          xmlns:nt="http://www.jcp.org/jcr/nt/1.0"
          jcr:primaryType="cq:Page">

    <jcr:content
            cq:policy="flagtick/components/page/policy"
            jcr:primaryType="nt:unstructured"
            sling:resourceType="wcm/core/components/policies/mappings">

        <root
                cq:policy="flagtick/components/container/policy_20251016_container"
                jcr:primaryType="nt:unstructured"
                sling:resourceType="wcm/core/components/policies/mapping">

            <container
                    cq:policy="flagtick/components/container/policy_20251016_container"
                    jcr:primaryType="nt:unstructured"
                    sling:resourceType="wcm/core/components/policies/mapping"/>

        </root>
    </jcr:content>
</jcr:root>Here’s the same policy mapping file, this time annotated to show how the root layout and header nodes connect to their container policies:
<?xml version="1.0" encoding="UTF-8"?>
<jcr:root
    xmlns:sling="http://sling.apache.org/jcr/sling/1.0"
    xmlns:cq="http://www.day.com/jcr/cq/1.0"
    xmlns:jcr="http://www.jcp.org/jcr/1.0"
    xmlns:nt="http://www.jcp.org/jcr/nt/1.0"
    jcr:primaryType="cq:Page">

    <jcr:content
        cq:policy="flagtick/components/page/policy"
        jcr:primaryType="nt:unstructured"
        sling:resourceType="wcm/core/components/policies/mappings">

        <!-- Root layout -->
        <root
            cq:policy="flagtick/components/container/policy_20251016_container"
            jcr:primaryType="nt:unstructured"
            sling:resourceType="wcm/core/components/policies/mapping">

            <!-- Experience Fragment Header -->
            <experiencefragment-header
                cq:policy="flagtick/components/experiencefragment/policy_20251016_header"
                jcr:primaryType="nt:unstructured"
                sling:resourceType="wcm/core/components/policies/mapping"/>

            <!-- Main Editable Container -->
            <container
                cq:policy="flagtick/components/container/policy_20251016_container"
                jcr:primaryType="nt:unstructured"
                sling:resourceType="wcm/core/components/policies/mapping"/>

            <!-- Optional Footer XF -->
            <experiencefragment-footer
                cq:policy="flagtick/components/experiencefragment/policy_20251016_footer"
                jcr:primaryType="nt:unstructured"
                sling:resourceType="wcm/core/components/policies/mapping"/>
        </root>
    </jcr:content>
</jcr:root>In CRXDE Lite, go to /conf/flagtick/settings/wcm/policies/flagtick/components/page and create a new node named policy_article.
This will be your custom page policy instead of the default one.
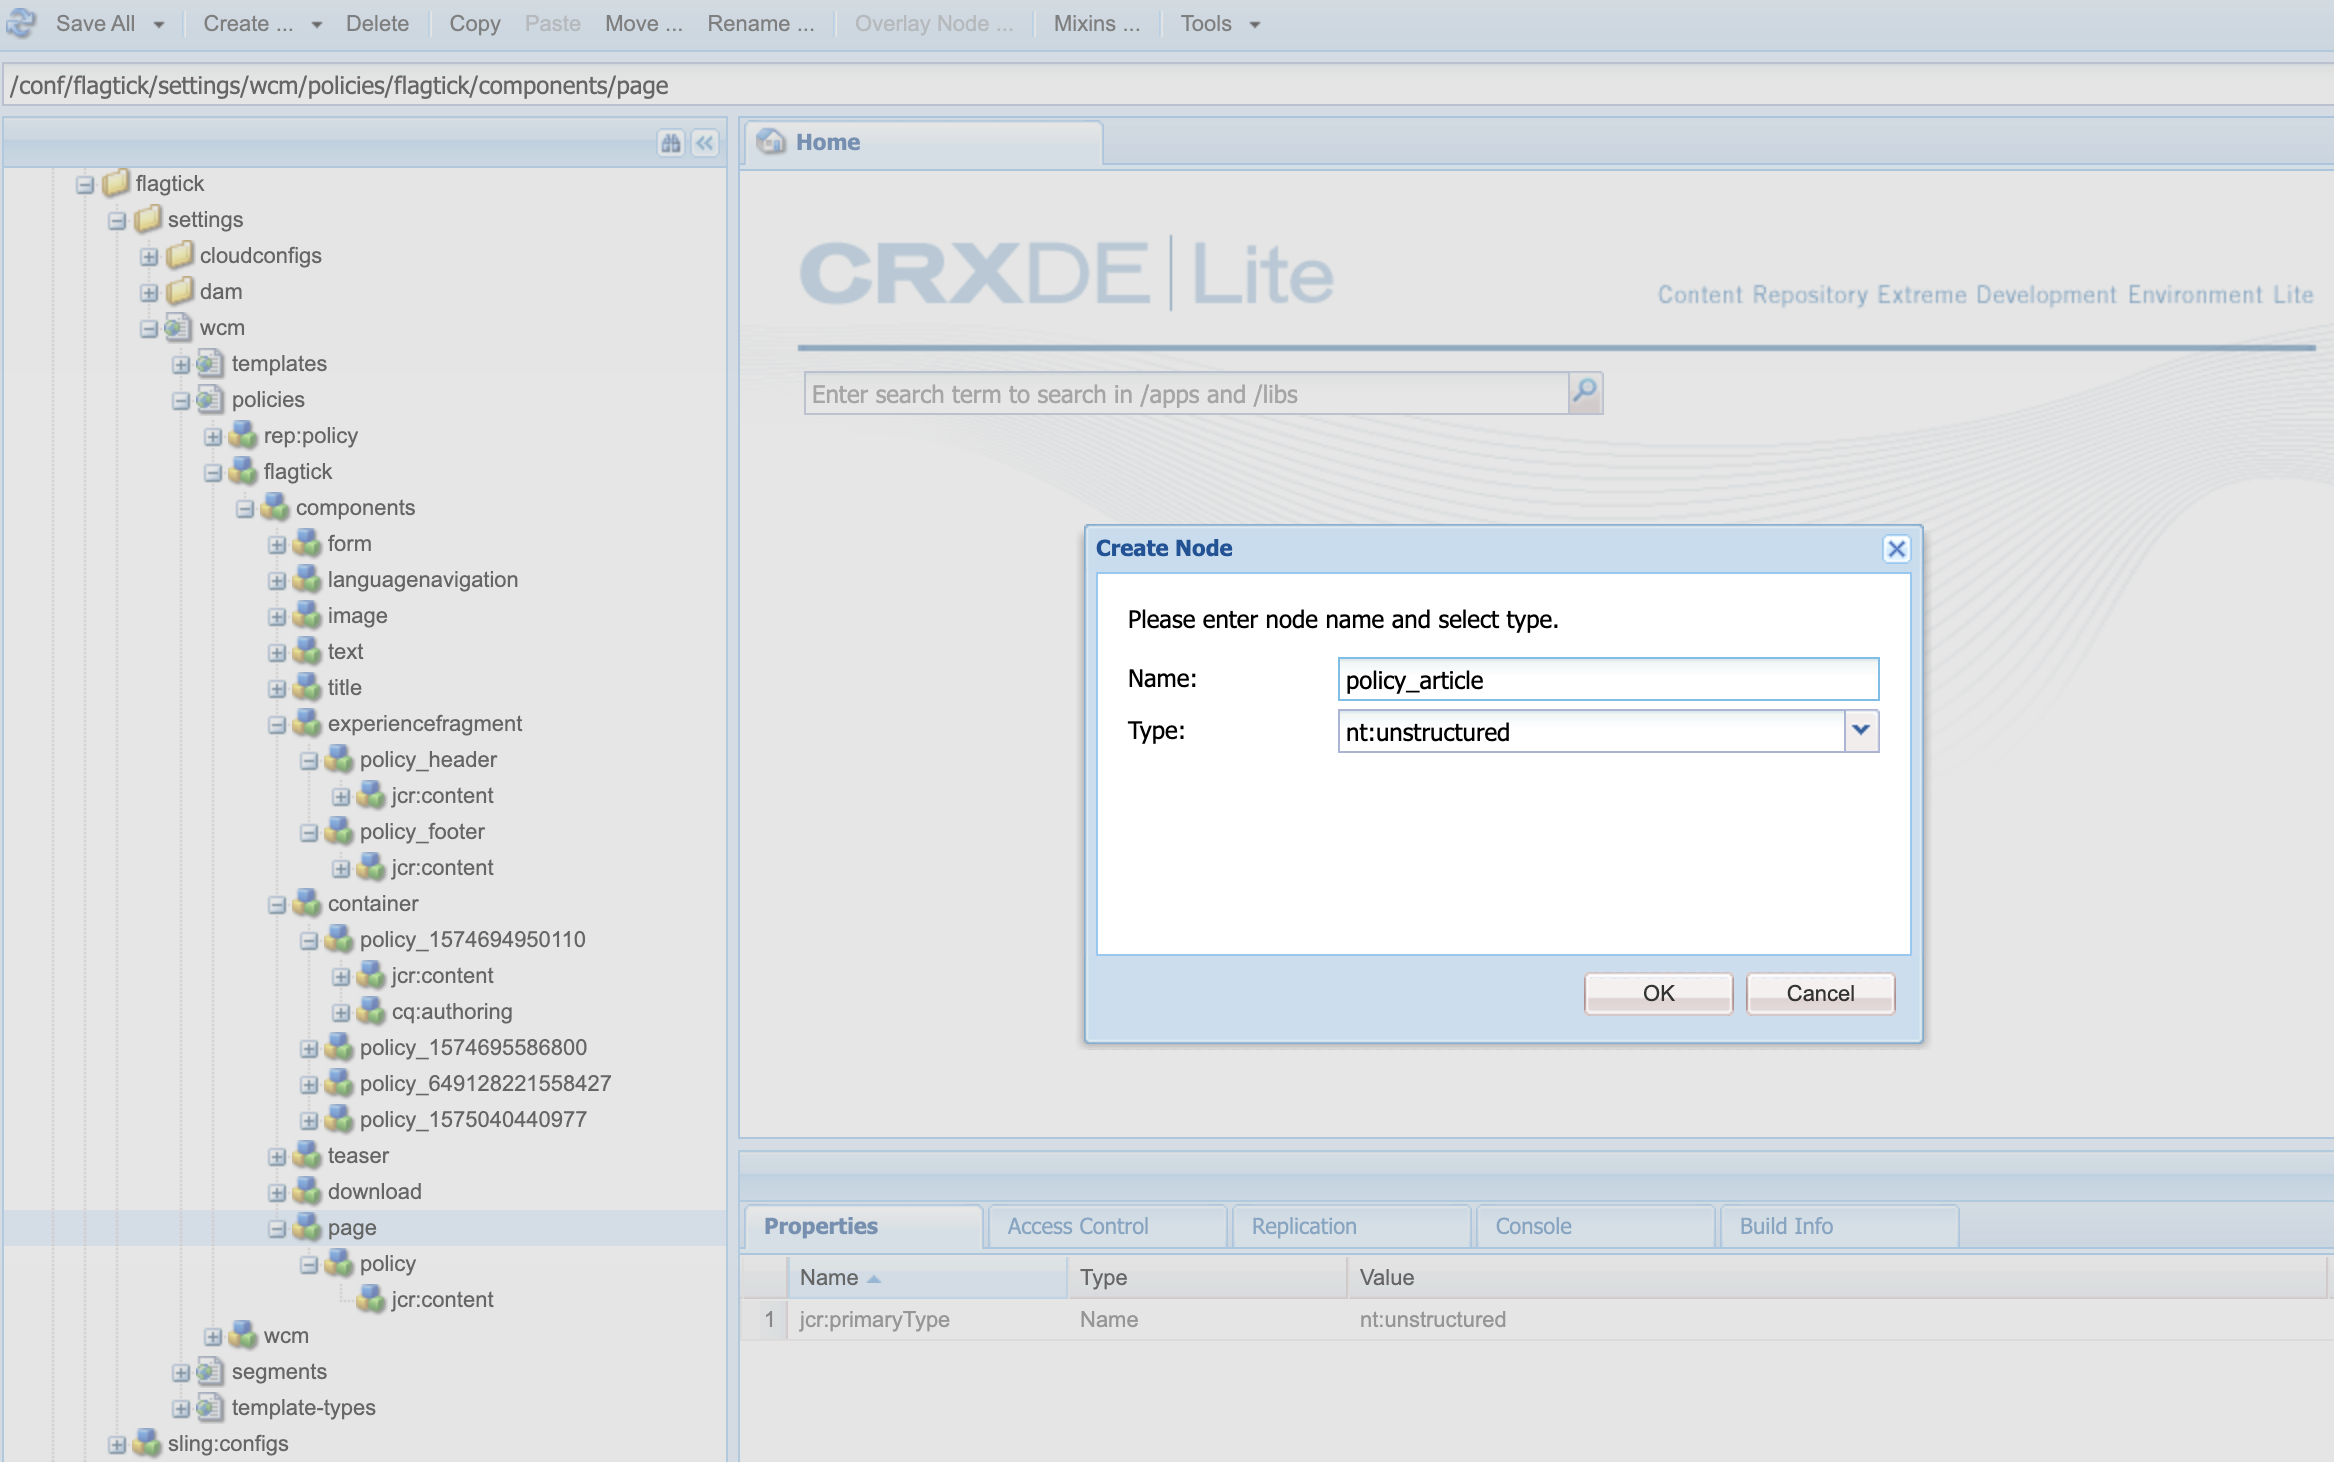
Now that we have created the policy_article node, let us see how AEM recognizes it and how policies link to editable areas inside your template.
Define Editable Areas and Link Policies in AEM
In the last step, we defined the policy_article policy in code — now let us check how it looks in AEM.
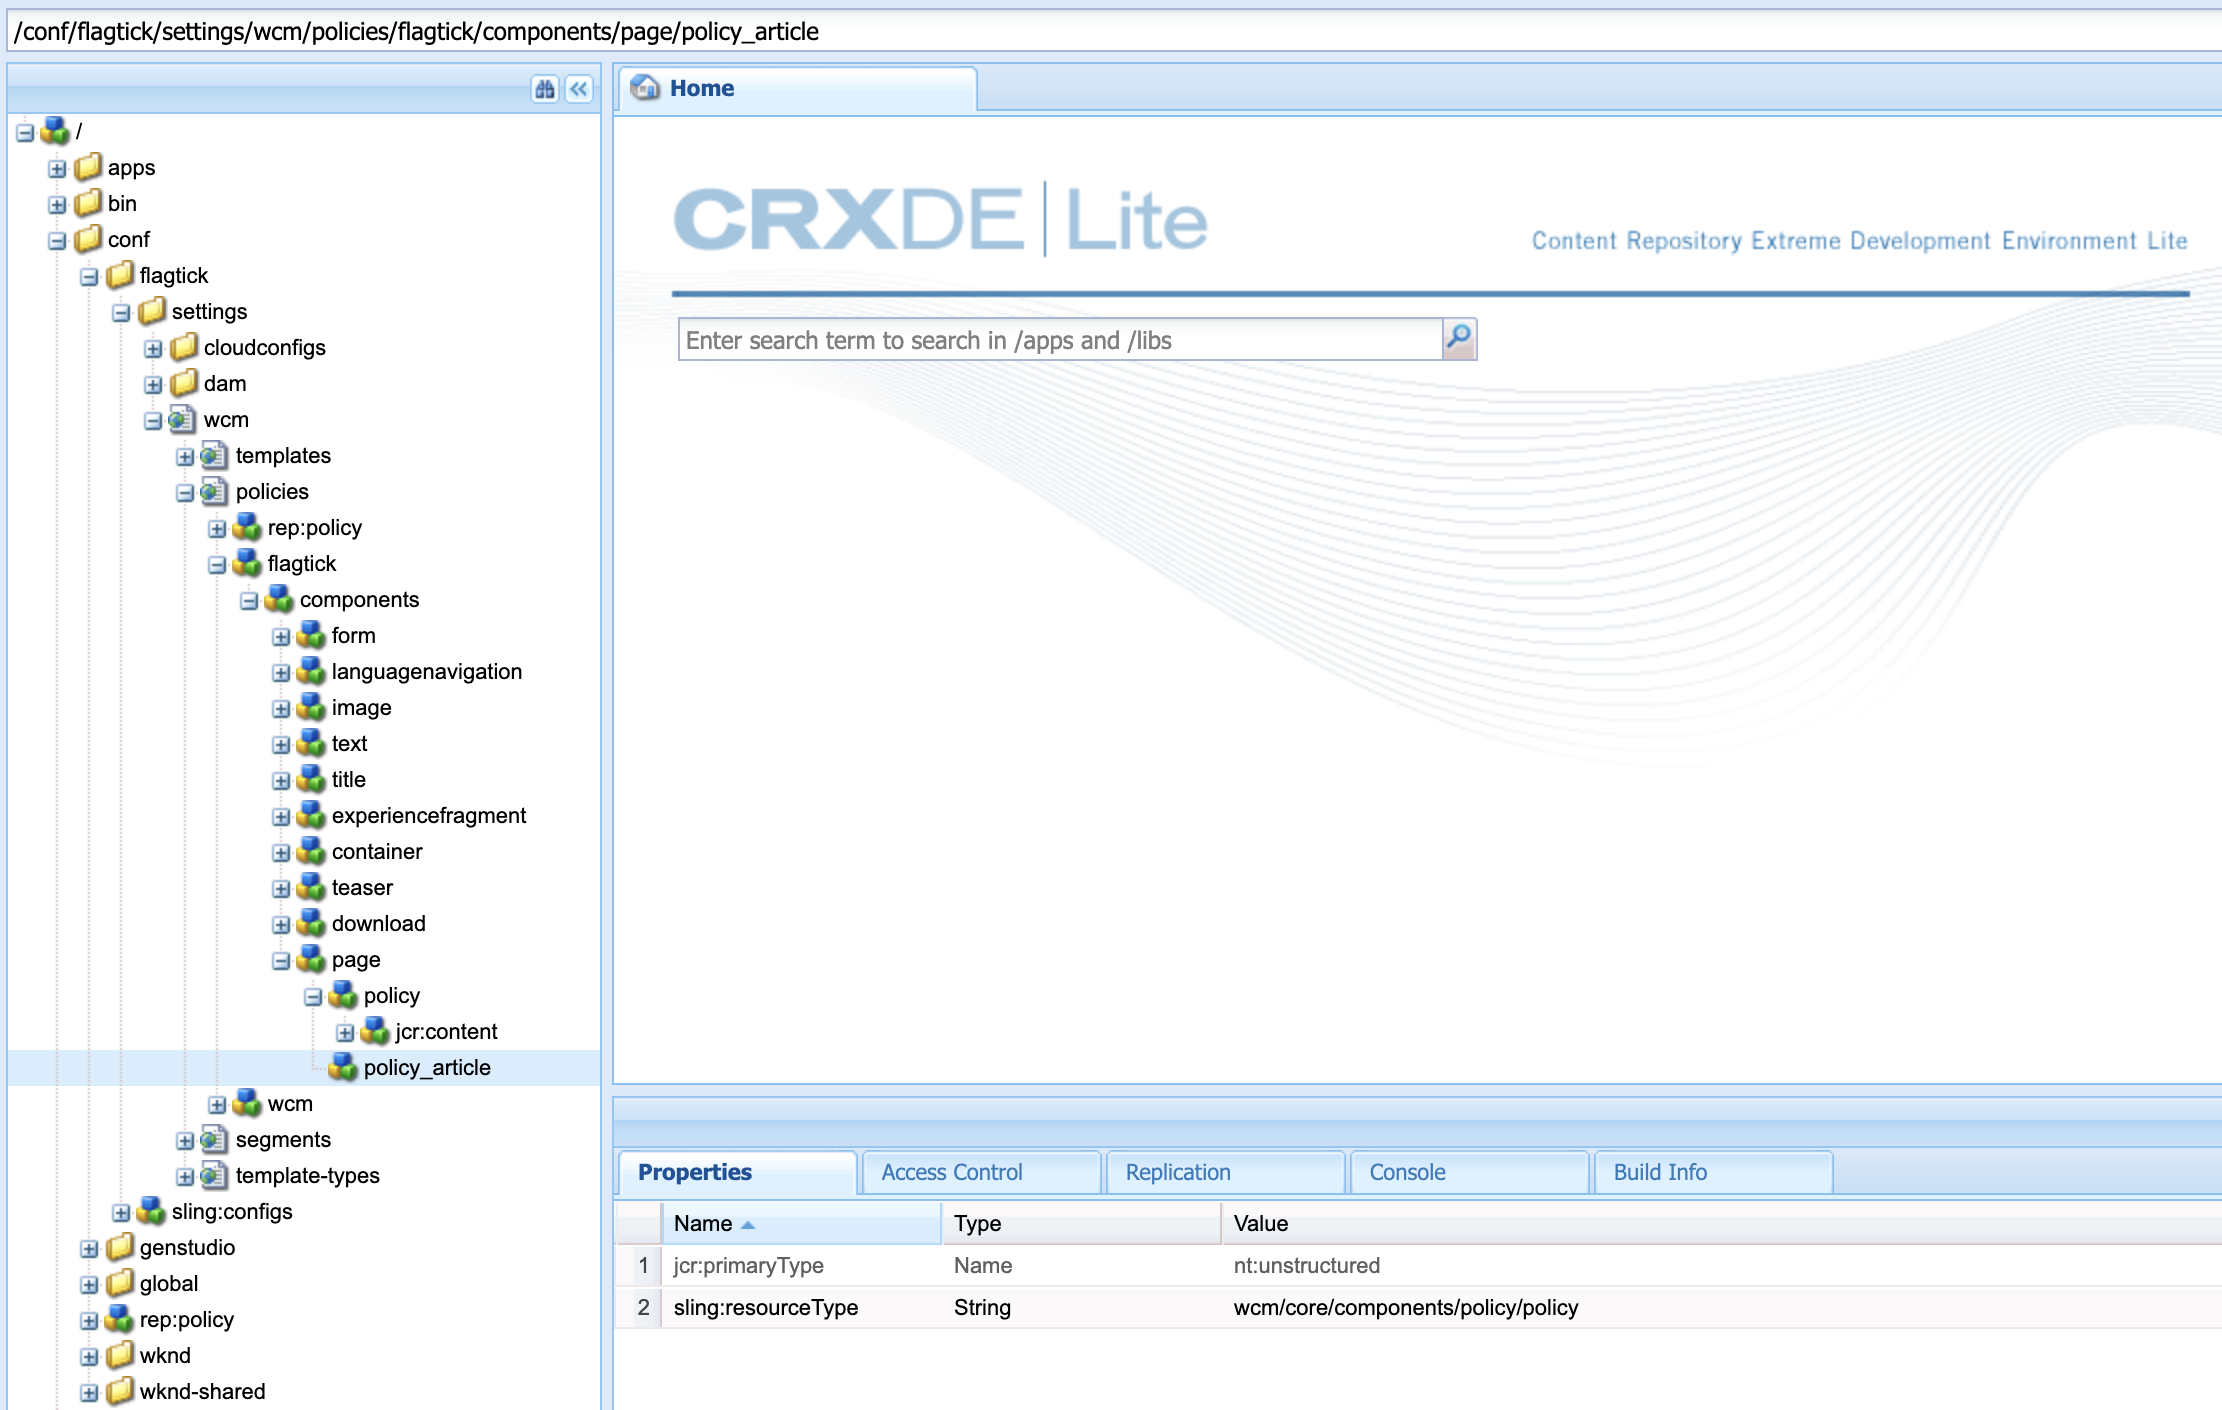
After deploying your ui.content package, open CRXDE Lite and go to /conf/flagtick/settings/wcm/policies/flagtick/components/page.
You will see the policy_article node there, but without a jcr:content subnode yet — and that is normal.
In practice, you don’t need a separate policy_article under the page component — AEM already manages policies through the template’s own /template-types/page-article/policies/.content.xml file.
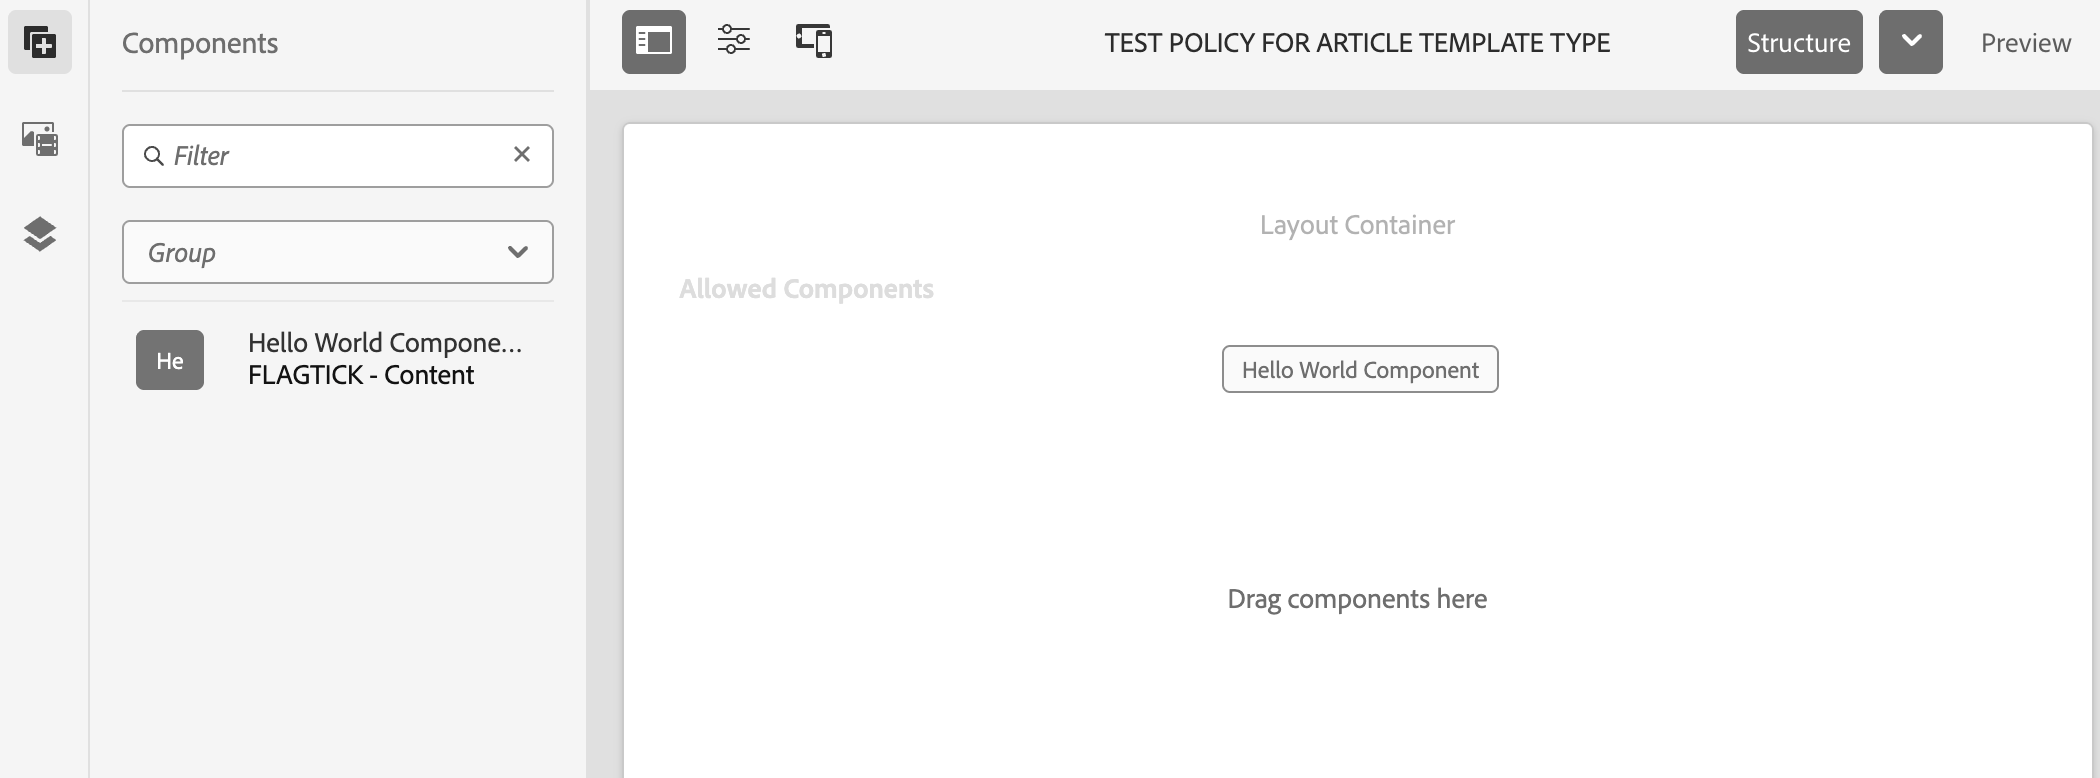
Now, let us test this setup by creating a template based on Page Article Template Type.
Open it in the Template Editor to check or adjust the policy mappings — they should look like this:
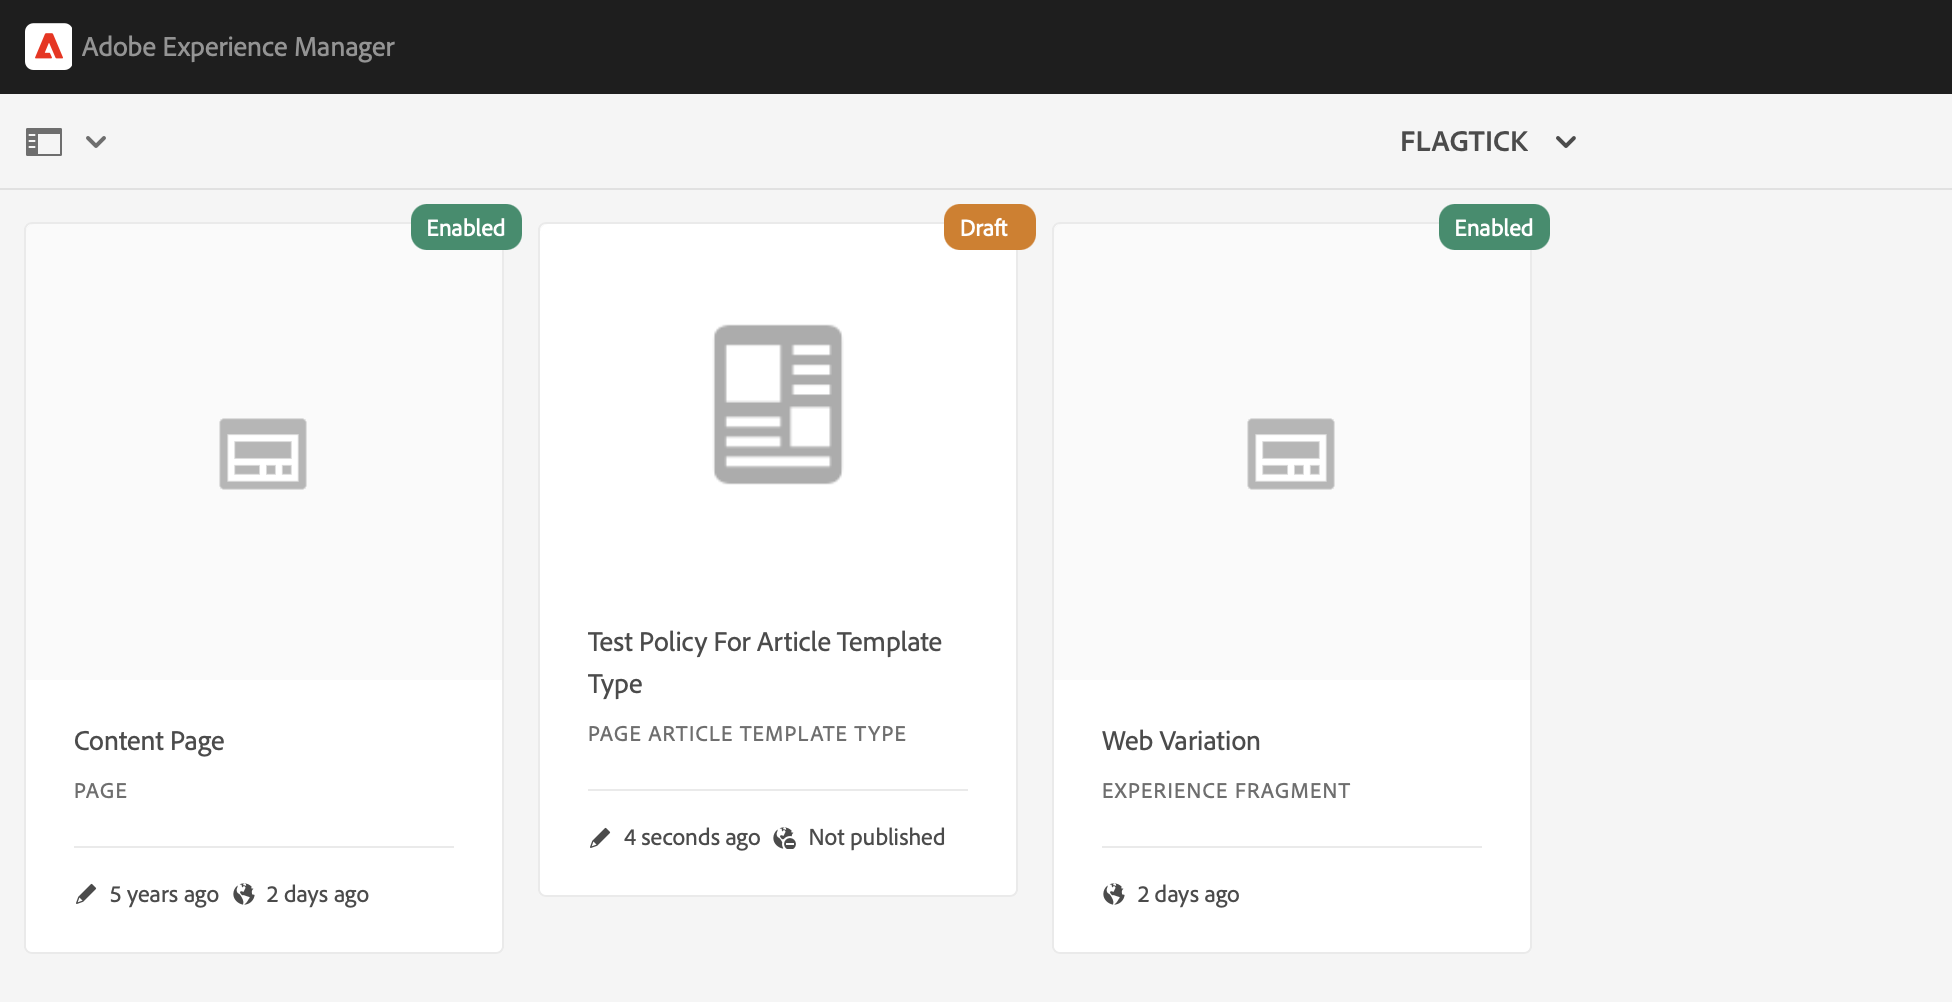
In the Template Editor, open your template (for example, Test Policy for Article Template Type) and check the Container policy.
It should use policy_article — if not, update it, save, and reload.
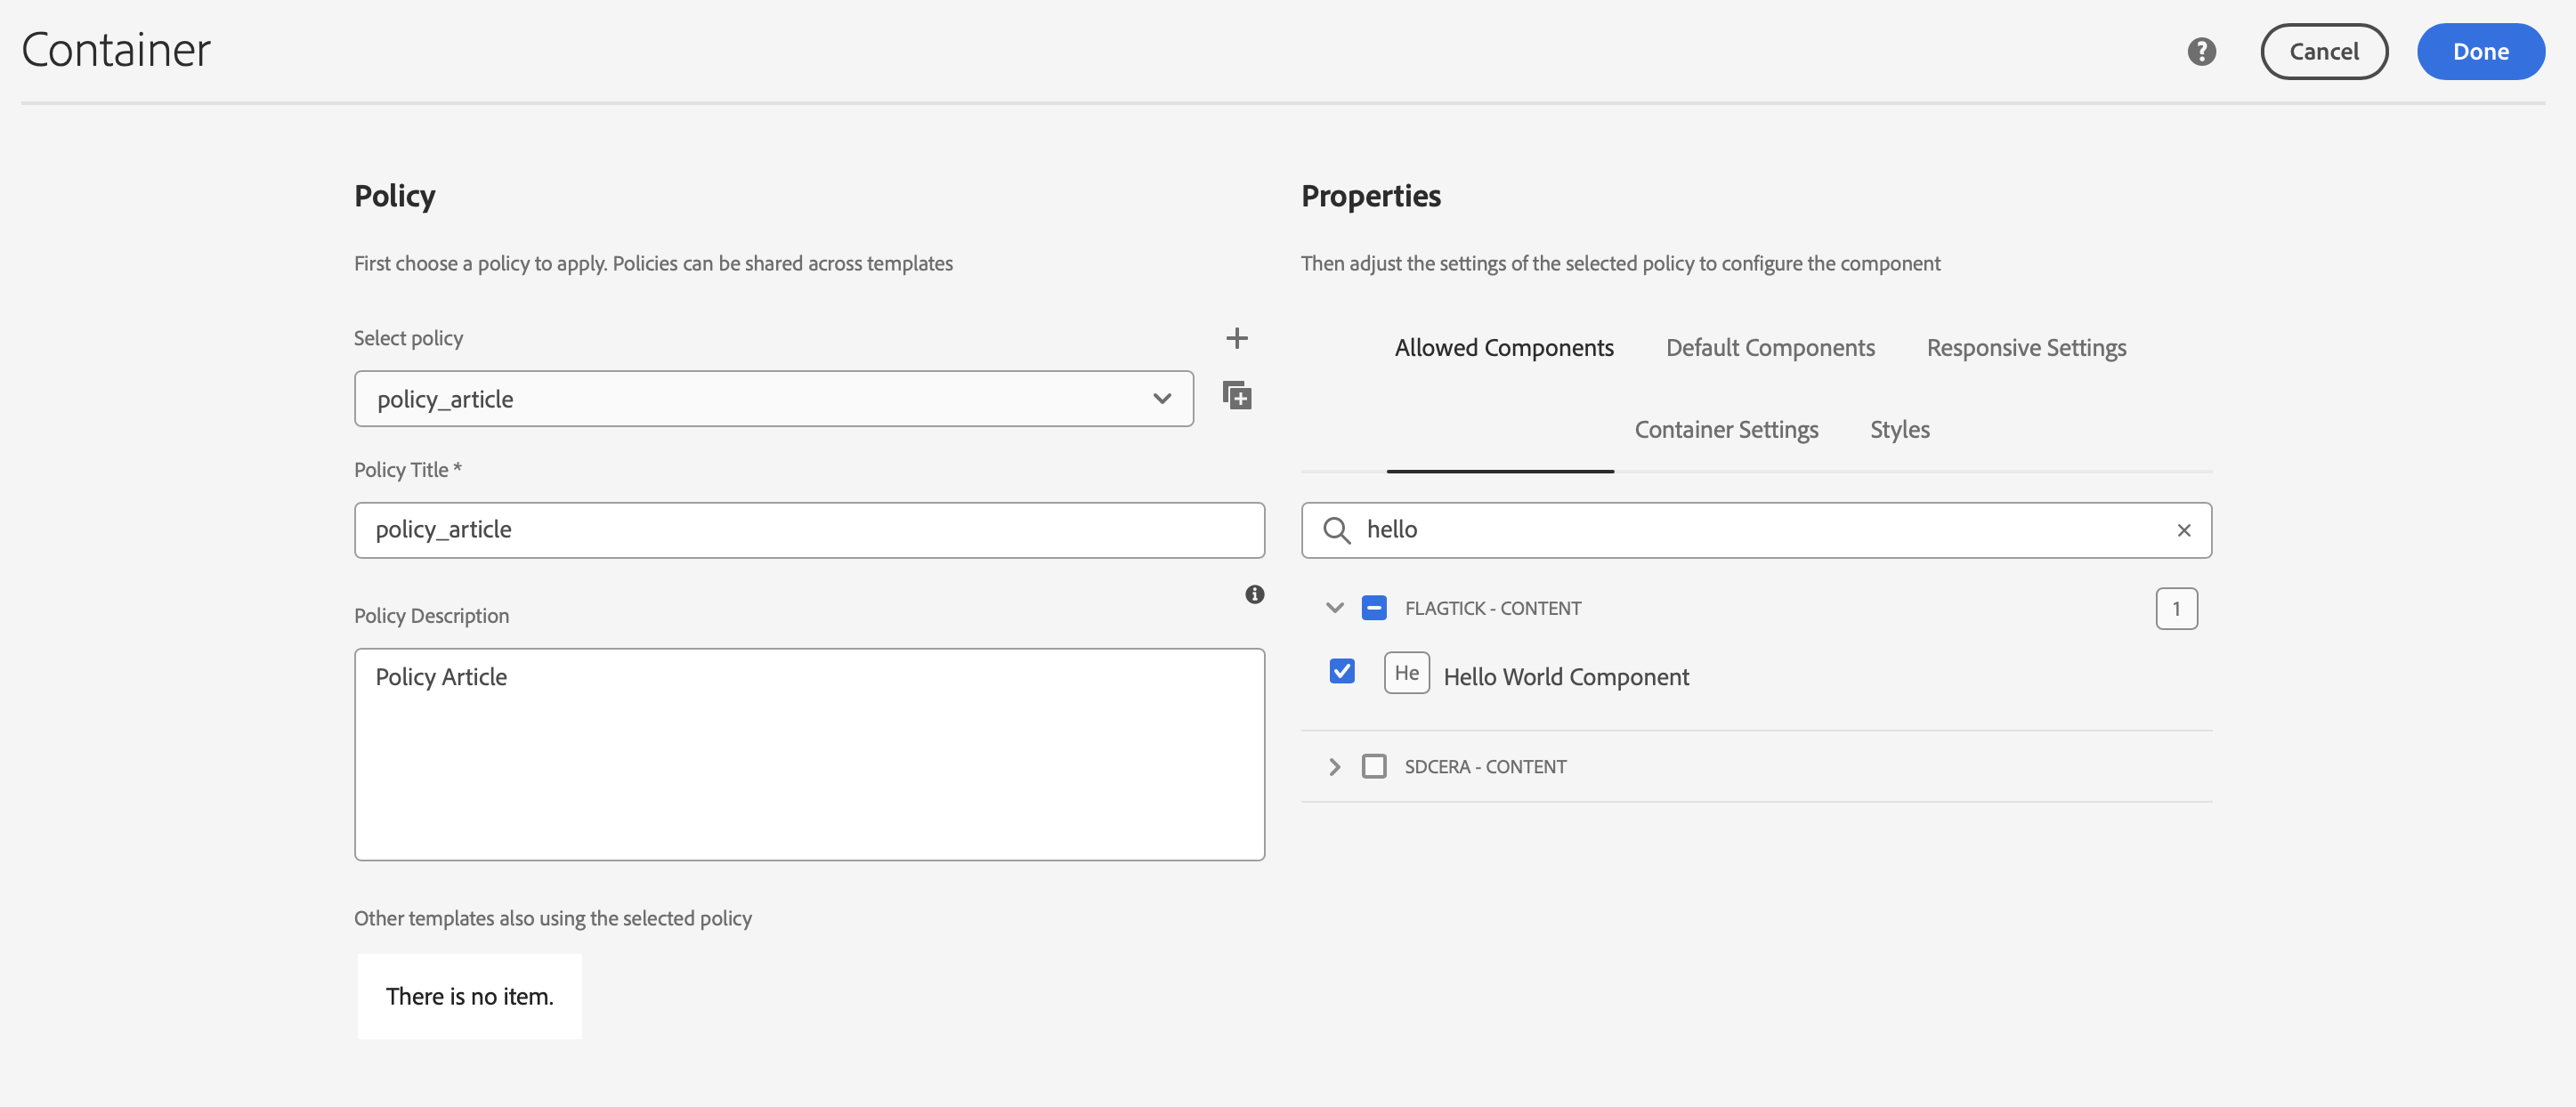
In Policy Editor → Allowed Components, make sure your project’s components (like Text or Hello World) are listed.
Drag one into the layout to test — container policies only work when allowed components are defined.
Copy the policy definition from:/conf/flagtick/settings/wcm/templates/test-policy-for-article-template-type/policies/jcr:content
to:
/conf/flagtick/settings/wcm/template-types/page-article/policies/jcr:content
so the Page Article Template Type inherits those settings automatically.
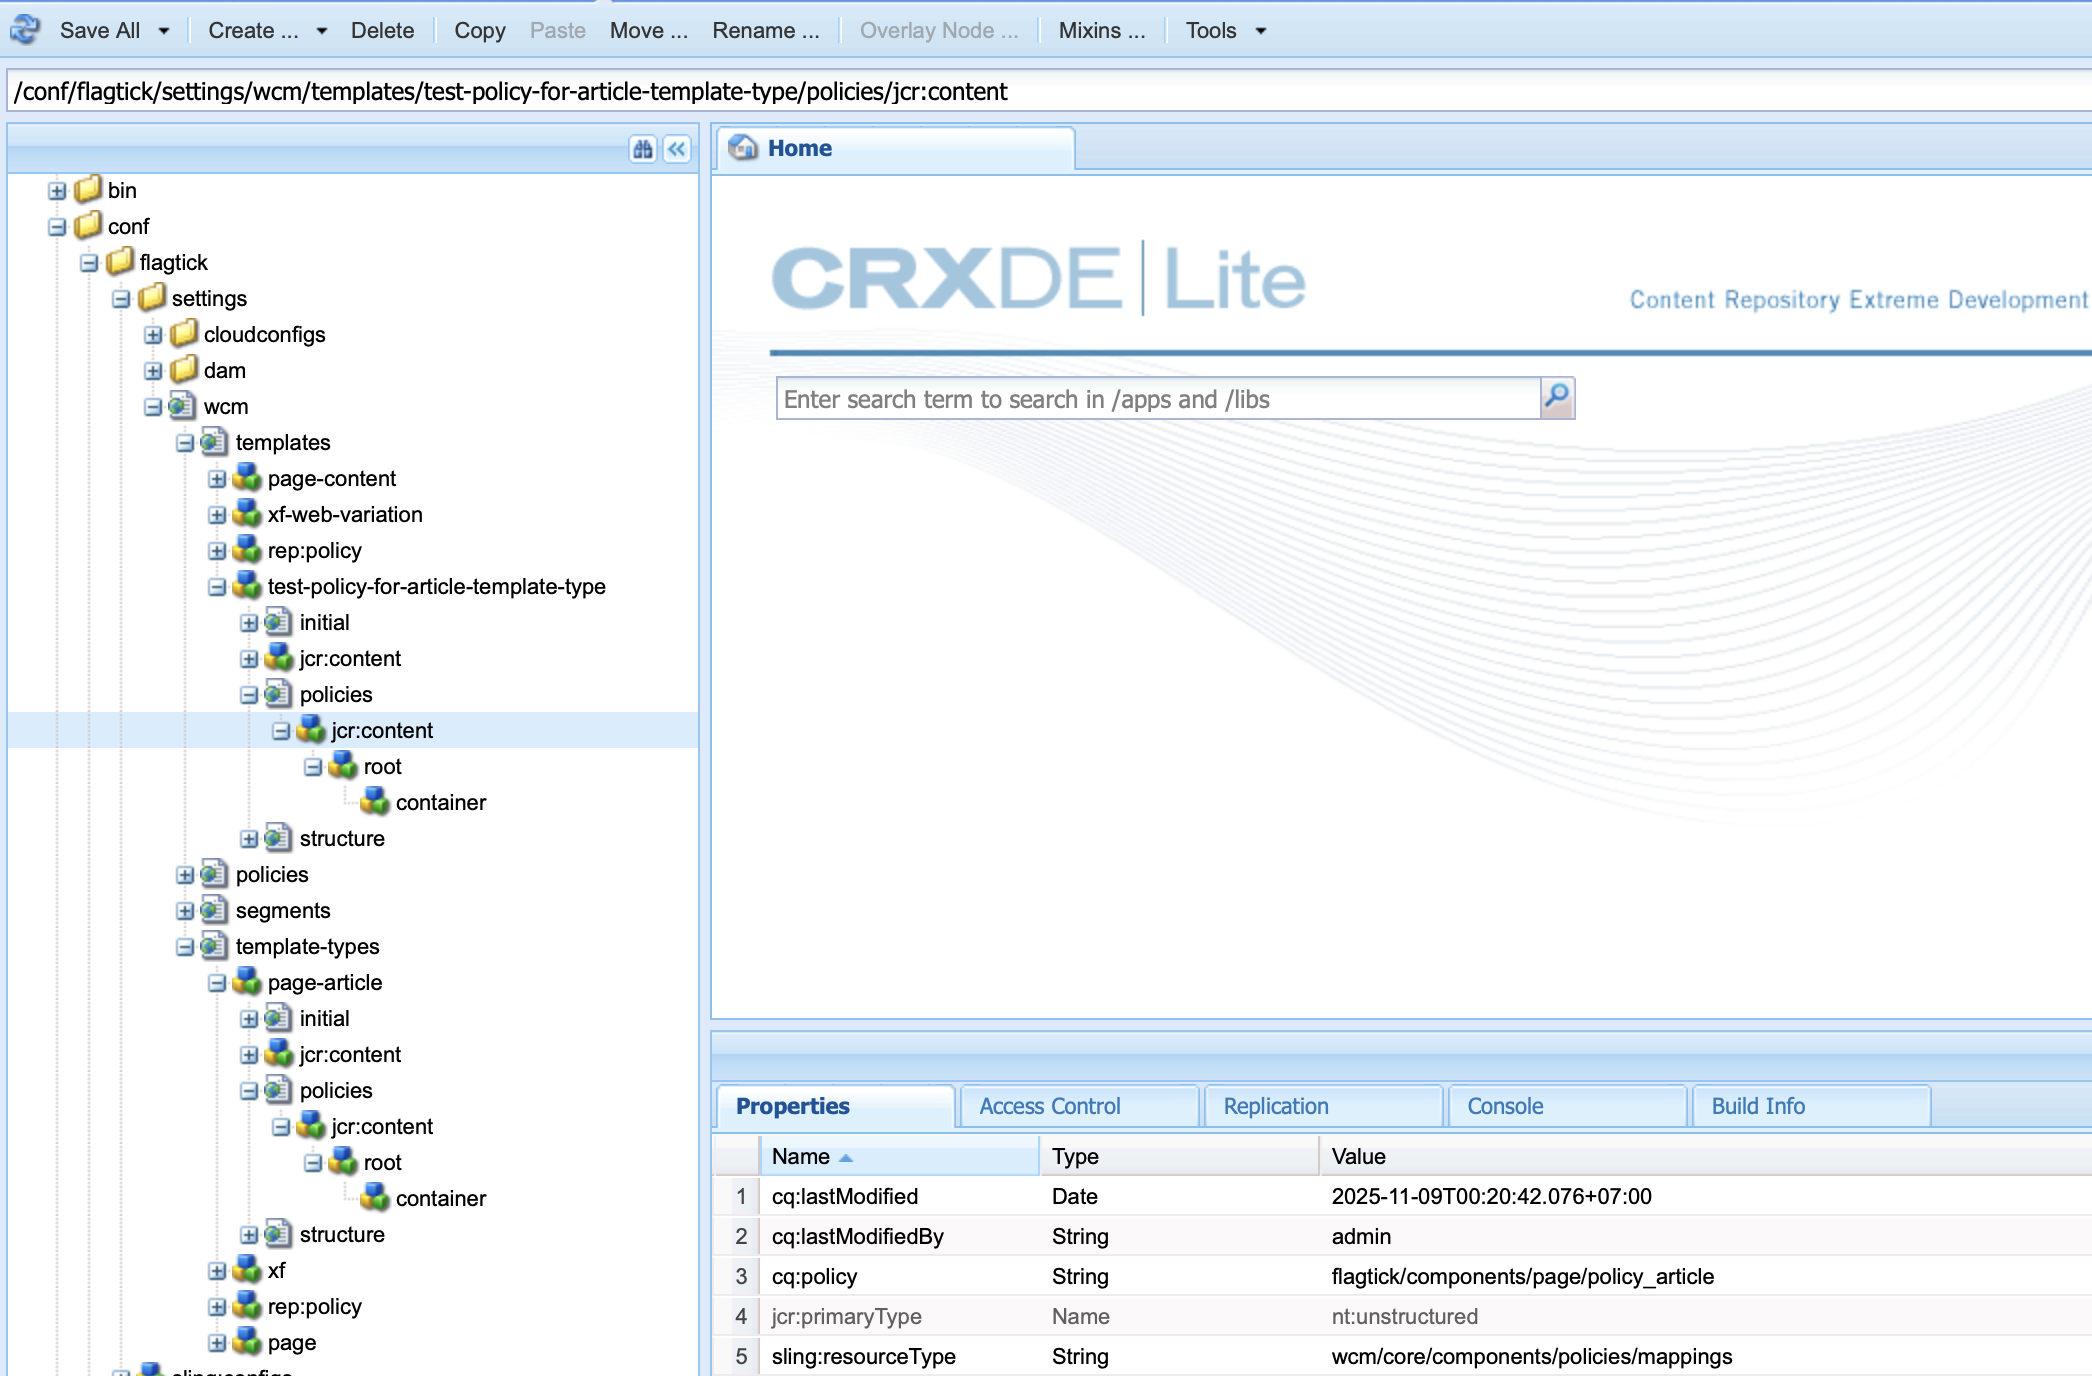
As you can see, the cq:policy still points to flagtick/components/page/policy_article.
That means it is still using the policy_article node — but if you prefer to use the default, just update the mapping path.

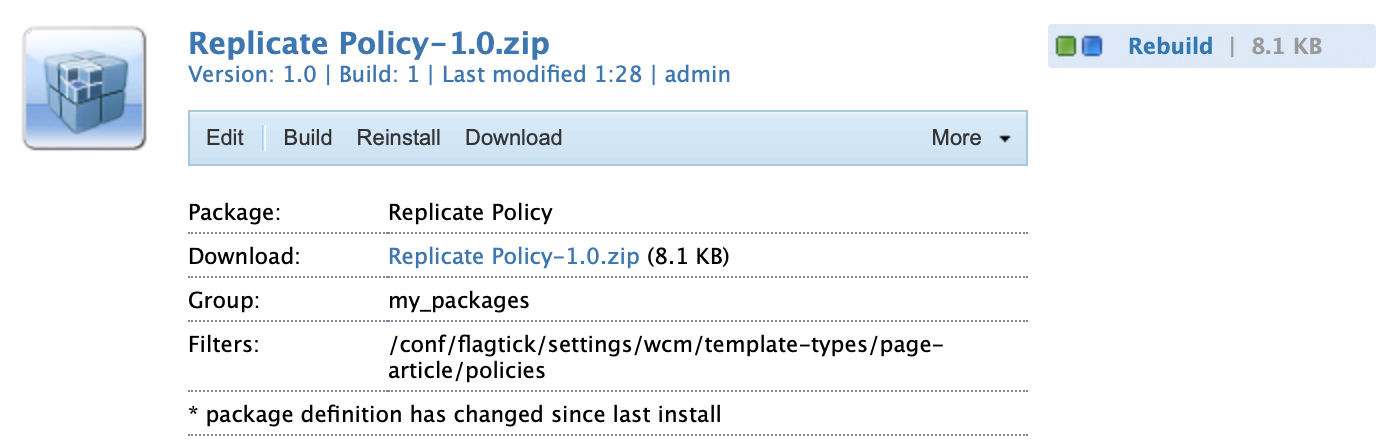
Next, build a package with this path:
/conf/flagtick/settings/wcm/templates/test-policy-for-article-template-type/policies
to export the policy content.
After that, modify it if needed, then install it to
/conf/flagtick/settings/wcm/template-types/page-article/policies
using Install in the Package Manager.
When setting up a template type, it is usually based on an existing template or one derived from it.
This ensures policies and cq:template links remain consistent between the initial and structure folders.
/template-types/page-article/structure
  └─ jcr:content
      └─ cq:template = /conf/flagtick/settings/wcm/templates/test-policy-for-article-template-type

/template-types/page-article/initial
  └─ jcr:content
└─ cq:template = /conf/flagtick/settings/wcm/templates/test-policy-for-article-template-typeNow, refactor test-policy-for-article-template-type to article-content, which serves as the base (or shadow source) template for the Page Article Template Type.
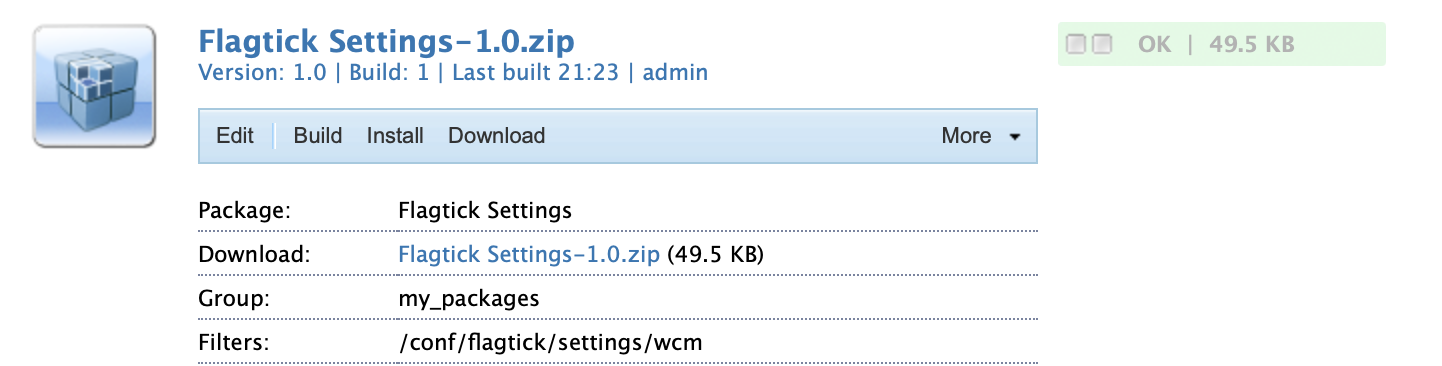
Use the Flagtick Settings package to export site configs into /wcm, then sync them across environments via your CI/CD pipeline for consistent deployment.
Go