Sending Emails from AEM as a Cloud Service with Amazon SES
When working with Adobe Experience Manager as a Cloud Service (AEMaaCS), you may need to send emails from your application. AEMaaCS can generate the email content, but it cannot actually deliver the email to users. In other words, AEMaaCS does not include an SMTP service or email delivery engine.
To solve this, we use an external email delivery service. In this tutorial, we will use Amazon Simple Email Service (SES), because it works well when our backend or infrastructure already runs on AWS.
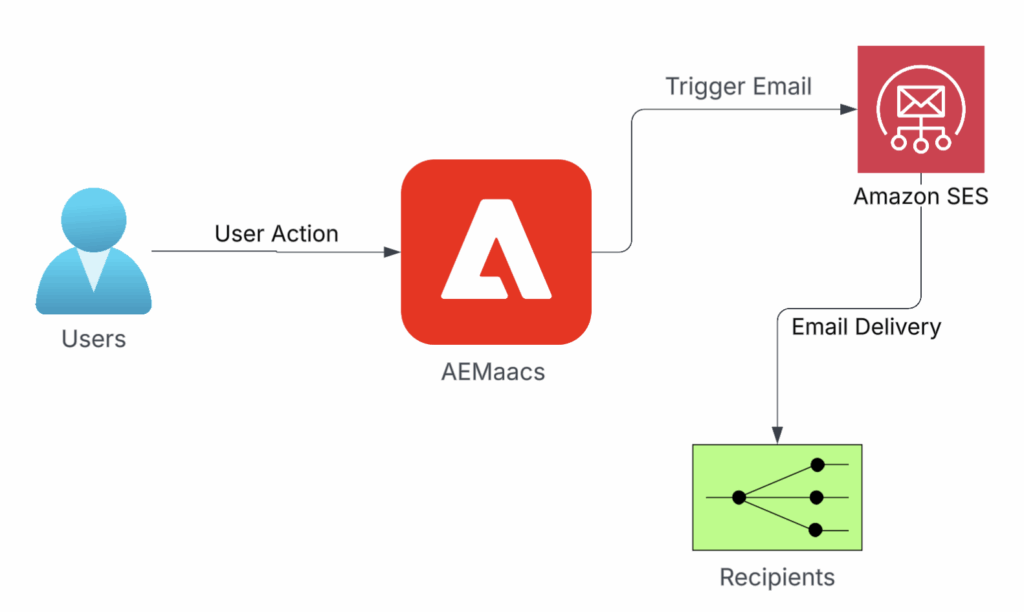
Before configuring anything, let us understand how the email travels:
- User performs action, such as sign-up, form submit, or purchase
- AEMaaCS triggers email workflow
- Application sends email request to SES
- SES delivers email to recipient
Visually, it looks like this:
If your system needs to handle email replies, you can also use AWS services to receive inbound messages and send those events back to your backend or application.
There are many email providers (SendGrid, Mailgun, Mandrill, etc.). SES is a good choice when:
- Application already runs on AWS
- Extra vendors are not desired
- Centralized monitoring matters
- Good deliverability support is important
SES also integrates easily with other AWS tools such as:
- SNS (notifications)
- SQS (queuing)
- Lambda (serverless processing)
- EventBridge (event routing)
This makes the architecture cleaner and easier to maintain.
Configuring SES in AWS Account for Outbound Delivery
In most enterprise setups, teams separate environments using Non-Prod AWS account for AEMaaCS Dev and Stage, and Prod AWS account for AEMaaCS Production.
This separation prevents test or staging changes from impacting live customers and keeps production data isolated from development work.
Resulting account structure:
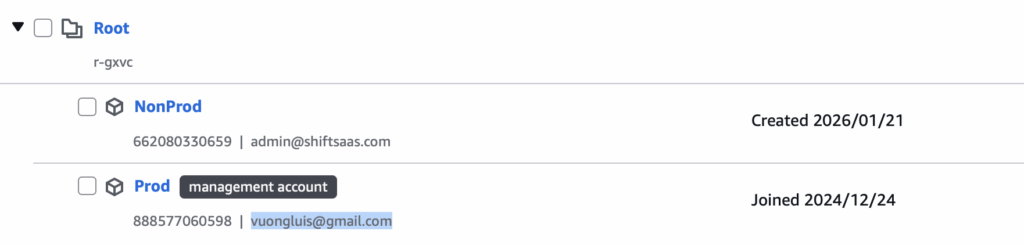
With environment structure in place, next step is configuring SES in AWS to extract SMTP credentials required by AEMaaCS for outbound email delivery.
After completing identity verification and authorization, SES allows you to generate SMTP credentials, which typically look like:
{
  "smtp.password":"$[secret:SMTP_PASSWORD]",
  "smtp.user":"$[env:SMTP_USER]",
  "from.address":"$[env:SMTP_FROM_ADDRESS]"
}SES asks to verify sender identity used for outbound delivery. Verified email address becomes value mapped into AEMaaCS as SMTP_FROM_ADDRESS, keeping both systems aligned on same sender identity.
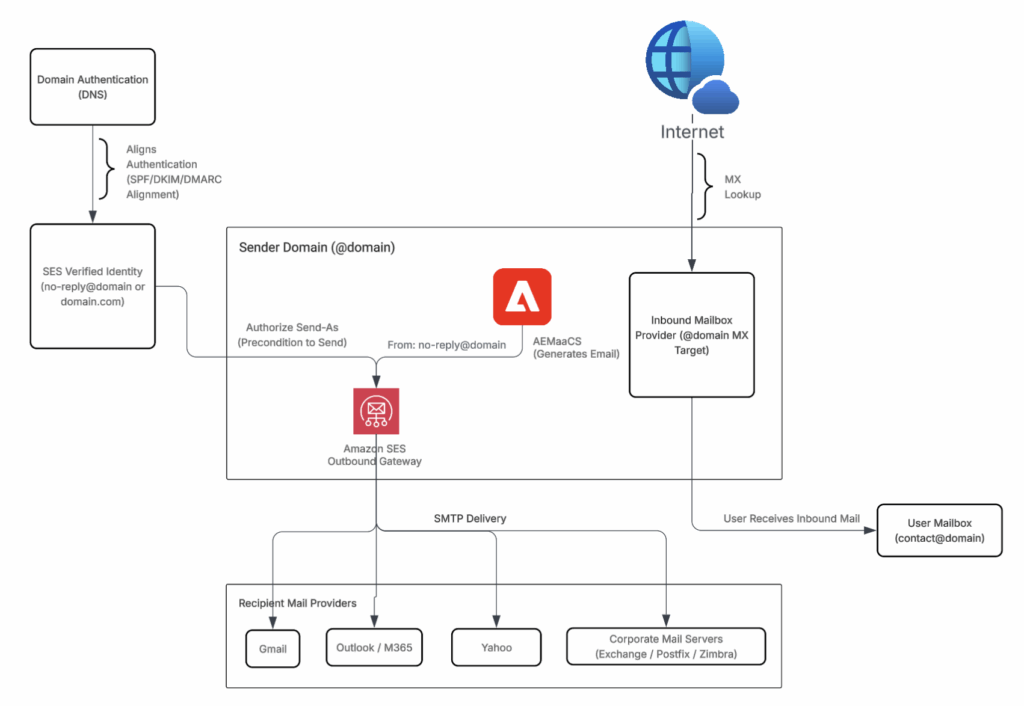
After sender identity verification, SES gains permission to send on behalf of domain. SES provides outbound transport only.
Existing mailbox hosting stays unchanged unless mail is re-hosted using Amazon WorkMail with MX record updates. Verification authorizes SES to send as domain, not to host mailboxes.
At this stage, SES acts as controlled outbound email gateway, applying SPF, DKIM, and DMARC checks before messages reach recipient providers such as Gmail, Outlook, Yahoo, or corporate mail servers.
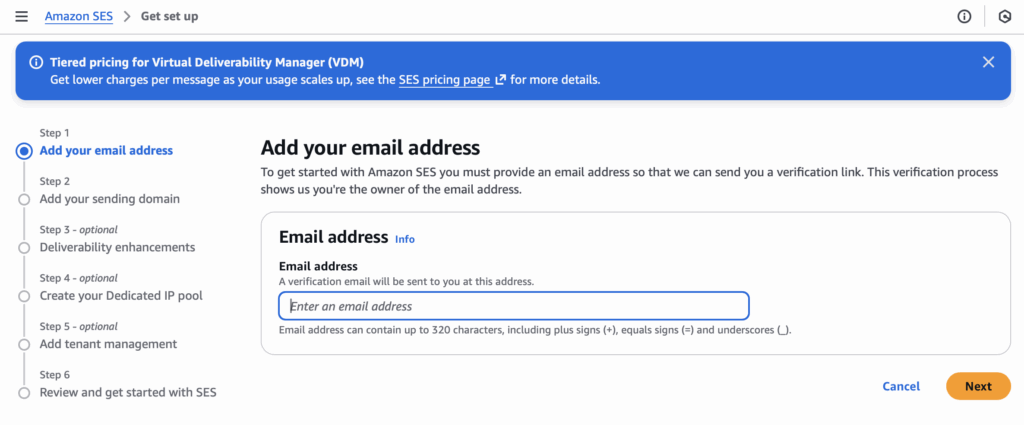
After email address verification, SES must be authorized to send using that identity. This step, often called Authorize Send-As, allows SES to act as outbound sending engine instead of mailbox provider.
Once sender authorization is complete, SES shows follow-up tasks to verify domain ownership, configure domain authentication via DNS, and enable SES as outbound email gateway.
Some tasks are optional, while others are required for production use.
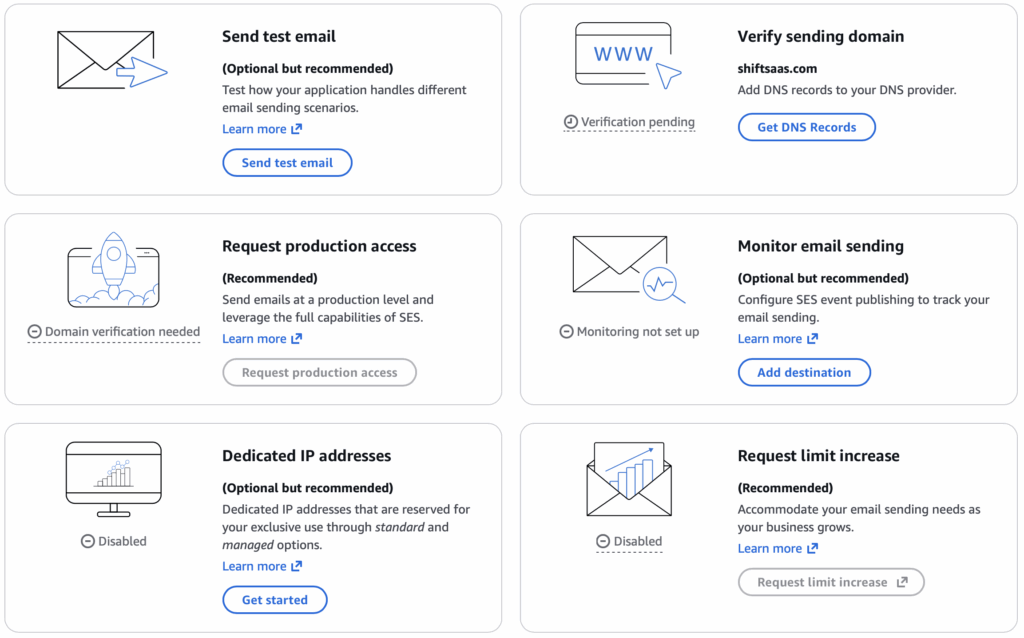
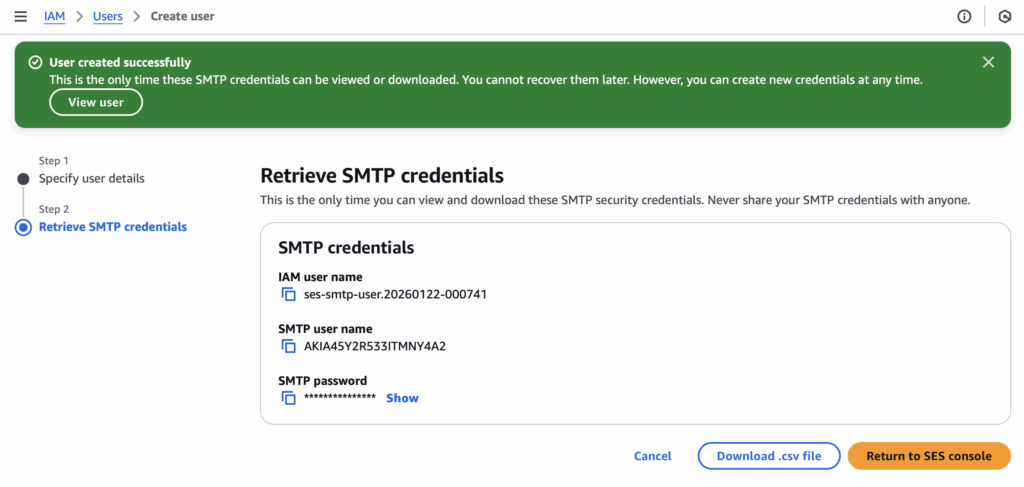
After identity and domain validation, retrieve SMTP credentials for AEMaaCS outbound email.
Open SES console and navigate to Email Sending → SMTP Settings → Create SMTP Credentials to generate SMTP username and password.
With SMTP credentials ready, AEMaaCS sends outbound email through SES. SES keeps setup simple and reliable, while Outlook/M365 introduces extra configuration and operational overhead.
Dynamic OSGi Configuration With Mail SMTP
With SMTP credentials ready in Amazon SES, next step is wiring AEMaaCS to send outbound email through SES. Configuration uses OSGi settings together with environment variables provided by Adobe Cloud Manager.
Approach allows Author and Publish environments to share same setup safely, while keeping sensitive values out of codebase. SMTP settings live in OSGi config file, and credentials resolve at runtime from environment variables and secrets.
Configuration file path:
config/<runmode>/com.day.cq.mailer.DefaultMailService.cfg.jsonMinimal SMTP configuration looks like this:
{
  "smtp.password":"${secret:SMTP_PASSWORD}",
  "smtp.requiretls":true,
  "smtp.user":"${env:SMTP_USER}",
  "smtp.port":"${env:SMTP_PORT}",
  "smtp.host":"${env:AEM_PROXY_HOST,default=proxy.tunnel}",
  "from.address":"${env:SMTP_FROM_ADDRESS}"
}From earlier SES setup, you already have required SMTP details:
SMTP User: AKIA45Y2R533ITMNY4A2
SMTP Password: *************************************
SMTP endpoint: email-smtp.us-east-1.amazonaws.comThese values map directly to OSGi framework configuration keys:
- SMTP_USER
- SMTP_PASSWORD
- SMTP_FROM_ADDRESS
Before AEMaaCS can use OSGi configuration, SMTP values need to be defined as environment variables and secrets in Adobe Cloud Manager. Values are injected into runtime when AEM environment starts.
At minimum, configure:
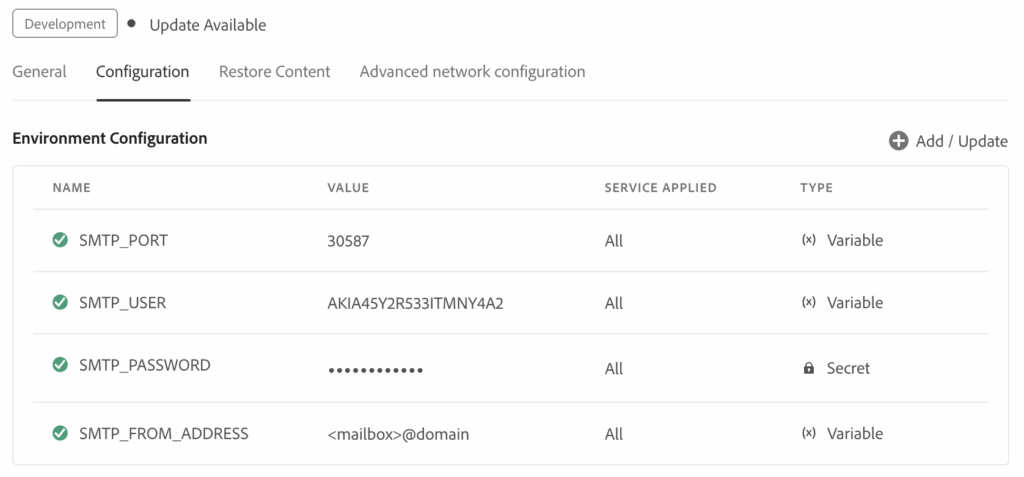
After environment variables are configured, next step is confirming AEMaaCS picks them up correctly at runtime.
Open Felix Console through AEMaaCS Developer Console or directly on Author or Publish instance (for example, localhost:4503), then navigate to:
/system/console/components/com.day.cq.mailer.DefaultMailServiceThis confirms Mail Service component is up and running.
Next, go to the ConfigMgr view:
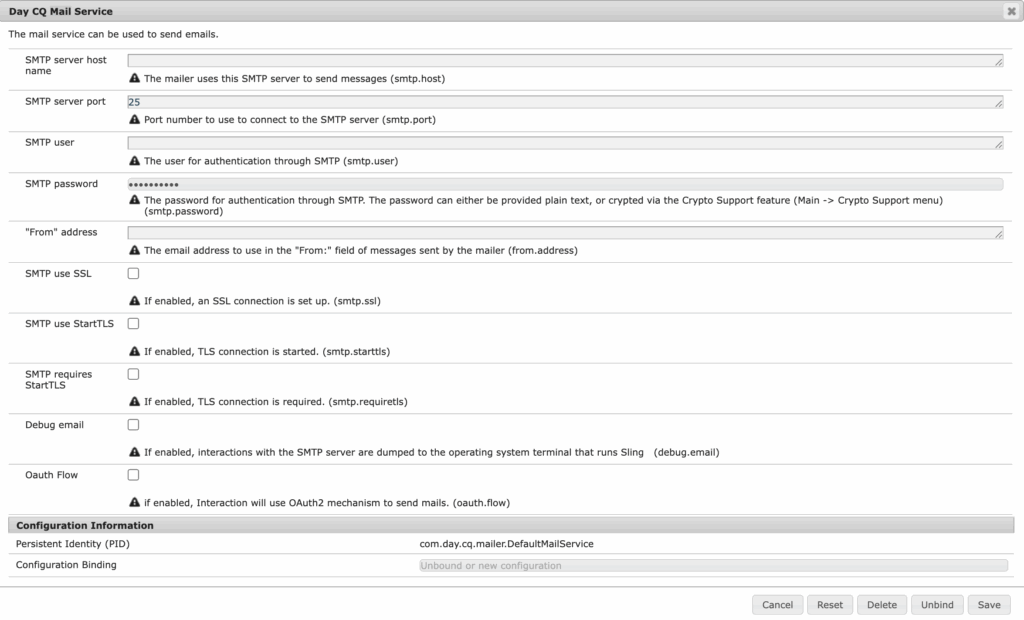
Locate Day CQ Mail Service and verify values such as SMTP host, port, user, password, and from.address are populated. This confirms OSGi configuration and environment variables resolve correctly.
Advanced Networking Email Service Configuration
With SMTP configuration validated inside AEMaaCS, focus shifts to Advanced Networking. This explains why extra parameters appear in mail setup.
Values such as AEM_PROXY_HOST and SMTP_PORT are required because outbound SMTP traffic flows through Advanced Networking and a managed proxy. Direct SMTP connections are blocked without this setup.
OSGi configuration controls email delivery, while Advanced Networking controls outbound traffic from AEMaaCS. SMTP testing requires Advanced Networking to be enabled.
Before API calls, prepare Cloud Manager credentials using Adobe Developer Console. Obtain x-gw-ims-org-id, Authorization token, and x-api-key for Advanced Networking requests.
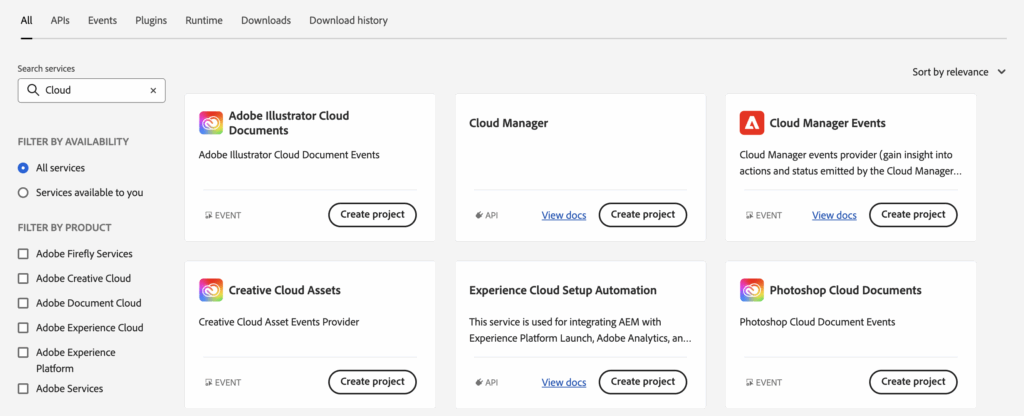
With credentials ready, next step is understanding how Advanced Networking is configured through Cloud Manager API. Reviewing official API documentation helps clarify required headers and request payload structure for enabling Advanced Networking in AEMaaCS.
{
  "name": "Enable Advanced Networking for AEMaaCS Environment",
  "request": {
    "method": "PUT",
    "header": [
      {
        "key": "x-gw-ims-org-id",
        "value": "<IMS_ORG_ID>",
        "type": "text"
      },
      {
        "key": "Authorization",
        "value": "Bearer <ACCESS_TOKEN>",
        "type": "text"
      },
      {
        "key": "x-api-key",
        "value": "<CLIENT_ID>",
        "type": "text"
      },
      {
        "key": "Content-Type",
        "value": "application/json",
        "type": "text"
      }
    ],
    "body": {
      "mode": "raw",
      "raw": "{ /* advanced networking config payload */ }",
      "options": {
        "raw": {
          "language": "json"
        }
      }
    },
    "url": {
      "raw": "https://cloudmanager.adobe.io/api/program/<PROGRAM_ID>/environment/<ENVIRONMENT_ID>/advancedNetworking",
      "protocol": "https",
      "host": [
        "cloudmanager",
        "adobe",
        "io"
      ],
      "path": [
        "api",
        "program",
        "<PROGRAM_ID>",
        "environment",
        "<ENVIRONMENT_ID>",
        "advancedNetworking"
      ]
    }
  },
  "response": []
}Request above enables Advanced Networking for specified environment. Payload then defines how outbound traffic is routed.
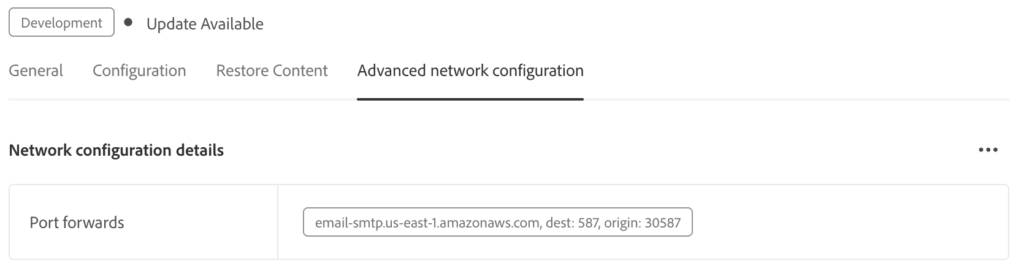
Sample payload below shows SMTP traffic forwarded to Amazon SES on port 587.
{
  "portForwards": [
    {
      "name": "email-smtp.us-east-1.amazonaws.com",
      "portDest": 587,
      "portOrig": 30587
    }
  ]
}After Advanced Networking is enabled, confirm configuration was applied correctly before moving on to SMTP testing or email integration.
Use GET endpoint below to retrieve current Advanced Networking configuration for specific environment:
https://cloudmanager.adobe.io/api/program/<Program ID>/environment/<Environment ID>/advancedNetworkingAfter making this request, response shows active networking configuration for environment. This helps confirm that port forwarding and other Advanced Networking settings are correctly applied.
You can also verify this visually in Cloud Manager UI, where Advanced Networking configuration and port forwarding rules are displayed for each environment, as shown below.
Besides using API, aio CLI provided by Adobe Cloud support can also be used to activate or manage networking configuration. This option is useful for local testing or automation workflows. Further documentation is available here:
https://experienceleague.adobe.com/en/docs/commerce-learn/tutorials/api-mesh/installing-aio-mesh-plugin
With Advanced Networking configured and verified, next section moves into practical usage by building Contact Us form and integrating it with backend services.
Contact Us Form Using SES for Outbound Email
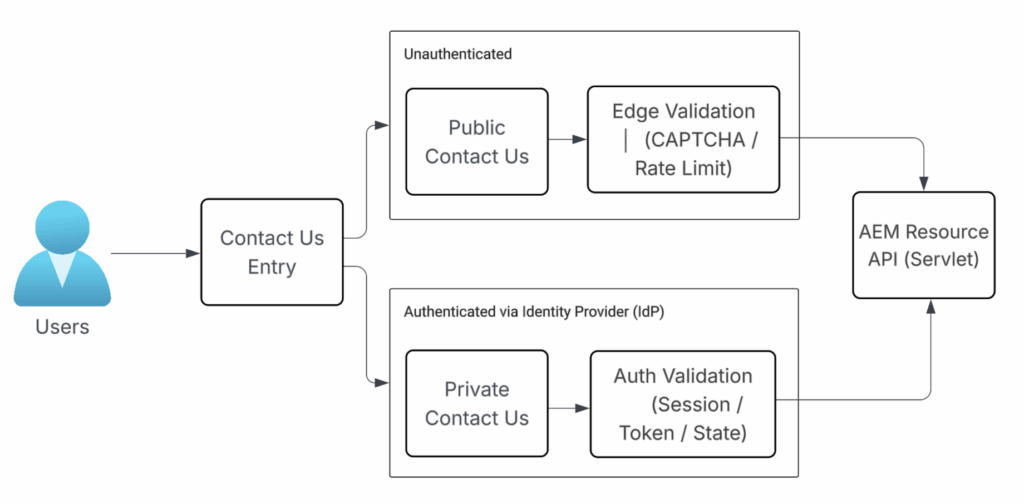
In the last section, we covered outbound email delivery with Amazon SES. Now let us get a bit more practical and look at the Contact Us flow—how users actually send messages through the app. One key decision here is whether the Contact Us page should be public or secured.
The diagram below shows both options and how each one ultimately connects to the AEM backend API.
Now that we understand the high-level flow, let us zoom in on how the Contact Us page is built in AEM. The diagram shows how it all connects.
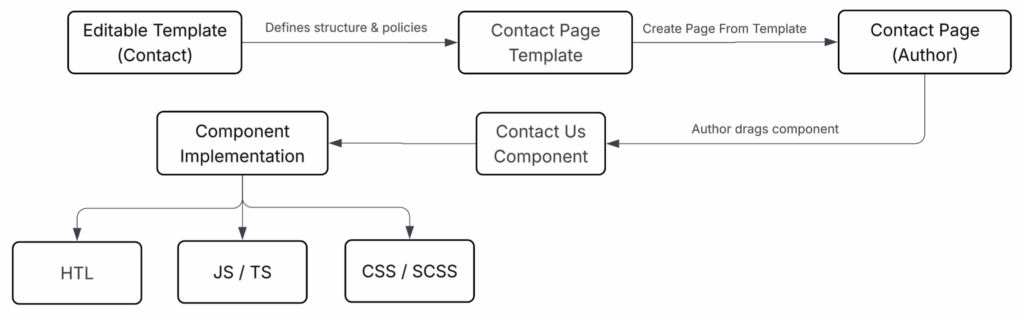
Next comes the client-side logic, where JS/TS collects input, validates it, and securely calls the AEM API.
const formData = {
  key: value
};

$.post(`${url}.${selector}.json`, formData)
  .done(() => showThankyou())
.fail(err => logger.error(err));After the request reaches AEM, the Servlet takes over. Using the AEM Servlet, you can author the email template and control outbound email delivery by managing three key pieces of information:
- Email template path (e.g.
/etc/notification/email/<site name>/contact.html) - Validate data extracted from
formDataand mapped to template parameters ({{parameter_key}}) - Recipient list, which can be determined from user input or default configuration (for example, admin@ or contact@ email)
Following AEM best practices, the Servlet should orchestrate the flow—validating input and calling services, not containing business logic.
Servlet
  -> Interface
-> Impl Class (Using @Reference to link com.adobe.acs.commons.email.EmailService)With all these pieces connected, you now have a complete Contact Us flow. This setup represents a practical, real-world use case for outbound email delivery, where messages submitted by users through the Contact Us form are processed by AEM and sent to the appropriate recipients using Amazon SES.
Wrapping Up
In this article, we built a complete outbound email solution for AEMaaCS using Amazon SES, moving from architecture to real Contact Us implementation.
We covered:
- Why AEMaaCS needs an external email service and how SES fits that role
- Setting up SES identities, SMTP credentials, and AWS environment separation
- Wiring SES into AEMaaCS using OSGi configuration and Cloud Manager variables
- Enabling Advanced Networking to shows how SMTP traffic is routed securely
- Implementing a Contact Us flow using templates, components, JS/TS, and Servlet
By the end, you have production-ready pattern for sending emails from AEMaaCS that is secure, scalable, and aligned with Adobe and AWS best practices. This same approach can be reused for notifications, approvals, and other transactional email use cases.
What’s Next
AEMaaCS email integration works well once SMTP, Advanced Networking, and SES configuration are validated in a single environment.
In real projects, however, these changes must be promoted safely across Non-Prod, Stage, and Prod using Adobe Cloud Manager pipelines.
If your team needs to deploy AEM projects to AEMaaCS, manage environment-specific configuration, and promote changes without exposing secrets, see:
🔗 Deploying AEM Projects to AEMaaCS Using Cloud Manager Pipelines (Non-Prod, Stage, and Prod)
This follow-up article shows how to structure AEM projects for AEMaaCS, configure pipelines for different environments, and promote code, OSGi configuration, secrets, and Advanced Networking changes safely through Non-Prod, Stage, and Production.