Integrating AEM with Adobe Commerce Using CIF and Venia Storefront
This guide shows how to connect Adobe Experience Manager (AEM) with Adobe Commerce using the Commerce Integration Framework (CIF) and the Venia Storefront template.
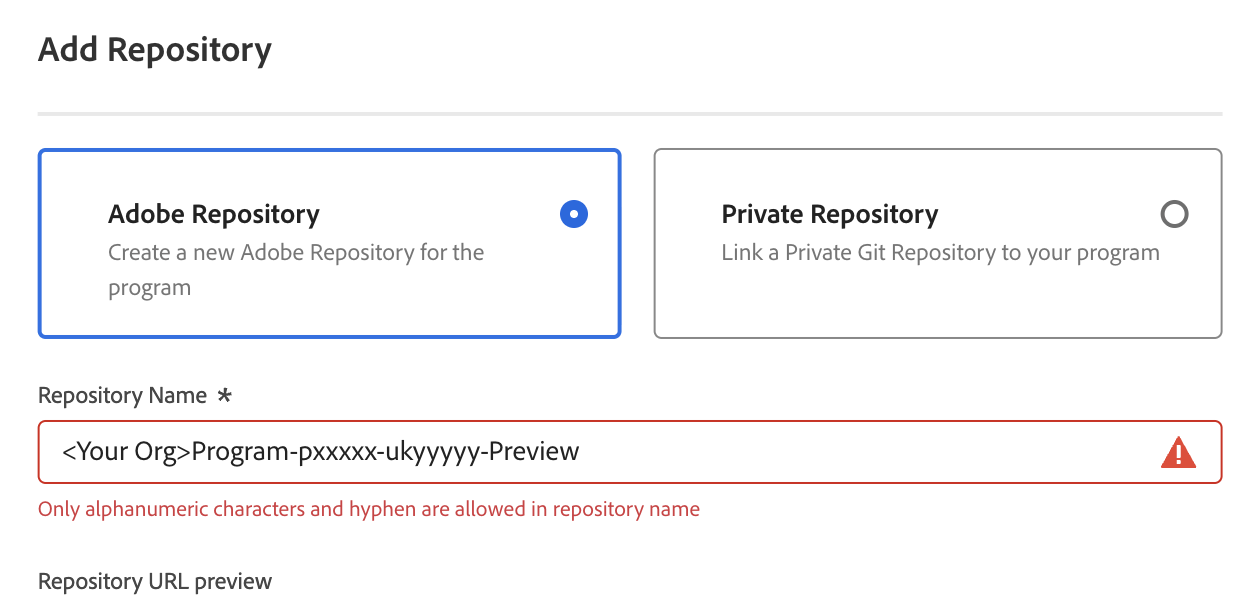
First, create an AEM Cloud Manager repository for your CIF and Venia project. This repository stores the code deployed through Cloud Manager pipelines.
(If the AEM SDK is not configured yet, see Setting Up AEM SDK and Local Environment.)
Steps
- Open Adobe Cloud Manager.
- Navigate to Repositories.
- Click Add Repository.
- Choose either:
- Adobe Repository (managed by Adobe)
- Private Repository (connect your own Git source).
Repository Creation Screen
Prepare Your AEM Environment
Prepare the local development environment by installing the AEM SDK and CIF Add-on. These packages provide the Author, Publish, and commerce integration components required for development.
Download Required Packages

- CIF Add-on → AEM CIF Venia Releases on GitHub
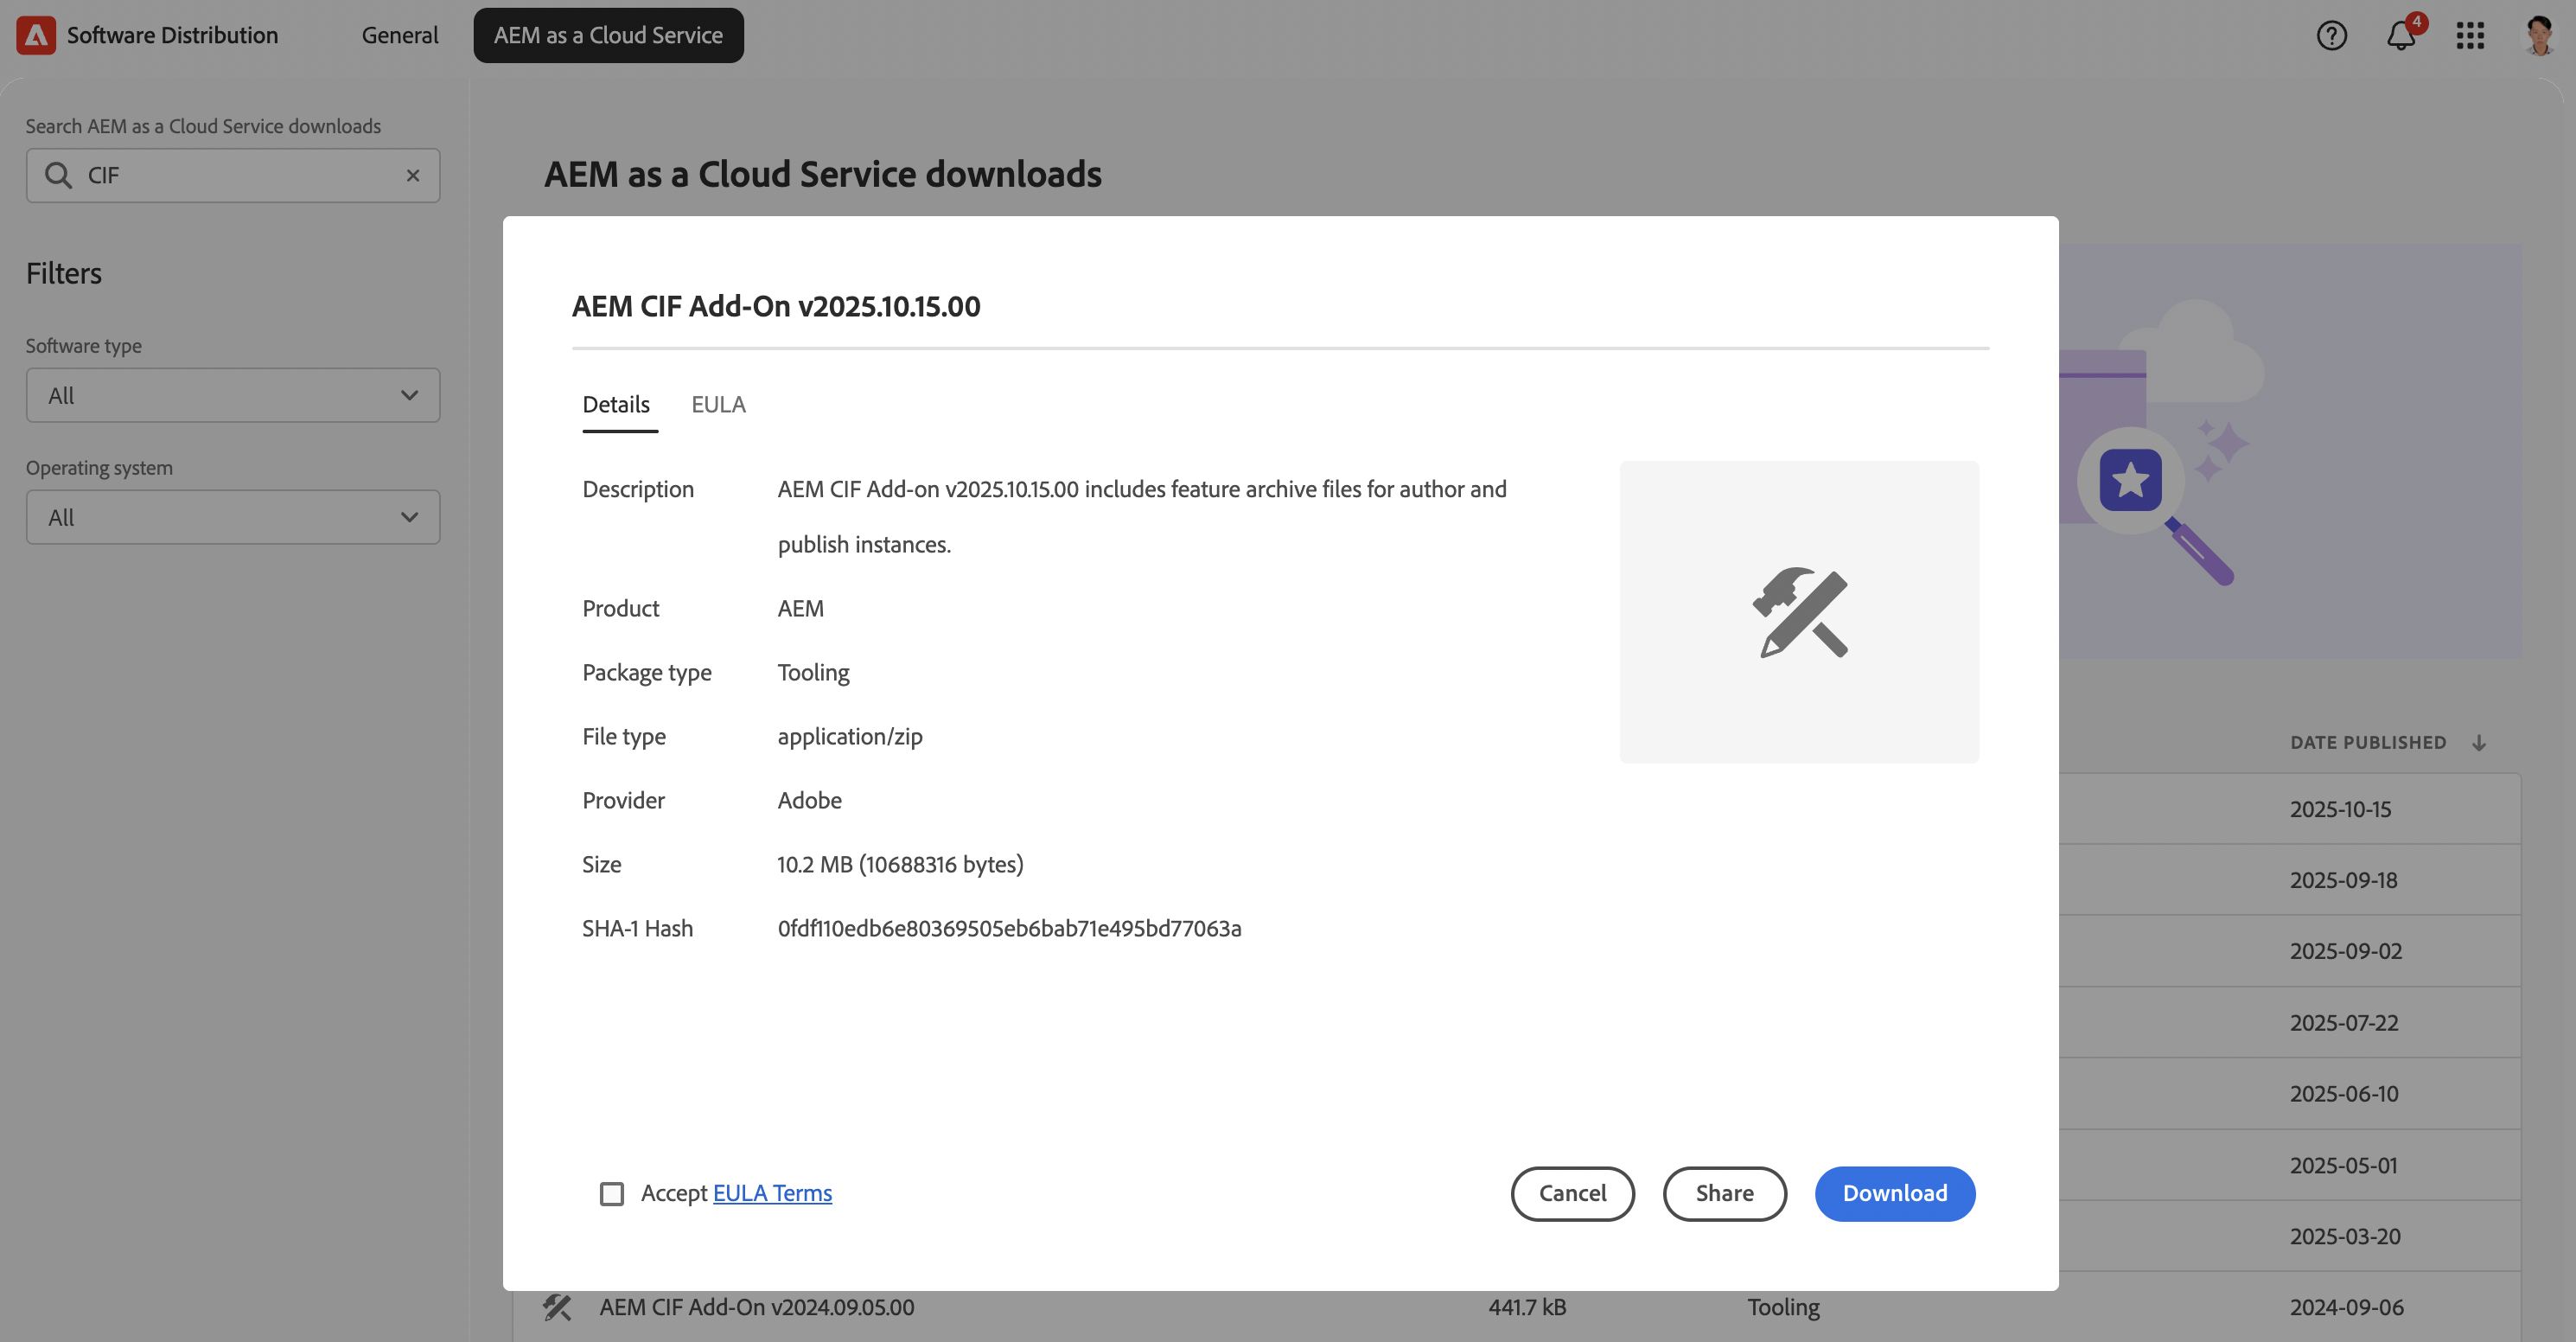
CIF Add-on integrates Adobe Commerce GraphQL APIs, product models, and commerce components into AEM to support dynamic product rendering.
Prerequisites
Install the following tools:
- Java 11 or later
- Maven 3.3.9+
- Node.js 14+
- npm 6+
- Git
SDK creates two environments: Author (port 4502) and Publish (port 4503), matching architecture used in AEM as a Cloud Service.
Extract AEM SDK zip file (for example: aem-sdk-2025.10.22943.zip) to a working directory.
/Users/<yourname>/aem-sdk/Extracted package contains two folders: Author and Publish.
aem-sdk/
├── author
│   ├── aem-author-http.command
│   ├── aem-author-p4502.jar
│   └── start-debug.bat
└── publish
    ├── aem-publish-p4503.command
└── aem-publish-p4503.jarNavigate to the author directory and run:
cd ~/aem-sdk/author
sh aem-author-http.commandStart the local AEM Author instance. The first startup may take several minutes while AEM installs bundles and initializes caches.
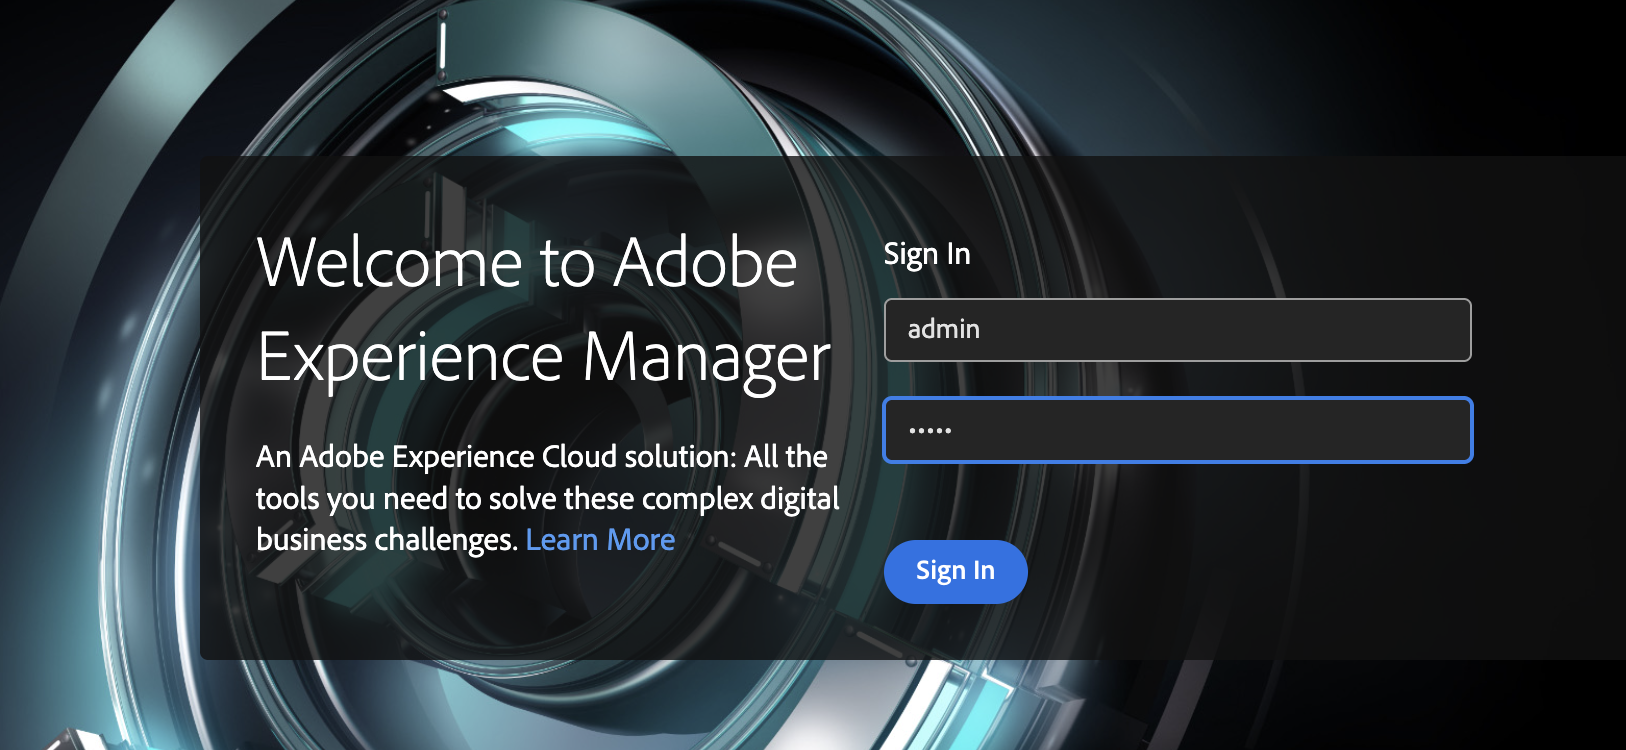
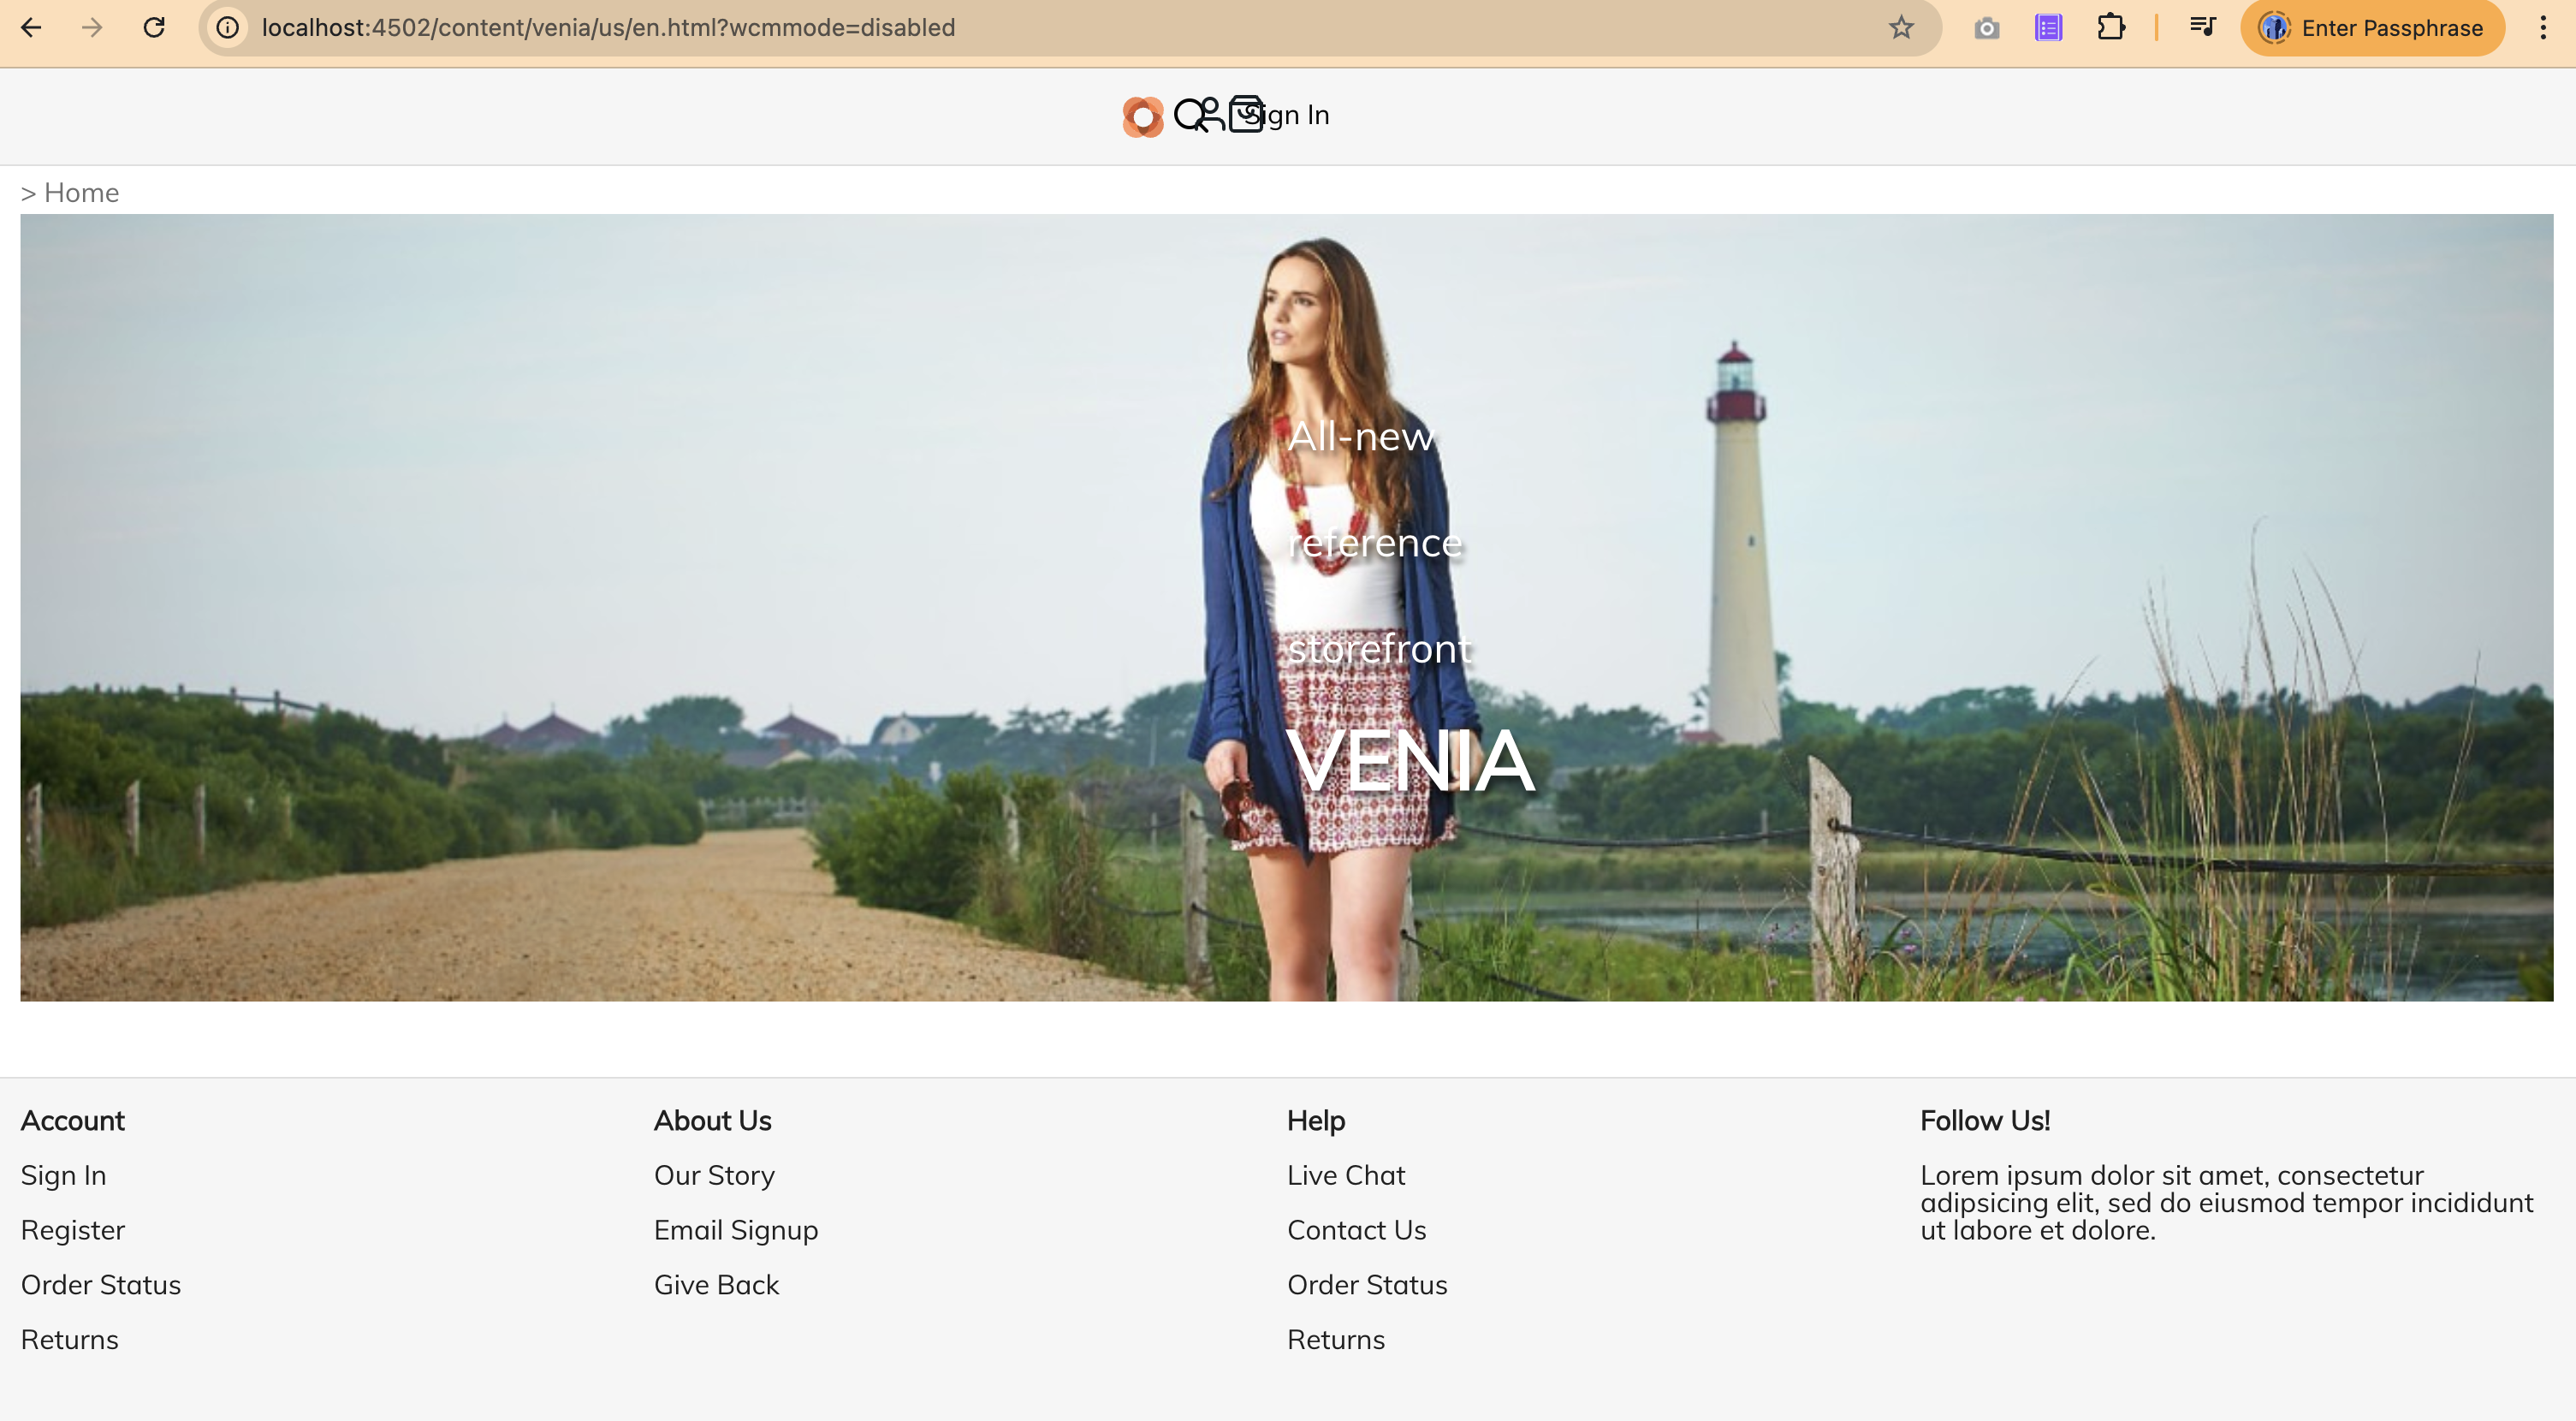
After startup, open: http://localhost:4502
Default credentials:
Username: admin
Password: adminIf the AEM Start screen or Sites console appears, the Author instance is running successfully.
💡 Note: Check AEM version at http://localhost:4502/system/console/productinfo. Version string (e.g., 2025.10.x) must match or exceed CIF Add-on release month.
Install the CIF Add-on
For local development using the AEM SDK, the CIF Add-on is installed by placing the .far package directly in the AEM root installation directory. This manual method aligns the local SDK environment with the commerce capabilities of a Cloud instance.
Copy the CIF Add-on package to the following directory:
/Users/<yourname>/aem-sdk/author/crx-quickstart/install/Your /install directory should look similar to the following:
├── README.md
├── cif-cloud-ready-feature-pkg-2025.10.15.00-cq-commerce-addon-authorfar.far
└── cif-cloud-ready-feature-pkg-2025.10.15.00-cq-commerce-addon-publishfar.farIf the install folder does not yet exist under your crx-quickstart directory, you can create it manually. Then paste:
cif-cloud-ready-feature-pkg-2025.10.15.00-cq-commerce-addon-authorfar.farinto that folder and restart your AEM Author instance.
After startup, the Commerce icon appears in the navigation rail:

💡 Remember: The CIF Add-on enables AEM to integrate with Adobe Commerce using GraphQL—bringing in product data, category trees, and Venia storefront templates.
Next, install the Venia Reference Site package.
For AEM 6.5, use the classic package:
aem-cif-guides-venia.all-classic-2025.08.12.zipFor AEM as a Cloud Service, use:
aem-cif-guides-venia.all-2025.08.12.zipDownload the CIF Venia Reference Site package from the GitHub release page:
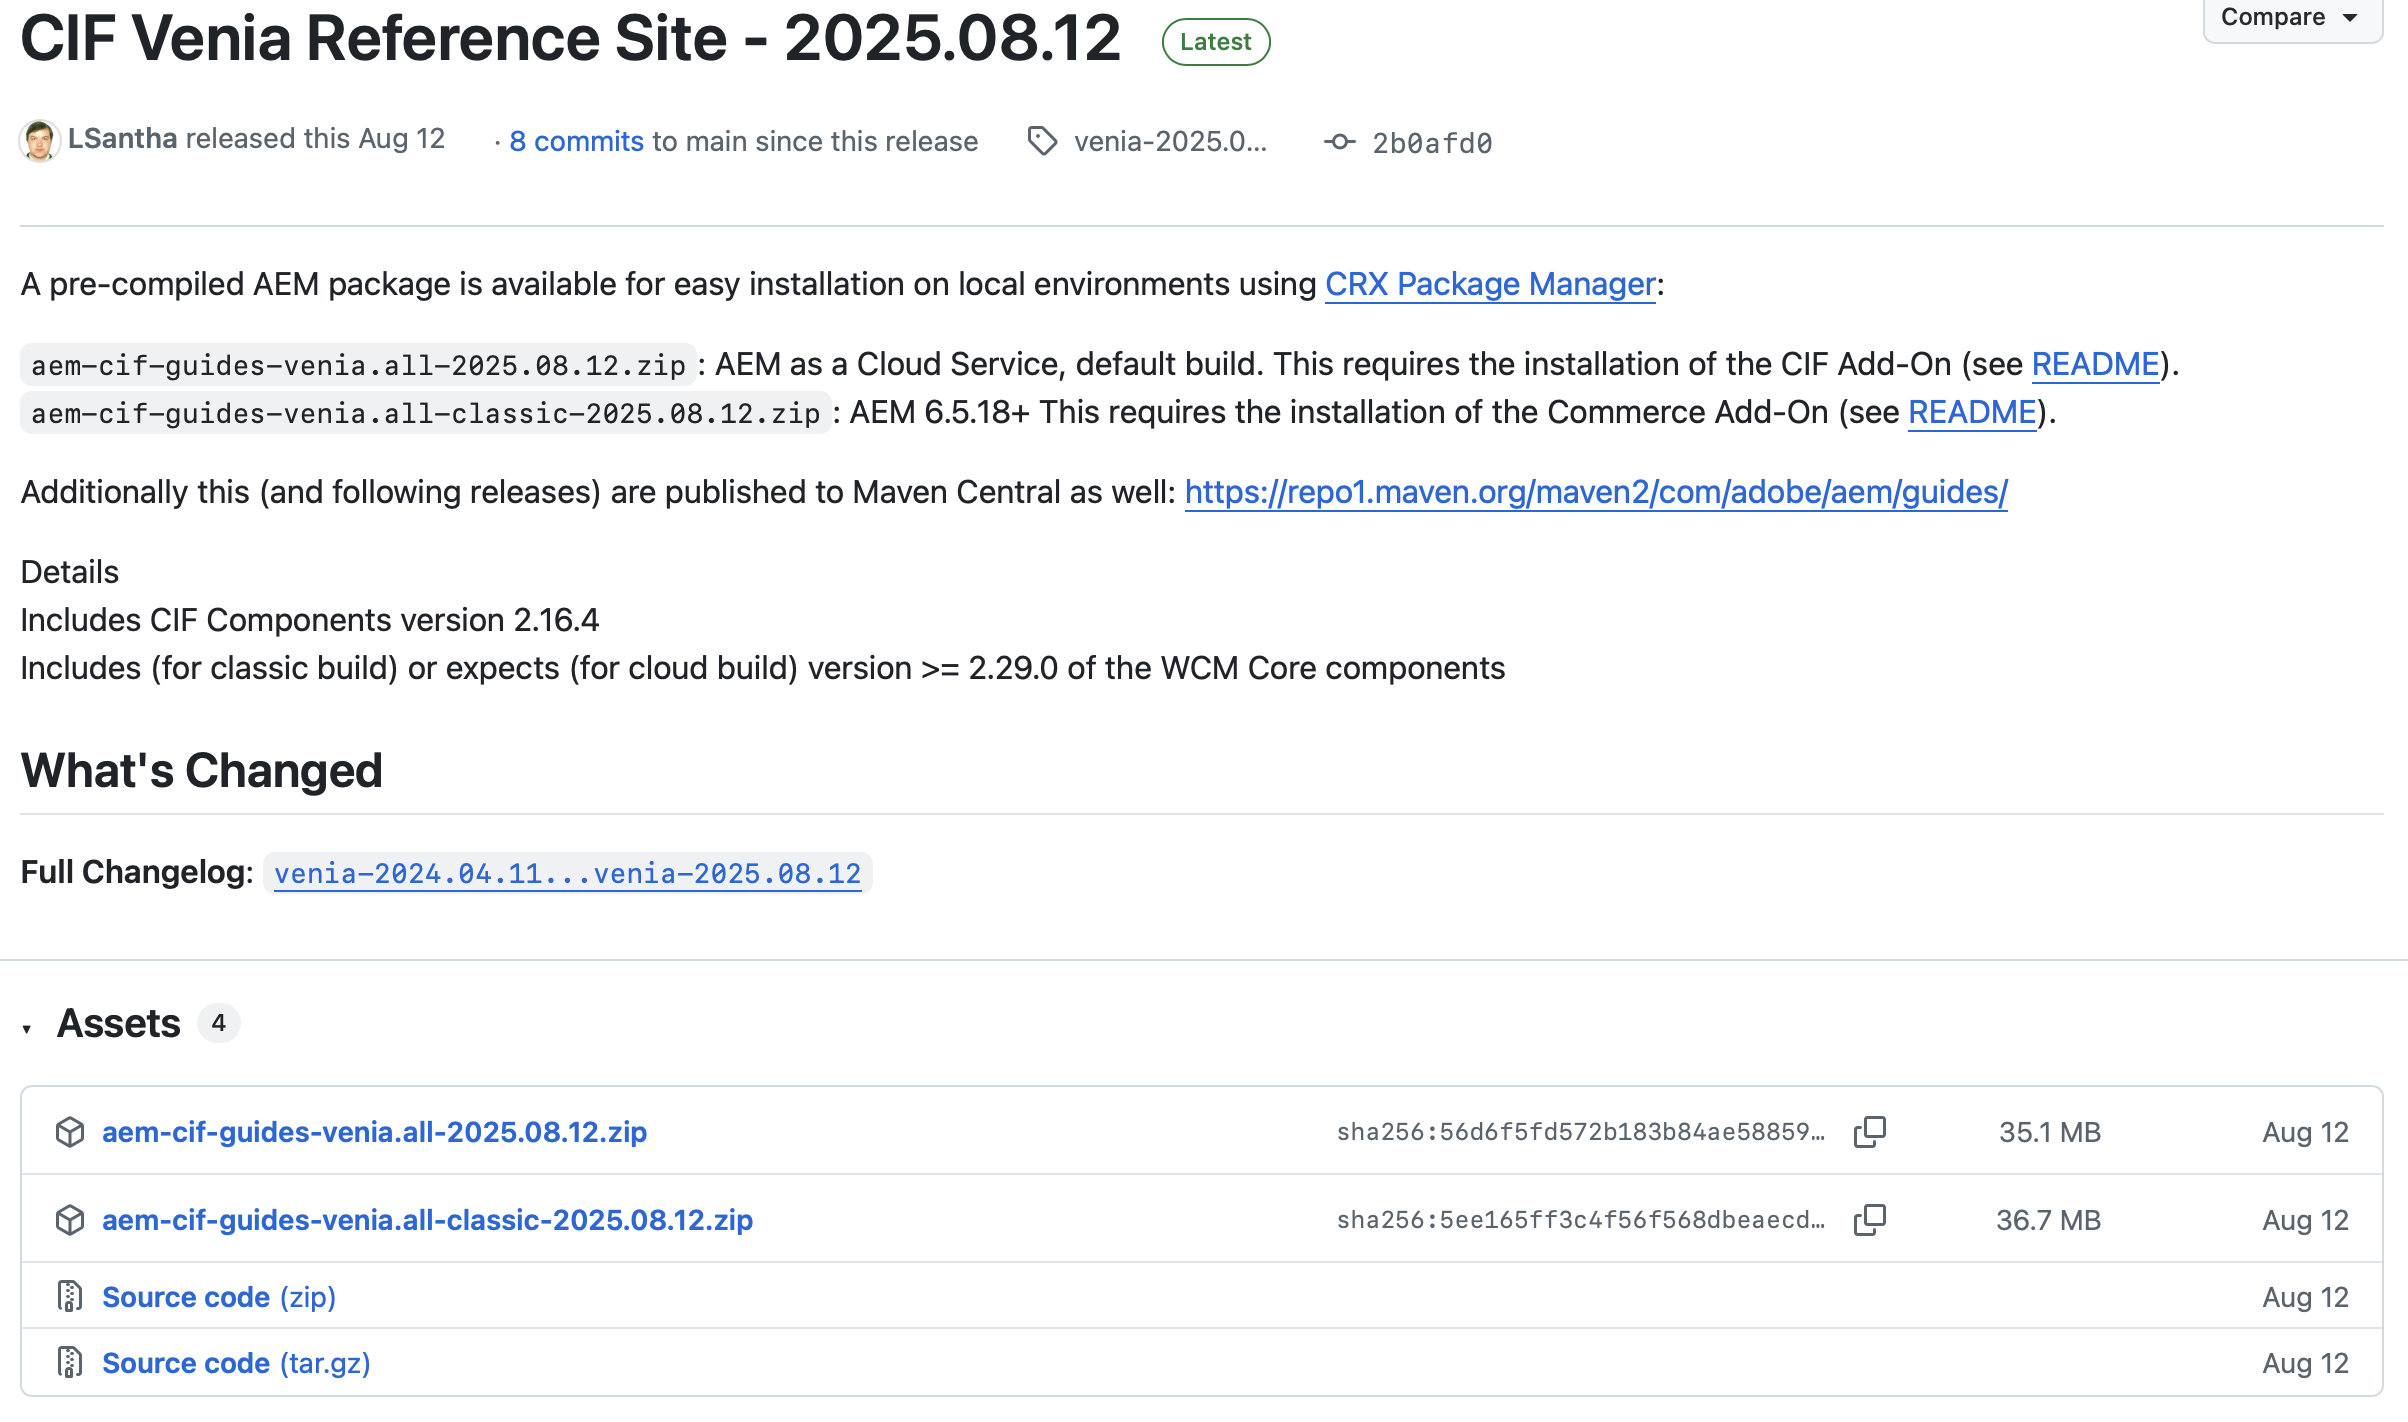
Validate the local deployment via the Package Manager. Confirm that the Venia storefront content has been fully committed to the repository with an ‘OK’ status.
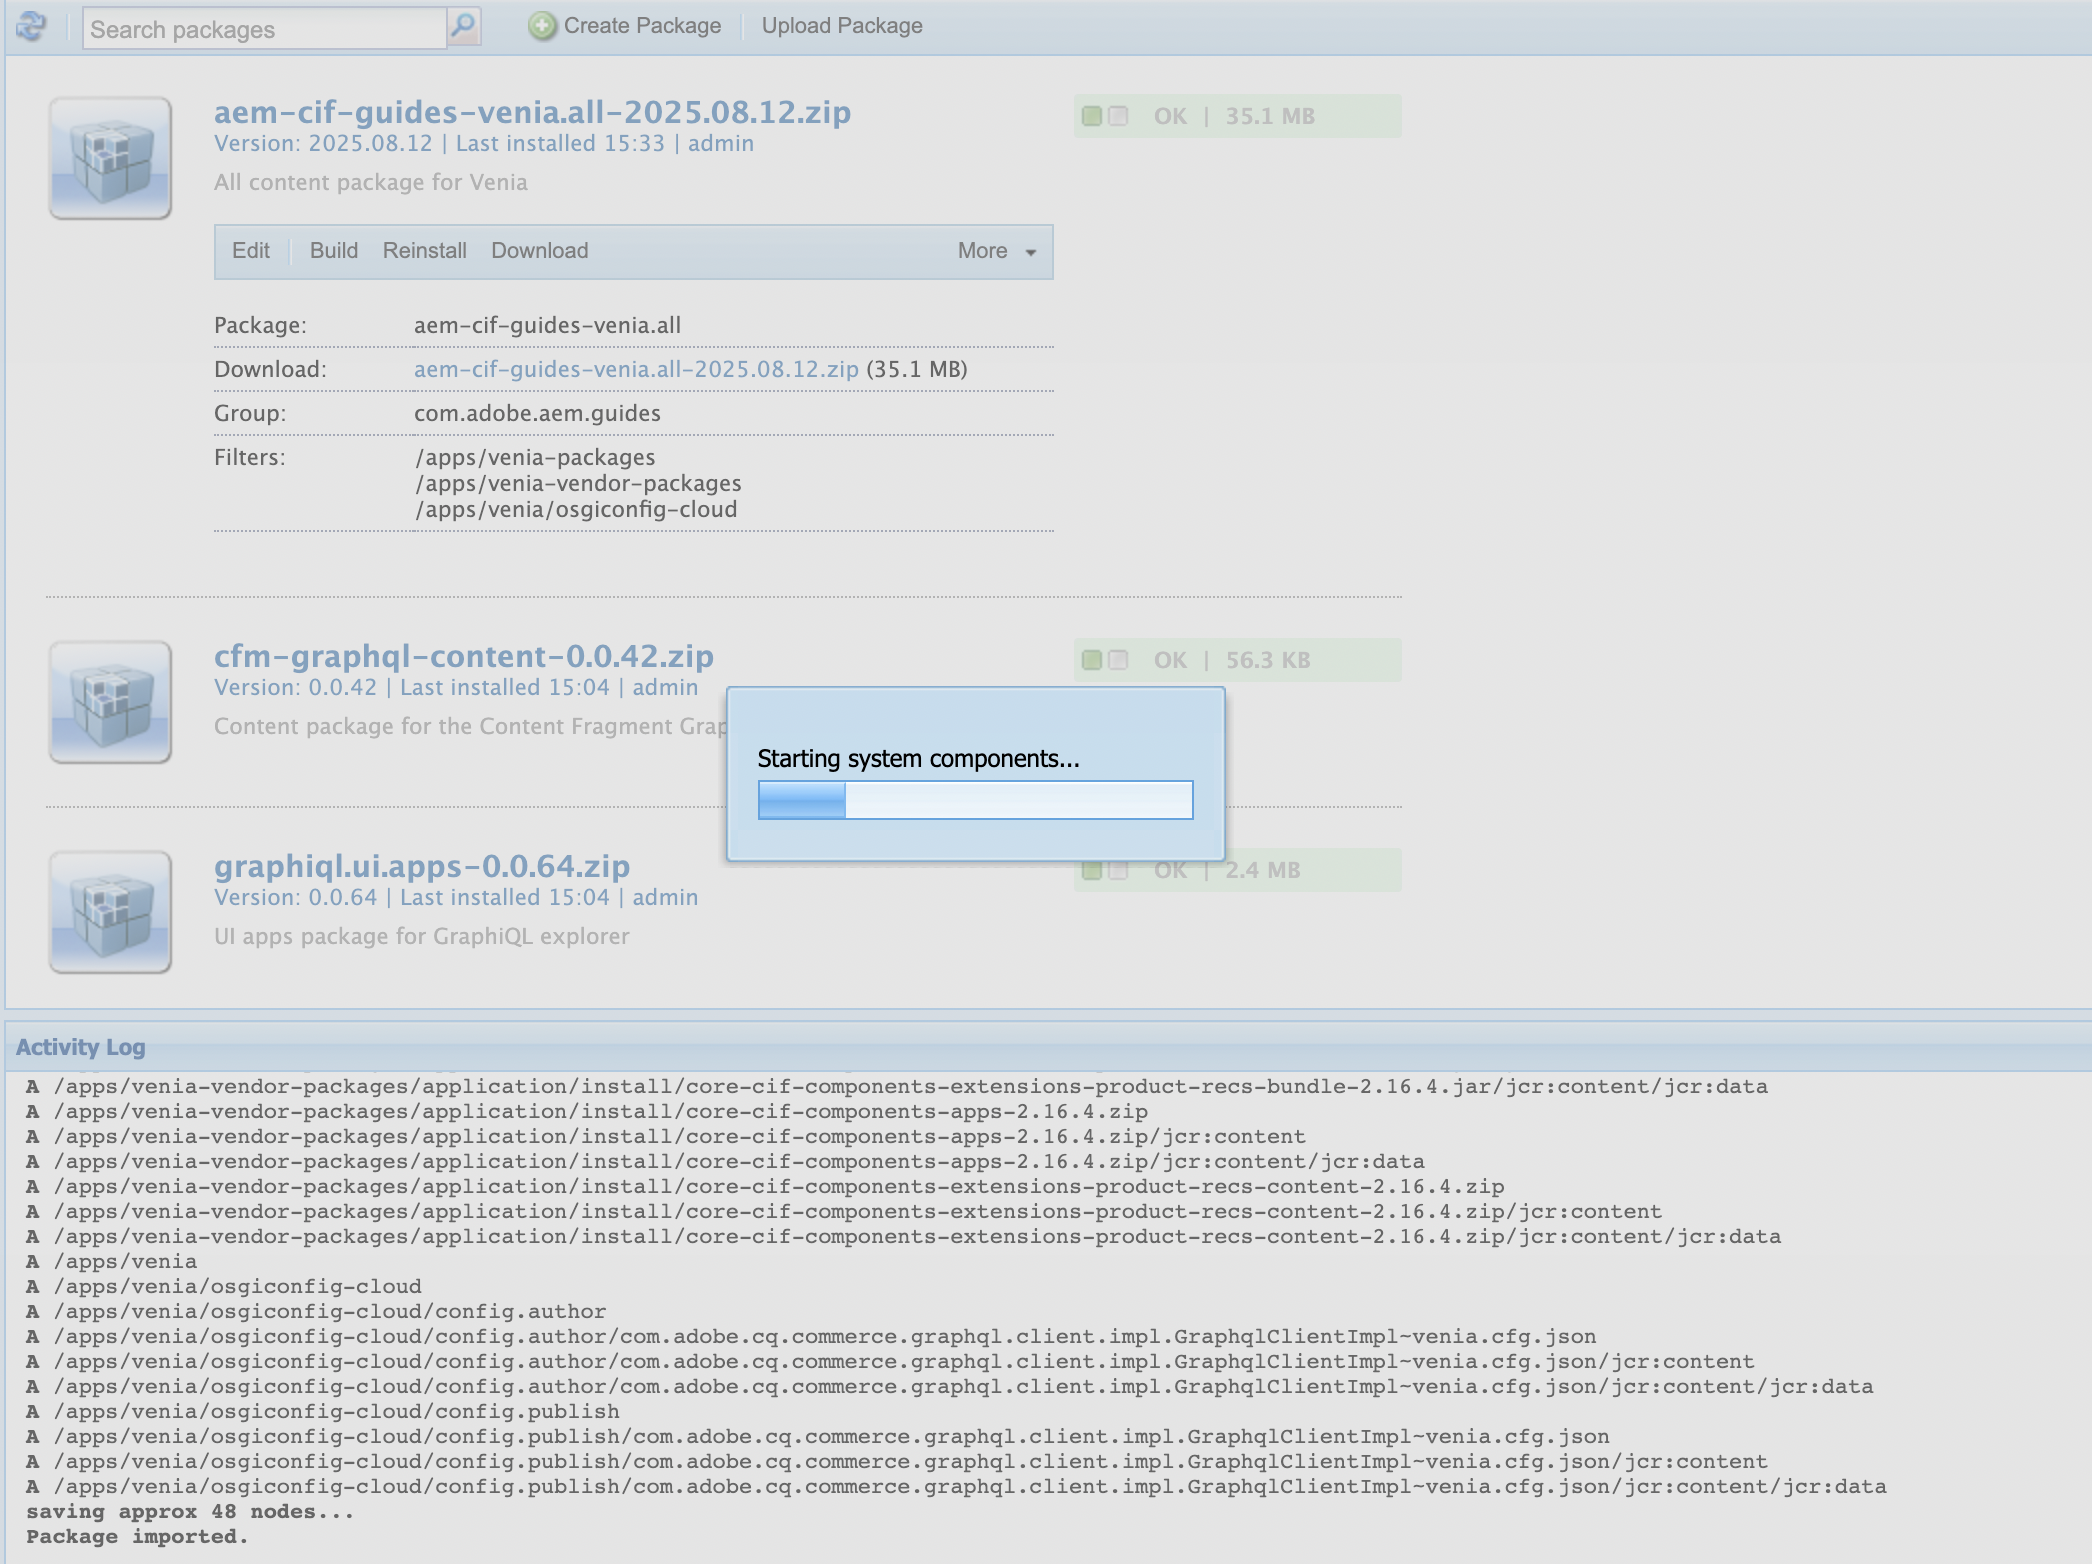
🧩 Venia Demo Store bundles with the CIF Add-on and demonstrates AEM product data, category listings, and price retrieval from Adobe Commerce through GraphQL APIs.
Verify CIF Add-on Integration
After installing the CIF Add-on, verify that AEM activates required Commerce modules. Commerce icon on the AEM Start screen indicates UI availability, but it does not confirm that underlying OSGi bundles are active.
Check Commerce OSGi bundles:
- Open the bundles console: http://localhost:4502/system/console/bundles
- Use the search bar and filter for cif or commerce.
- You should see Commerce-related bundles in Active status, for example:
| Name | Version | Status |
|---|---|---|
| com.adobe.commerce.cif.core-cif-components-core | 2.16.4 | Active |
| com.adobe.commerce.cif.core-cif-components-extensions-product-recs-bundle | 2.16.4 | Active |
| com.adobe.commerce.cif.magento-graphql | 9.1.0.magento242ee | Active |
| aem-cif-guides-venia.core | 2025.8.12 | Active |
If any bundle shows Installed, Resolved, or Cannot be resolved, AEM lacks a dependency or continues initialization.
For example:
Imported package com.adobe.cq.cif.common.associatedcontent,version=[1.0,2) -- Cannot be resolvedIf this error appears:
- Restart AEM (author instance on port 4502)
- Refresh the bundles console
- Verify the CIF Add-on version matches the AEM SDK version
When all Commerce-related OSGi bundles show Active, CIF Add-on installation completes and AEM communicates with Adobe Commerce through GraphQL.
If the Commerce icon in the AEM Start screen displays the following error:
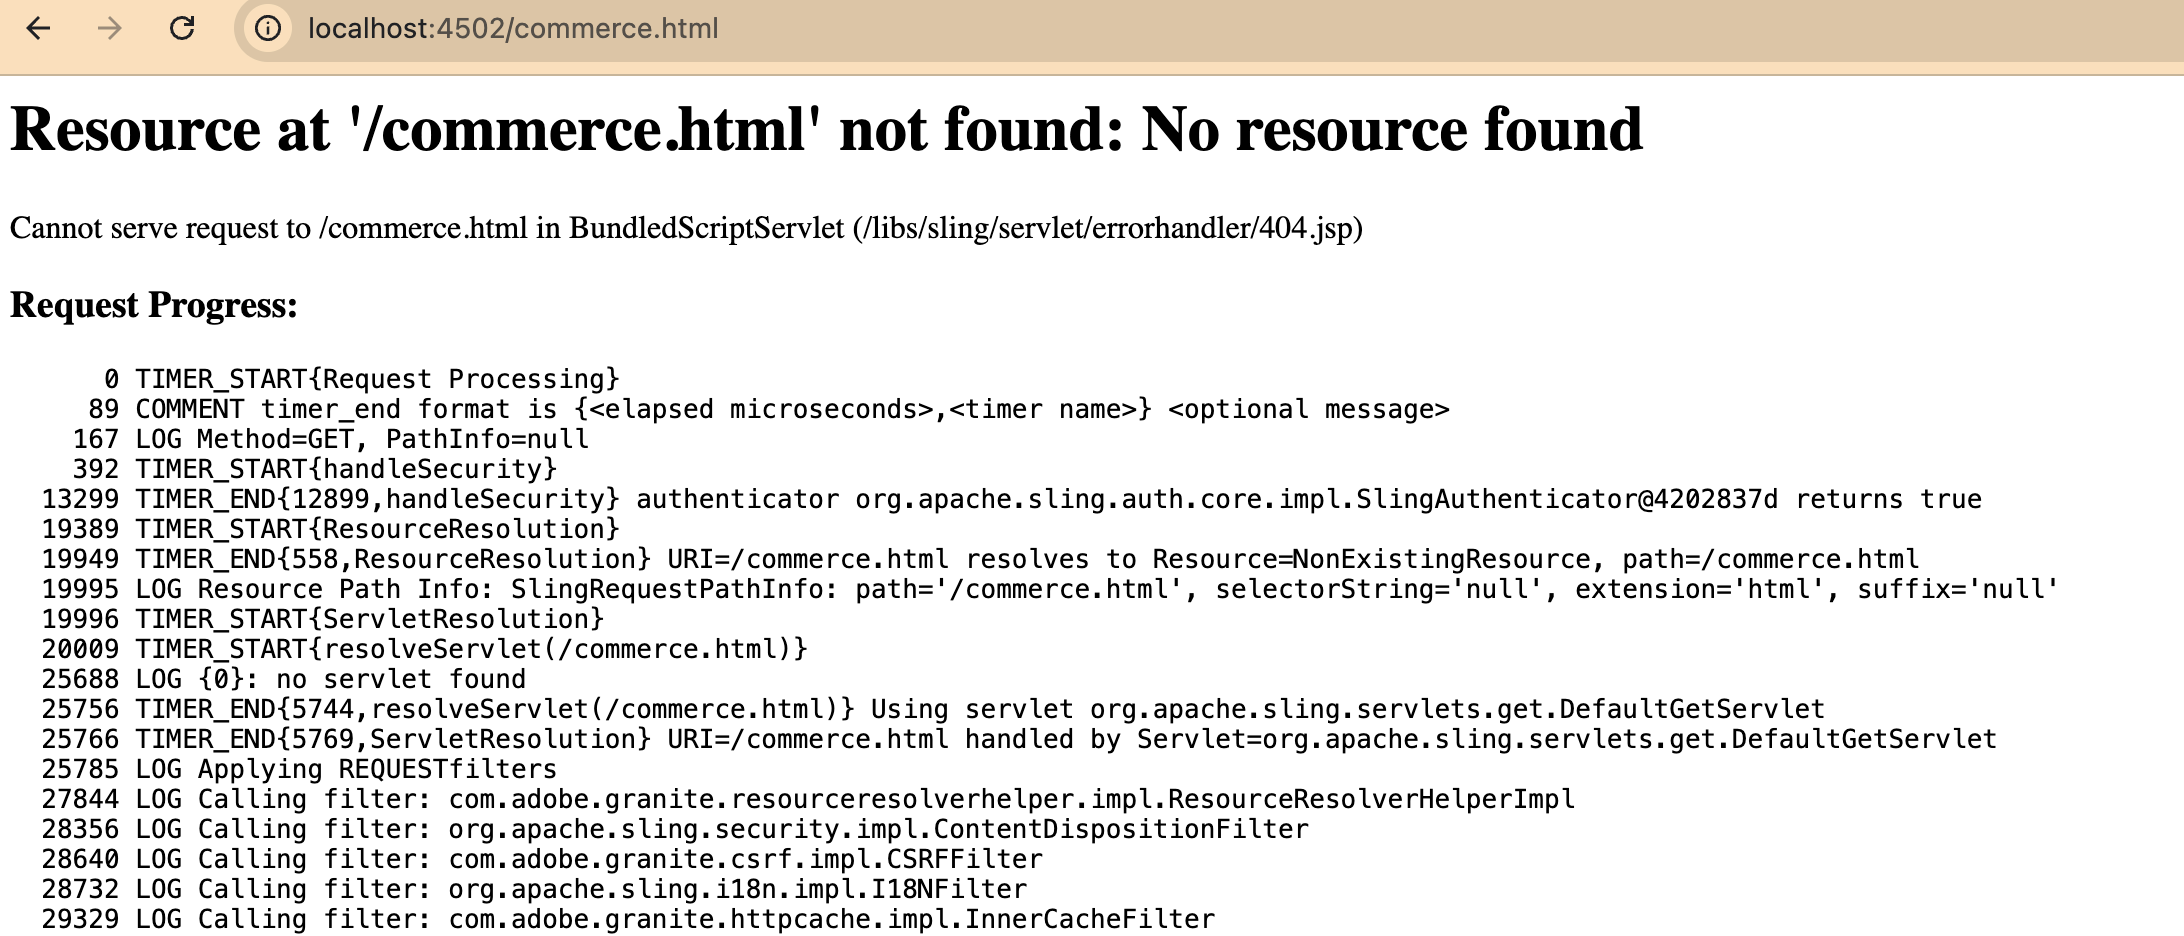
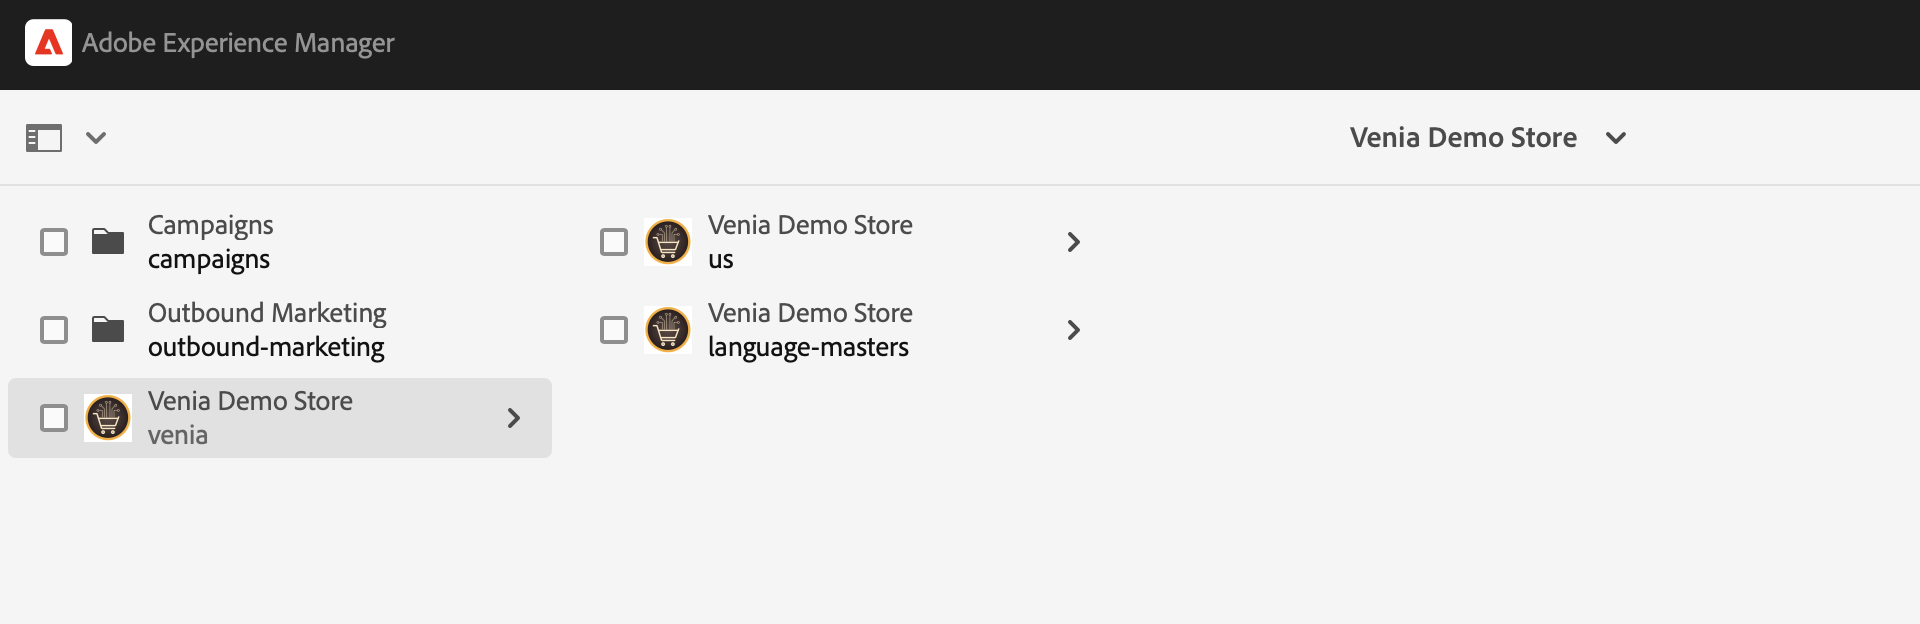
After installing the Venia Reference Site package, AEM creates the Venia Demo Store site structure. You can access it from the Sites console.
However, the Commerce console may still display the following message:
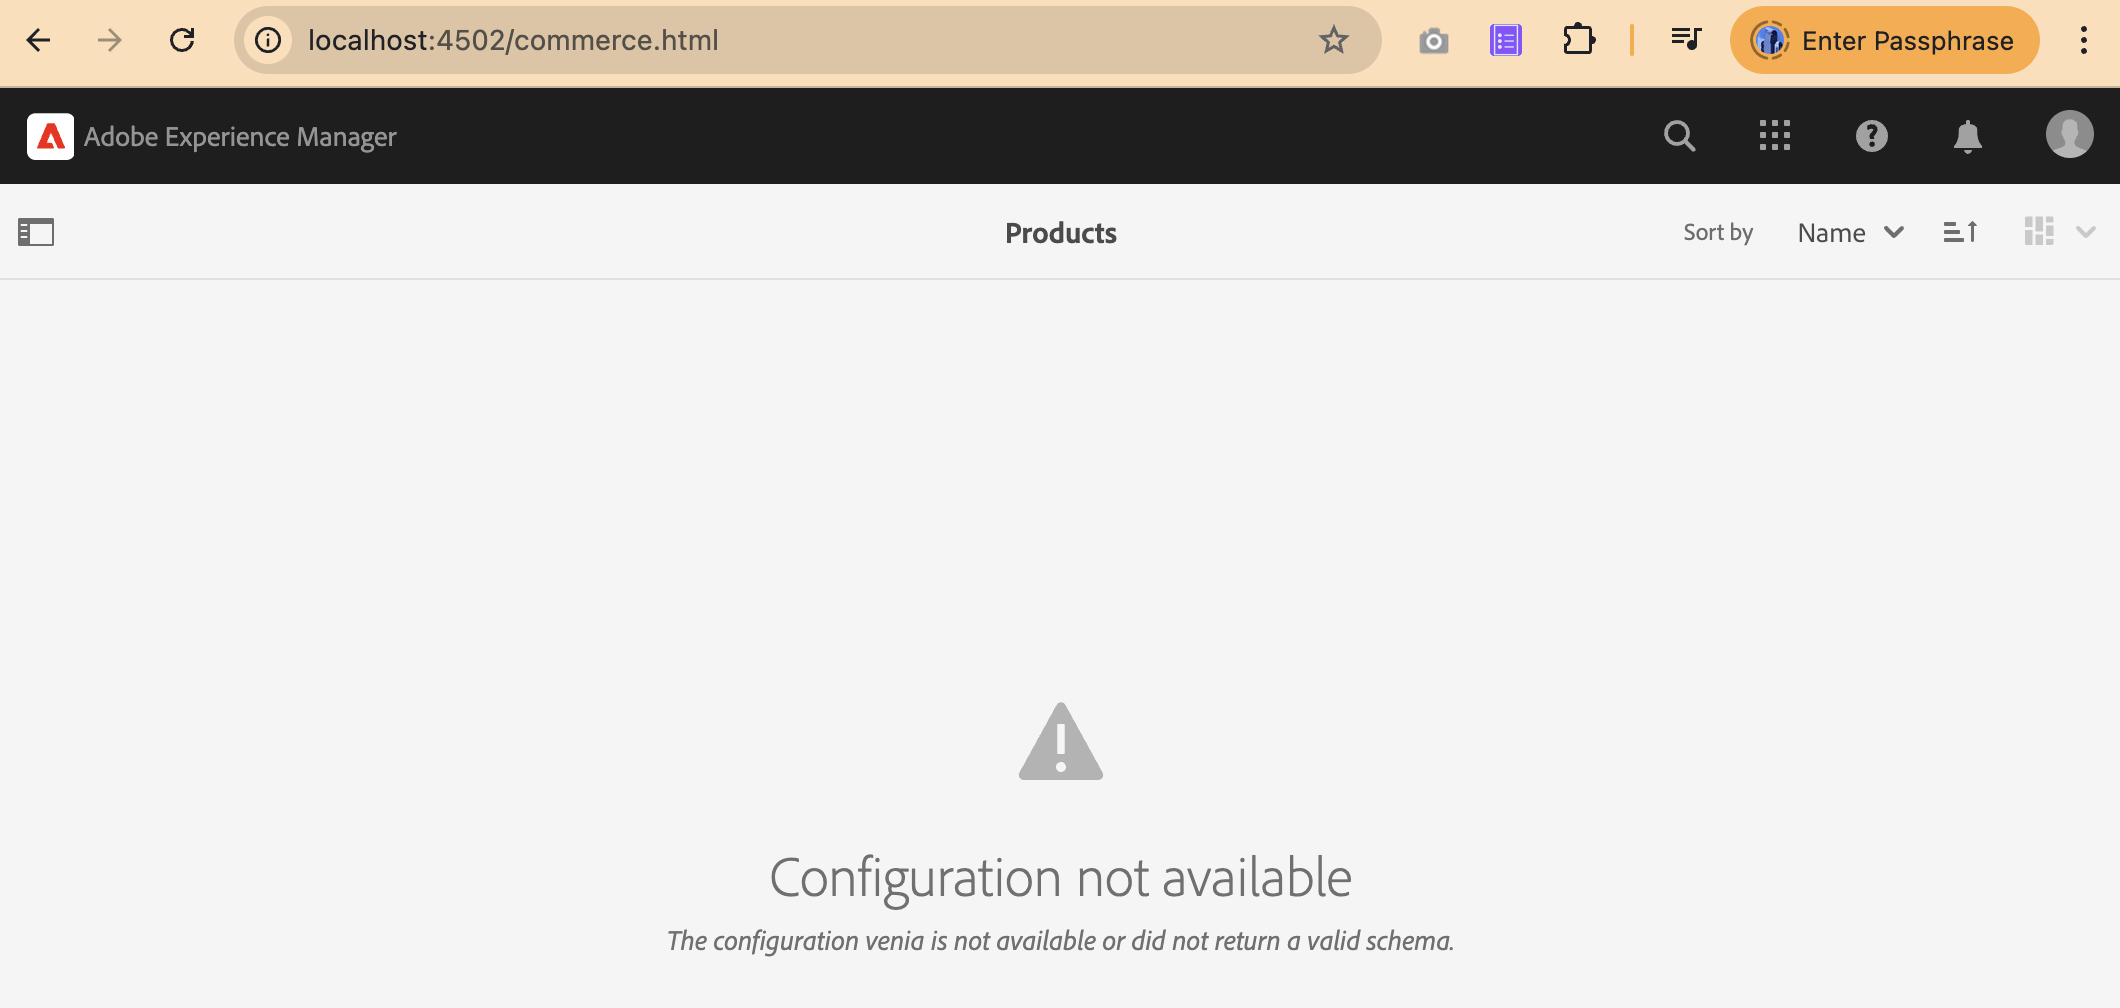
This message indicates that no CIF configuration is assigned to the Venia site.
CIF Add-on installs backend commerce services but does not automatically connect them to the storefront.
Next step: create and assign a CIF configuration.
Configure CIF for Your AEM Commerce Console
After verifying that the Venia storefront loads correctly, create a CIF configuration to connect the storefront to Adobe Commerce.
Commerce console requires the following configuration:
- Create a CIF configuration (GraphQL endpoint + store view)
- Assign the configuration to the Venia site
- Link the storefront to the Commerce console
Navigate to: Tools → Cloud Services → CIF Configurations.
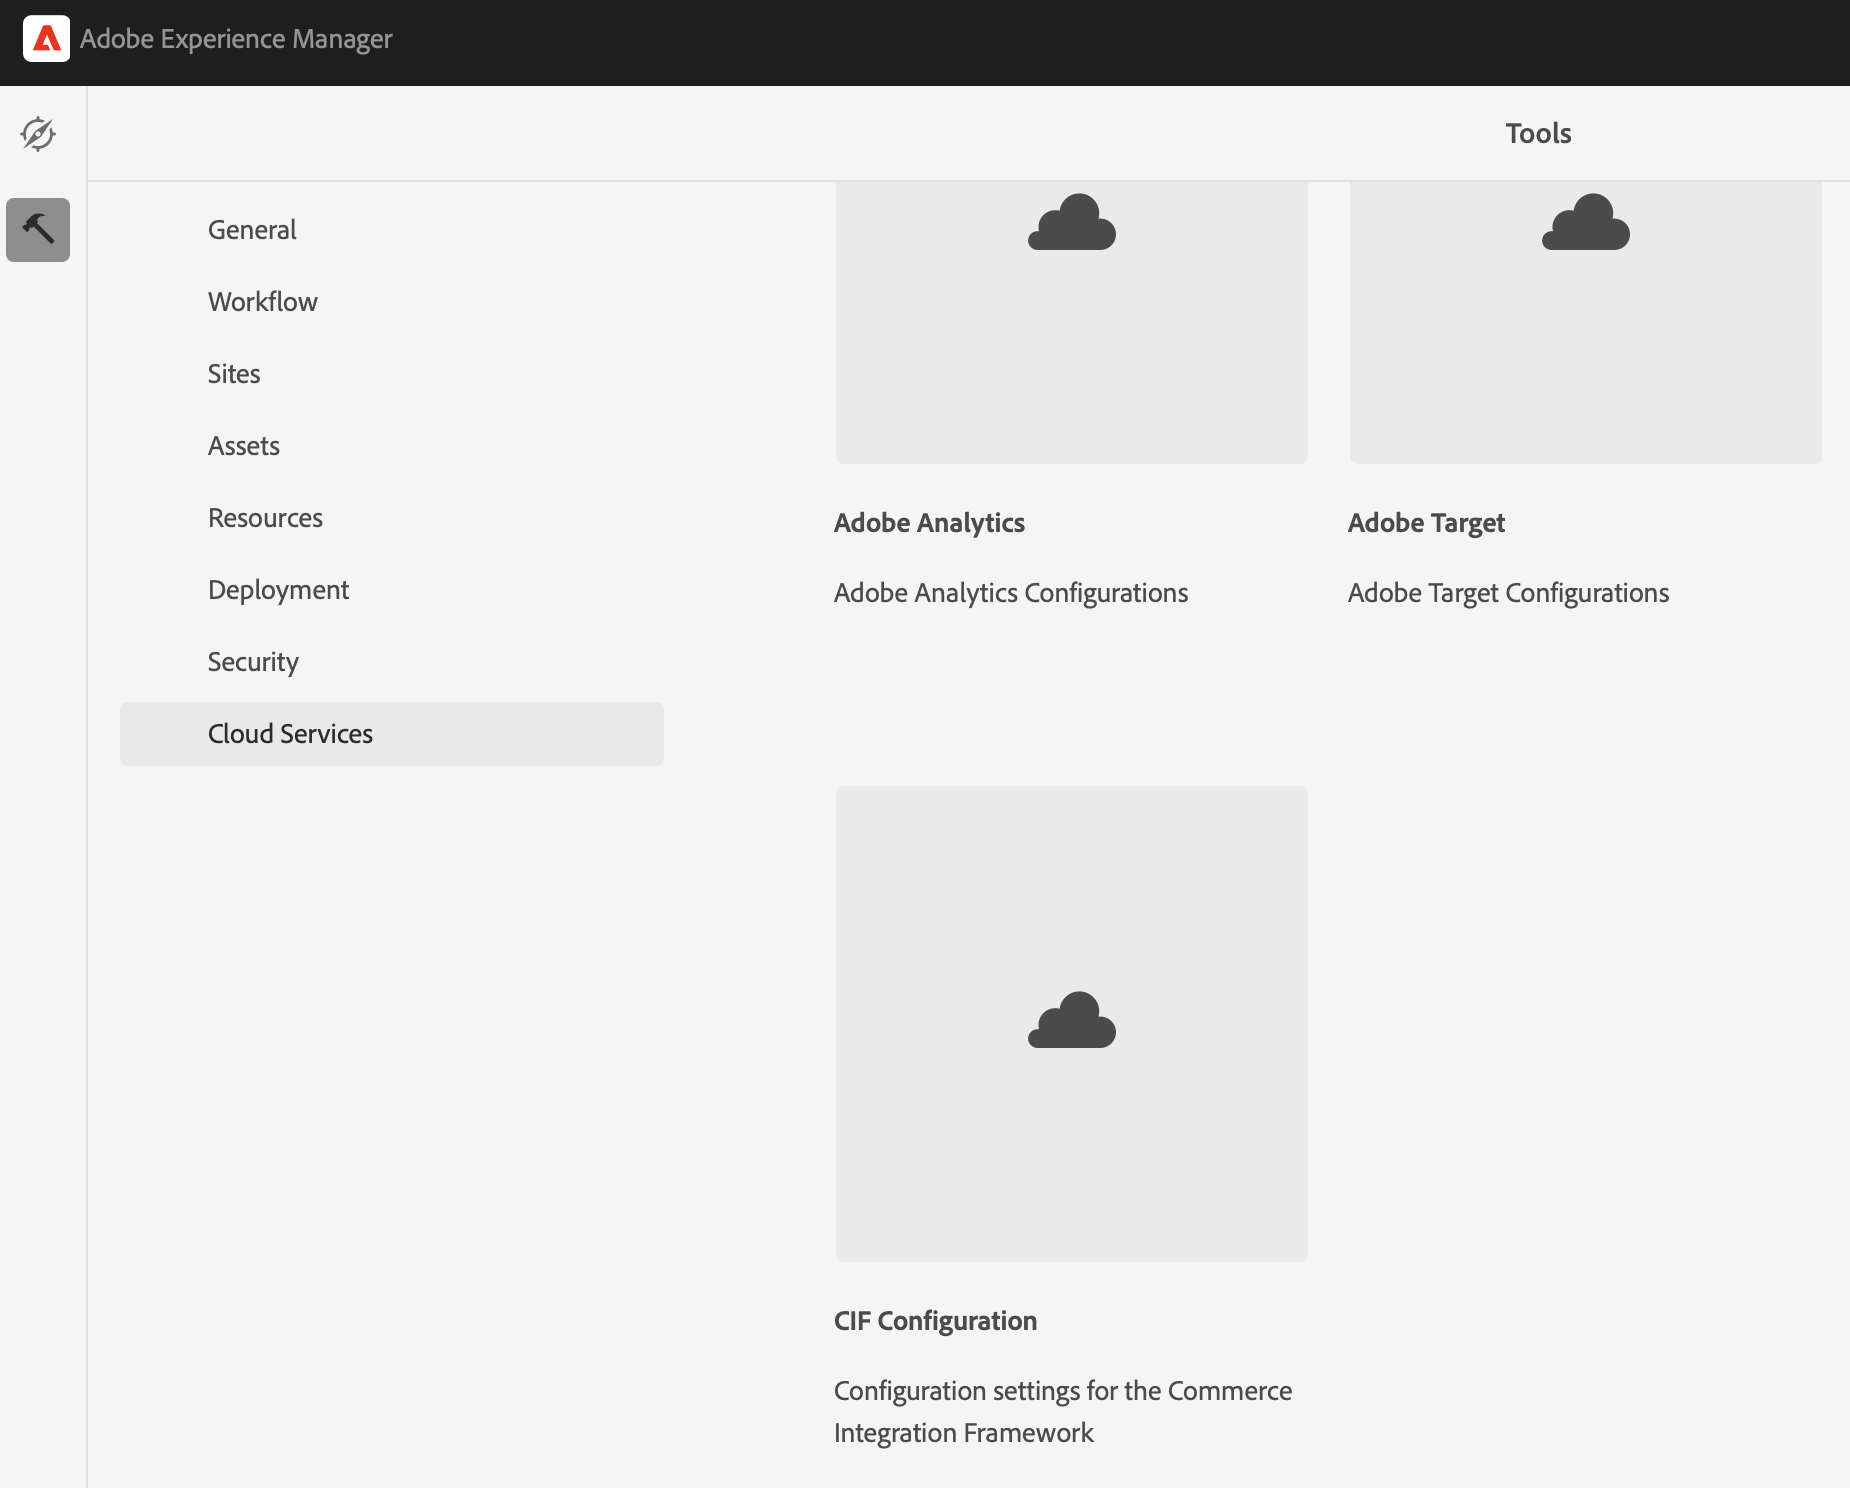
Configure the GraphQL endpoint used to connect AEM to Adobe Commerce.
Verify the Magento GraphQL endpoint response.
curl -X POST https://venia.magento.com/graphql \
  -H 'Content-Type: application/json' \
-d '{"query":"{ __schema { types { name } } }"}'A working endpoint returns a JSON response containing GraphQL schema types.
Open the Configuration Manager and search for: CIF GraphQL Client Configuration
Go to: http://localhost:4502/system/console/configMgr
Open the appropriate client (for example, venia) and enter the Adobe Commerce GraphQL endpoint and credentials.

Define the GraphQL connection used by the Venia storefront (for example, the venia client).
Configuration includes the following fields:
- GraphQL Service Identifier
- GraphQL Service URL
- Default HTTP Method
- SSL / HTTP options
- Timeout settings
Configuration defines the Adobe Commerce GraphQL endpoint.
Example endpoint (Adobe demo service):
https://venia.magento.com/graphqlSaved configuration provides the connection AEM uses to load:
- Products
- Categories
- Pricing data
- Store configuration
Update the configuration for this client created during Venia installation:
com.adobe.cq.commerce.graphql.client.impl.GraphqlClientImpl~veniaVenia storefront uses this client.
| Field | Value |
|---|---|
| GraphQL Service URL | https://venia.magento.com/graphql |
| Default HTTP Method | POST |
| Accept self-signed SSL certificates | Enable |
| Allow HTTP communication | Enable |

Link the Venia storefront to this GraphQL client through the CIF configuration.
Configuration defines the Magento endpoint, store view, and catalog root used by the Commerce console.
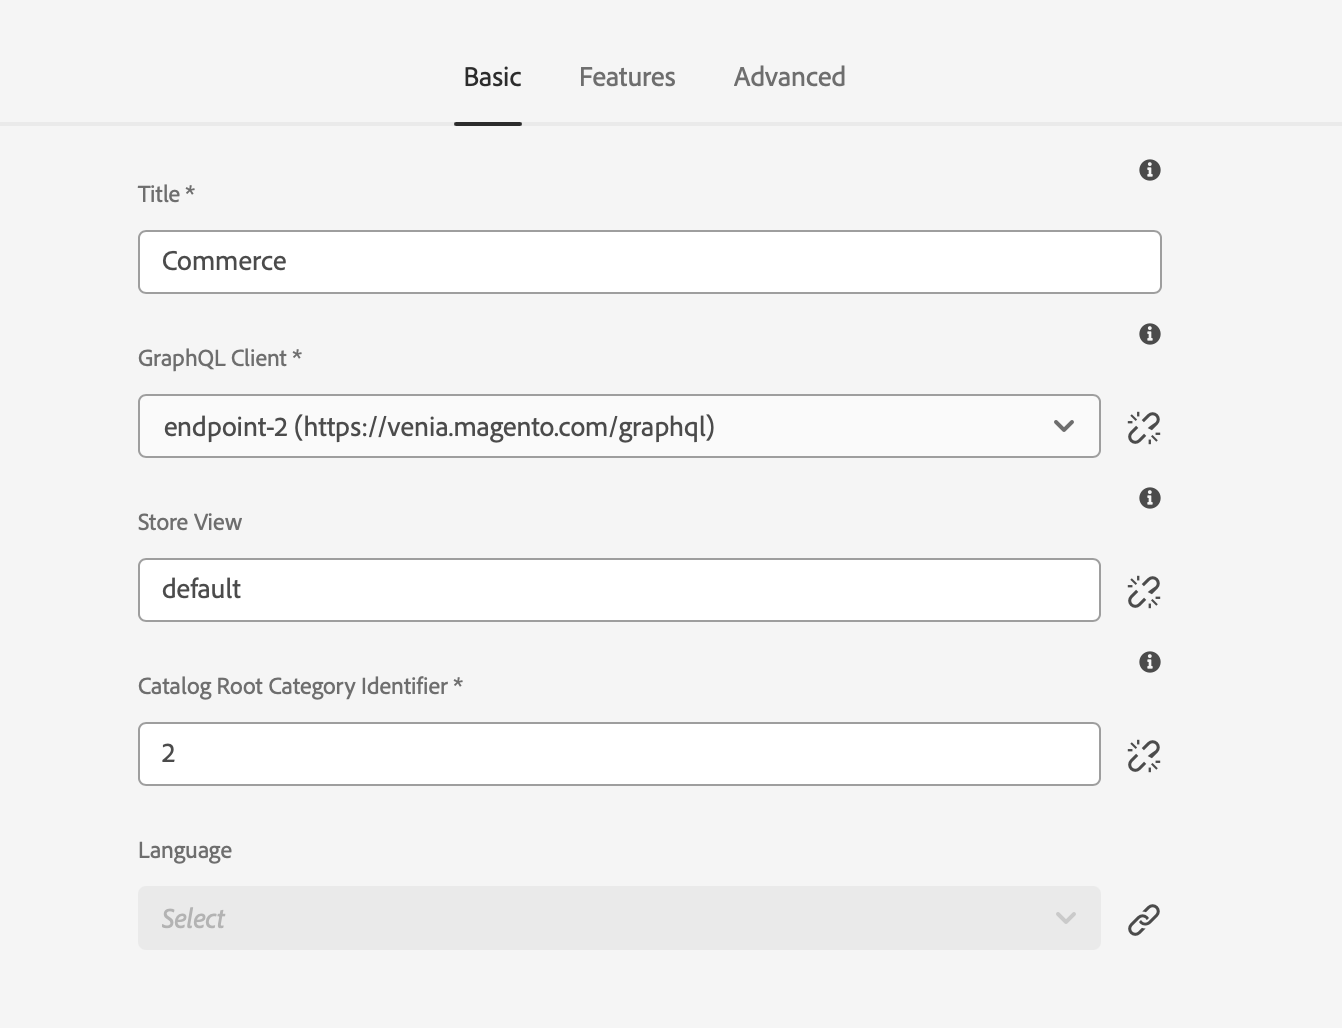
Set the GraphQL client, store view, and catalog root category ID.
Category Limit (Category/Product Picker) *: 10
GraphQL Proxy Path *: /api/graphqlNote: Click the chain icon to break inheritance and enter a different value if required.
Return to the Commerce console and open the Venia catalog.
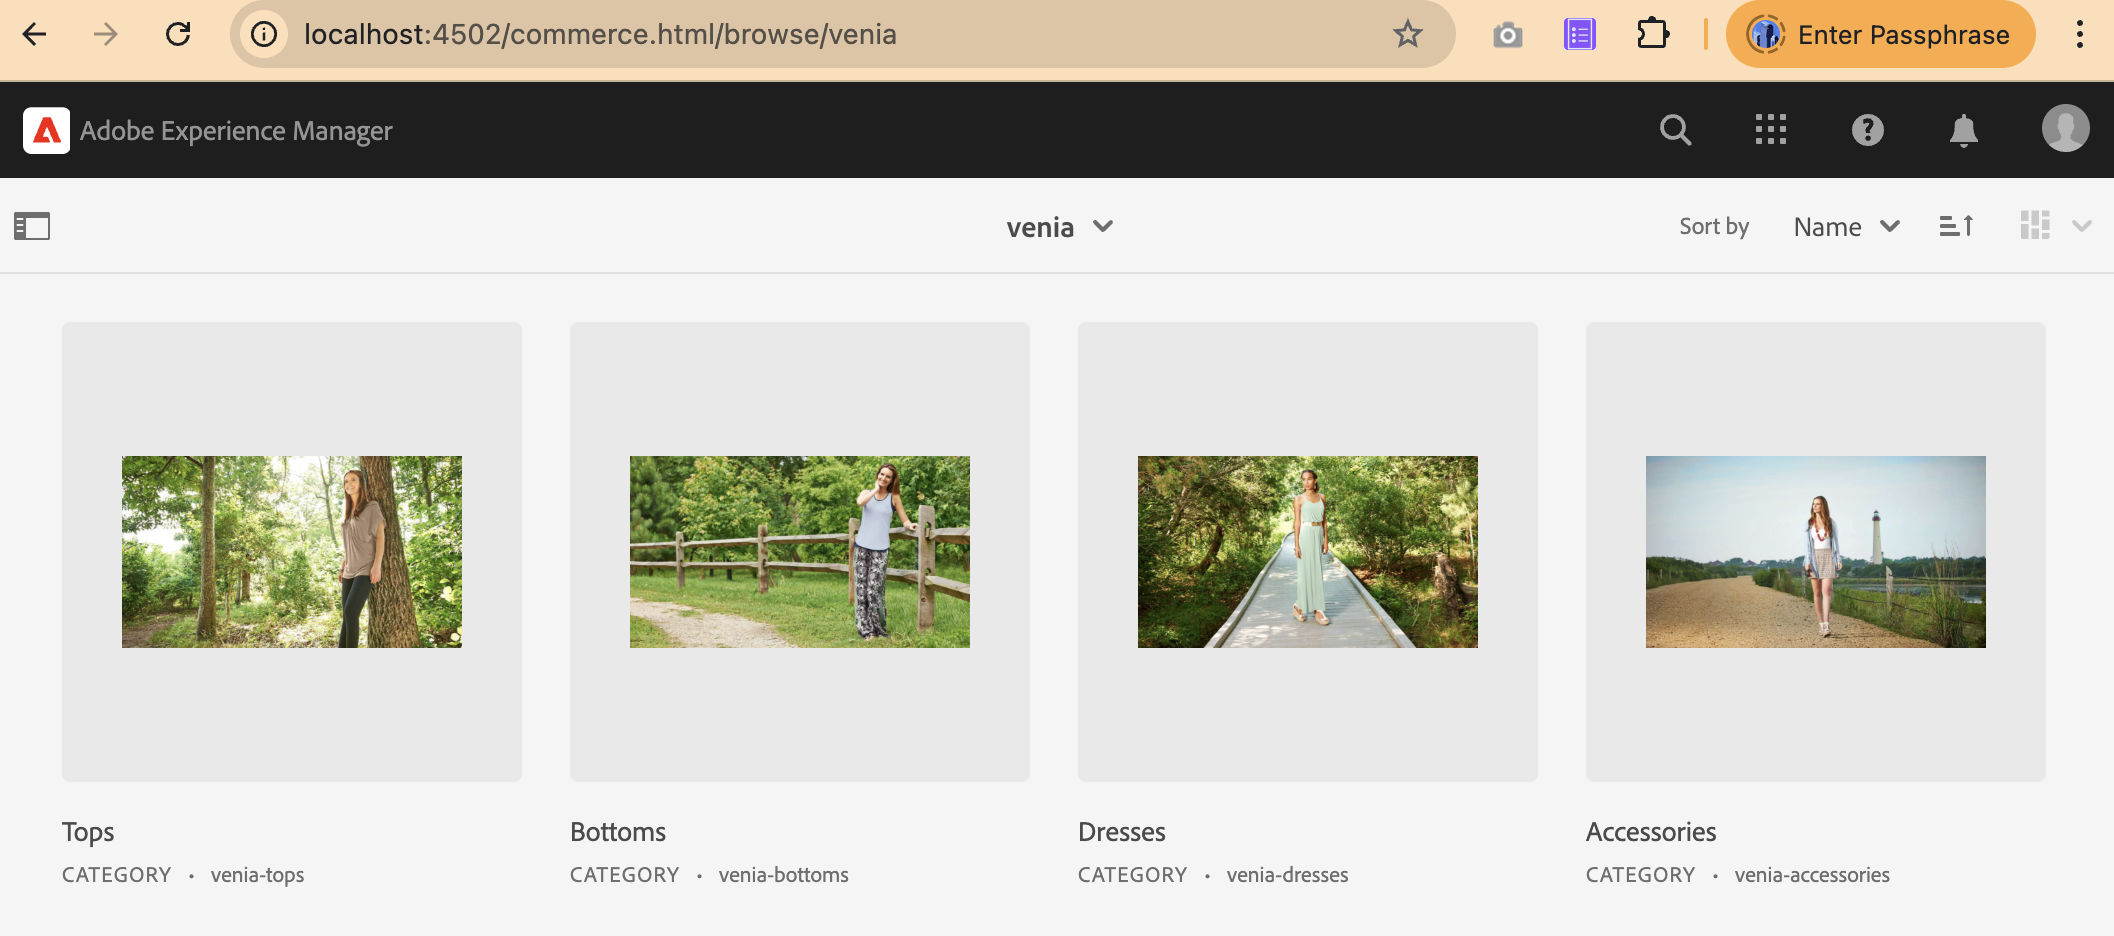
Product categories appearing in the console confirm the GraphQL configuration works.
Verify Venia Pages & Components Work With CIF
Confirm that all Venia commerce components are installed. Venia commerce components provide product functionality, including category pages, PDPs, carts, search, and account pages.
Commerce components are under:
/apps/venia/components/commerce
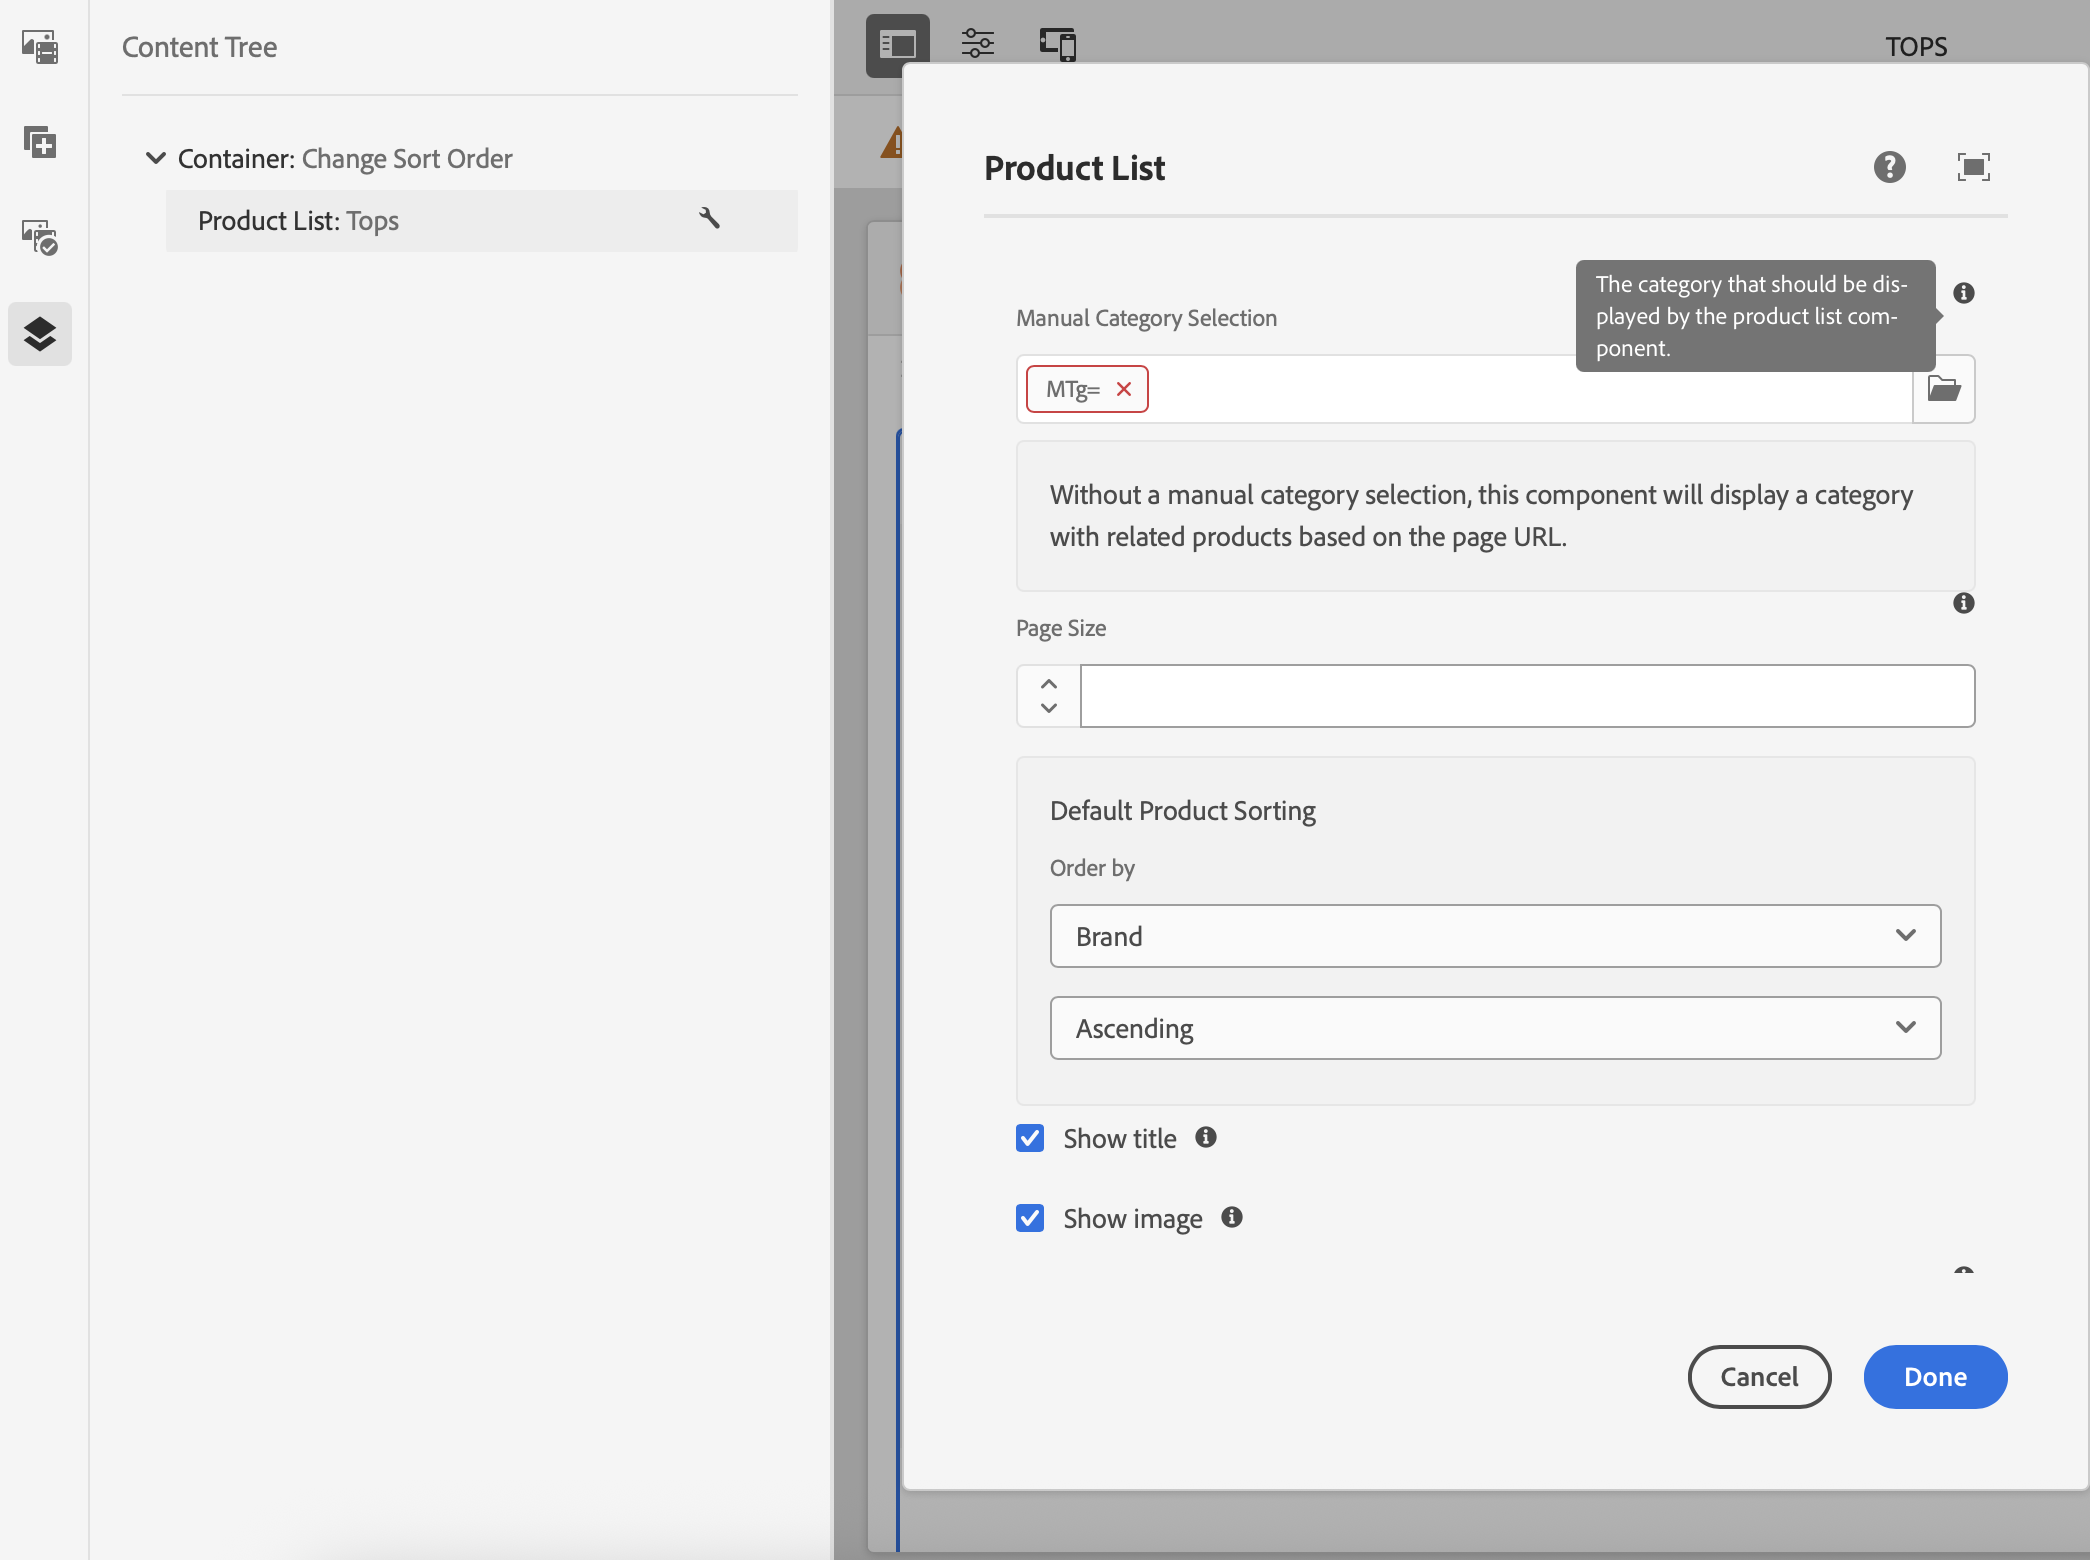
Open the Venia Category Page and check that product data loads through the configured GraphQL client.
👉 Open in Editor: http://localhost:4502/editor.html/content/venia/us/en/products/category-page.html
In the page editor, select the Product List component.
Build the Venia project directly instead of using the packaged Venia ZIP.
Clone the repository:
🔗 GitHub: https://github.com/adobe/aem-cif-guides-venia
Build and install the package in the local AEM instance:
mvn clean install -PautoInstallSinglePackage
Expected result:
- Venia components are installed
- Category Page loads without errors
- Product List component loads Magento categories
- Components render actual product data from your GraphQL endpoint
Successful results confirm that the Venia storefront connects to Adobe Commerce through CIF.
The storefront is ready for customization or new product pages.
Wrapping up
In this guide, you completed the following steps:
- Set up a local AEM SDK development environment
- Installed the CIF Add-on to enable Adobe Commerce integration
- Deployed the Venia reference storefront
- Verified that required CIF and Commerce OSGi bundles were active
- Configured the GraphQL client connection for Adobe Commerce
- Linked the Venia storefront to the CIF configuration
- Confirmed that product categories and catalog data load in the Commerce console
With these steps complete, AEM now retrieves product data from Adobe Commerce through the Commerce Integration Framework (CIF).
Your environment is ready for custom storefront development using CIF components and GraphQL APIs.
What’s Next
With CIF fully integrated and Venia loading real Magento data, you are ready to build your own AEM Commerce site from scratch — without depending on the Venia reference project.
In the next guide, you will learn how to create a clean, production-ready AEM Commerce setup using CIF core components but not Venia’s templates or site structure.
You will:
- Generate a new AEM project using the CIF Archetype
- Create your own site structure, templates, and commerce pages
- Connect to either the Venia demo GraphQL endpoint or your own Commerce instance
- Test product and category queries independently
- Build minimal PLP, PDP, and navigation using CIF core APIs
The next article continues from here and shows how to build your own commerce foundation using the same CIF and GraphQL setup you configured.