Designing Voice Call OTP for Cognito via Custom Auth Flow
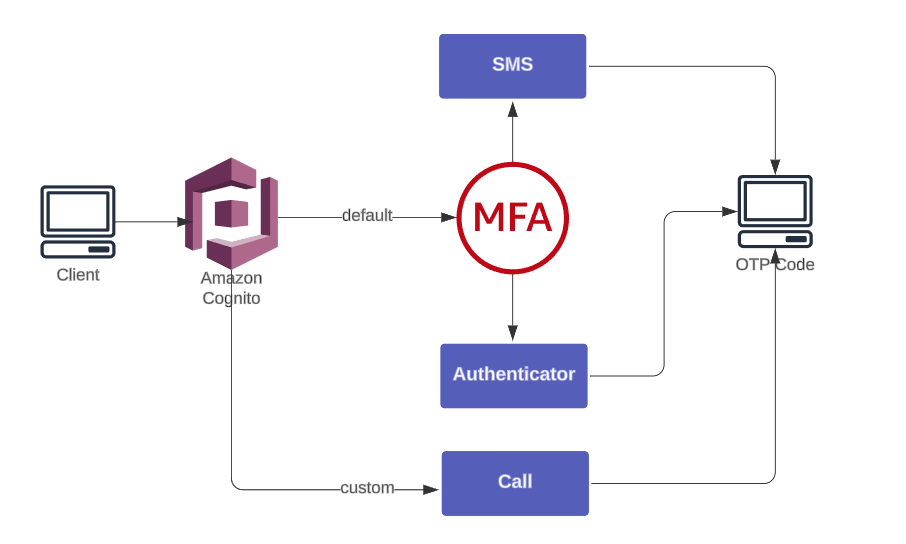
Amazon Cognito supports MFA through SMS and Authenticator Apps but excludes voice calls, creating gap that requires custom flow.
To add phone-call OTP delivery without third-party vendors, we use:
- Amazon Connect → place automated outbound calls
- AWS Lambda → generate OTP + invoke Connect
- Cognito Custom Auth Flow → verify OTP
This guide walks through complete AWS-native voice OTP flow from setup to verification.
Setting up outbound voice flows with Amazon Connect
Before building voice flow, confirm Amazon Connect availability for account. If Connect is not available, open a Support ticket to request activation.
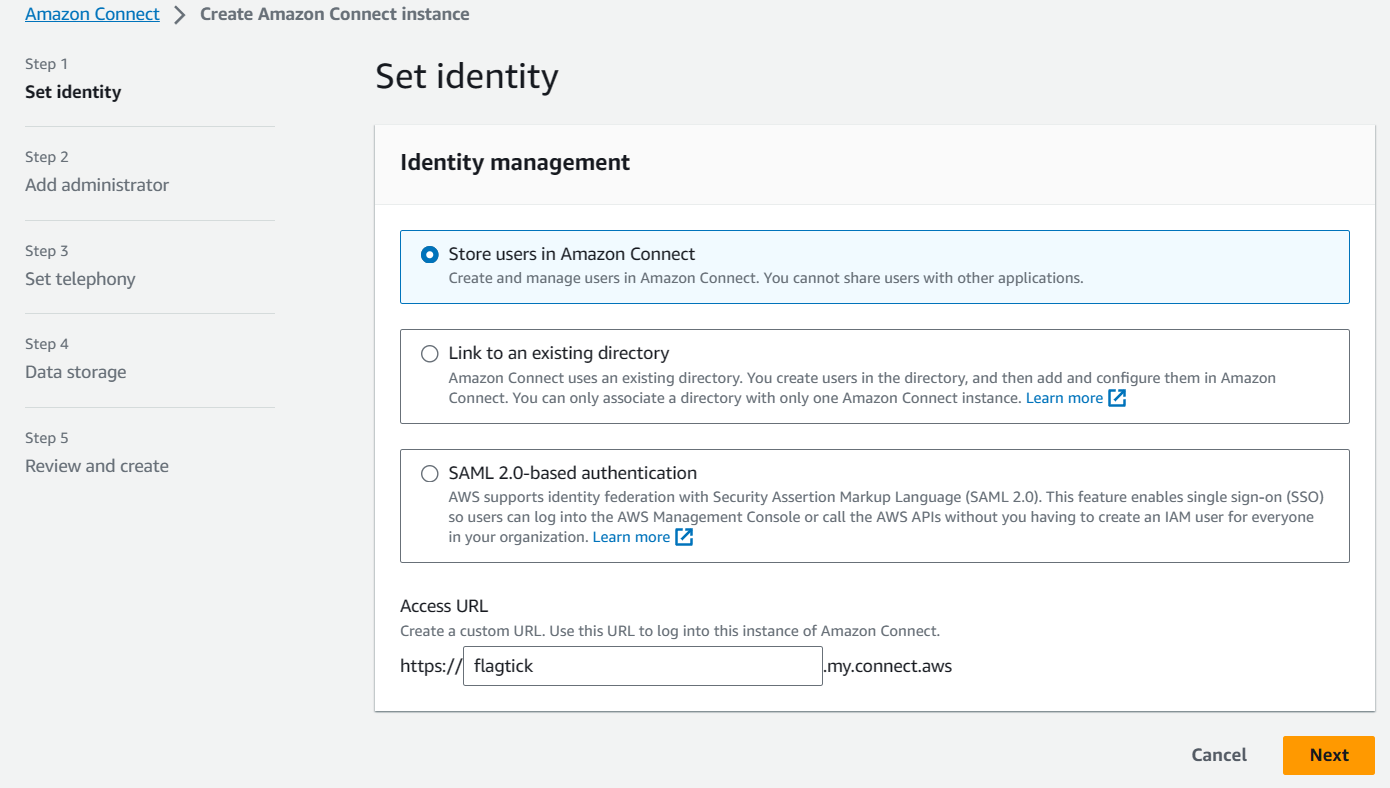
Setup begins with Amazon Connect instance creation, which hosts outbound voice flow.
- Choose Store users in Amazon Connect.
- Provide a custom URL (optional).
- Add at least one administrator.
Amazon Connect setup screen appears as shown below.
During instance wizard, Step 2 requires assigning administrator access.

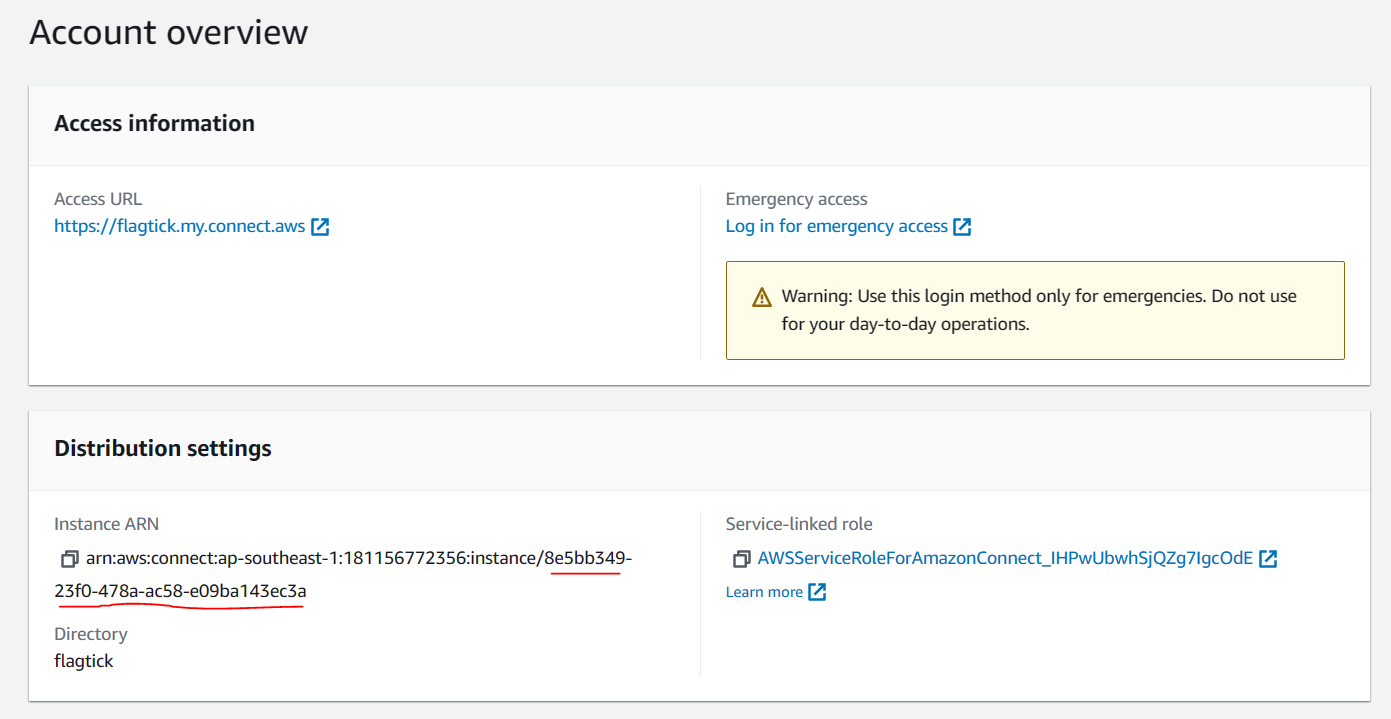
After instance creation completes, collect identifiers required for Lambda and Connect integration:
- Instance ID
- Contact Flow ID
- Claimed (source) phone number
- User phone number (destination)
These identifiers map directly to parameters used when invoking outbound calls via CLI or SDK.
Example CLI reference:
start-outbound-voice-contact
[--name <value>]
[--description <value>]
[--references <value>]
[--related-contact-id <value>]
--destination-phone-number <value>
--contact-flow-id <value>
--instance-id <value>
[--client-token <value>]
[--source-phone-number <value>]
[--queue-id <value>]
[--attributes <value>]
[--answer-machine-detection-config <value>]
[--campaign-id <value>]
[--traffic-type <value>]
[--cli-input-json <value>]
[--generate-cli-skeleton <value>]
[--debug]
[--endpoint-url <value>]
[--no-verify-ssl]
[--no-paginate]
[--output <value>]
[--query <value>]
[--profile <value>]
[--region <value>]
[--version <value>]
[--color <value>]
[--no-sign-request]
[--ca-bundle <value>]
[--cli-read-timeout <value>]
[--cli-connect-timeout <value>]AWS docs: https://docs.aws.amazon.com/cli/latest/reference/connect/start-outbound-voice-contact.html
If instance was created without administrator assignment, emergency login may be required.
https://flagtick.my.connect.aws/home
Example contact flow ID from screenshot:
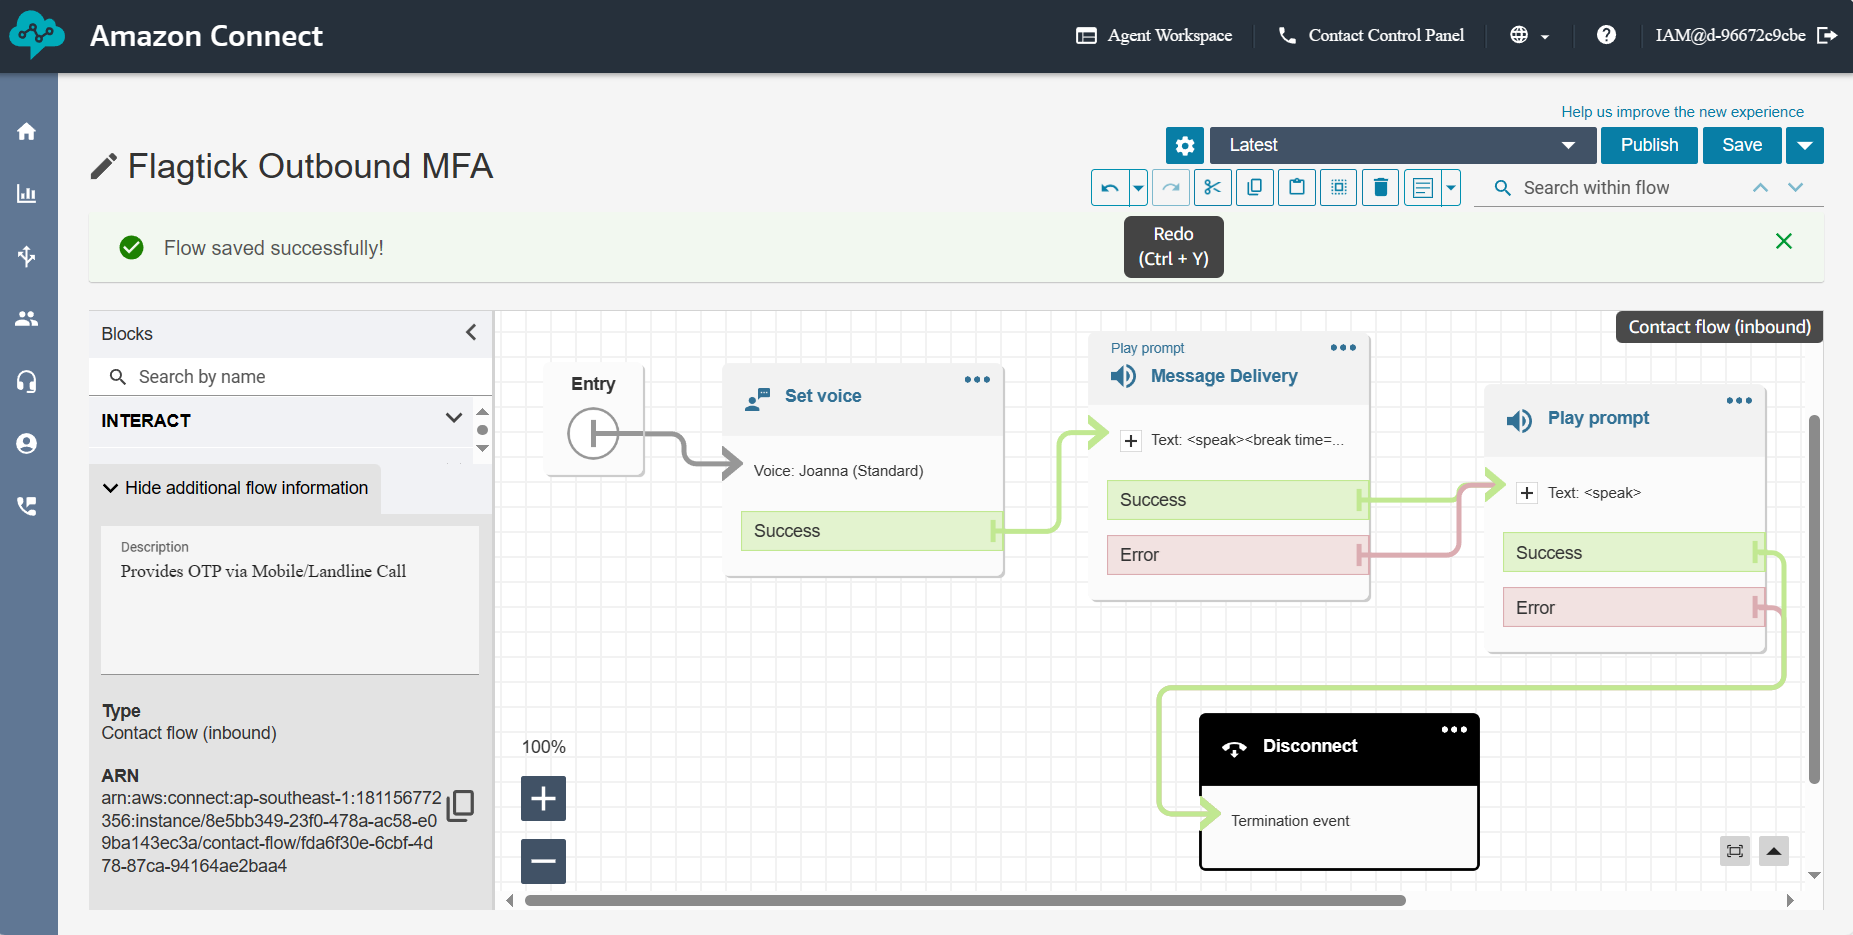
fda6f30e-6cbf-4d78-87ca-94164ae2baa4With required identifiers prepared, proceed to outbound voice contact flow creation.
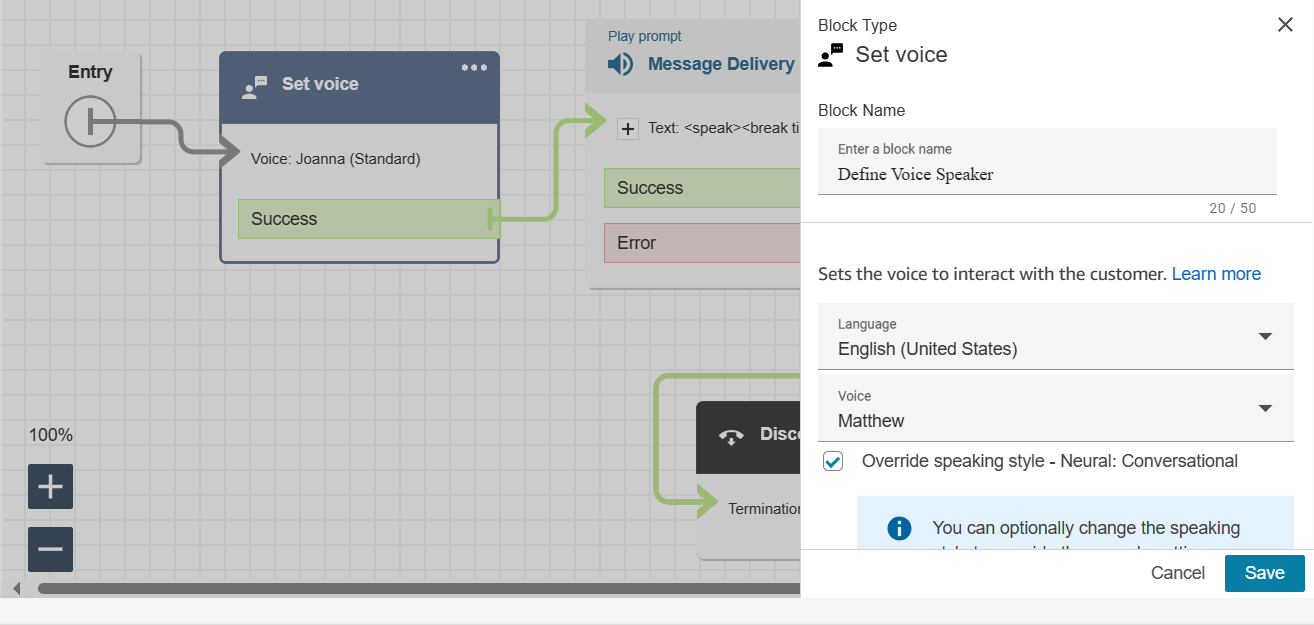
Set Voice — choose voice + language
Message Delivery — supports SSML for natural speech tuning

Play Prompt — reads OTP from Lambda attribute
$.Attributes.VoiceMFA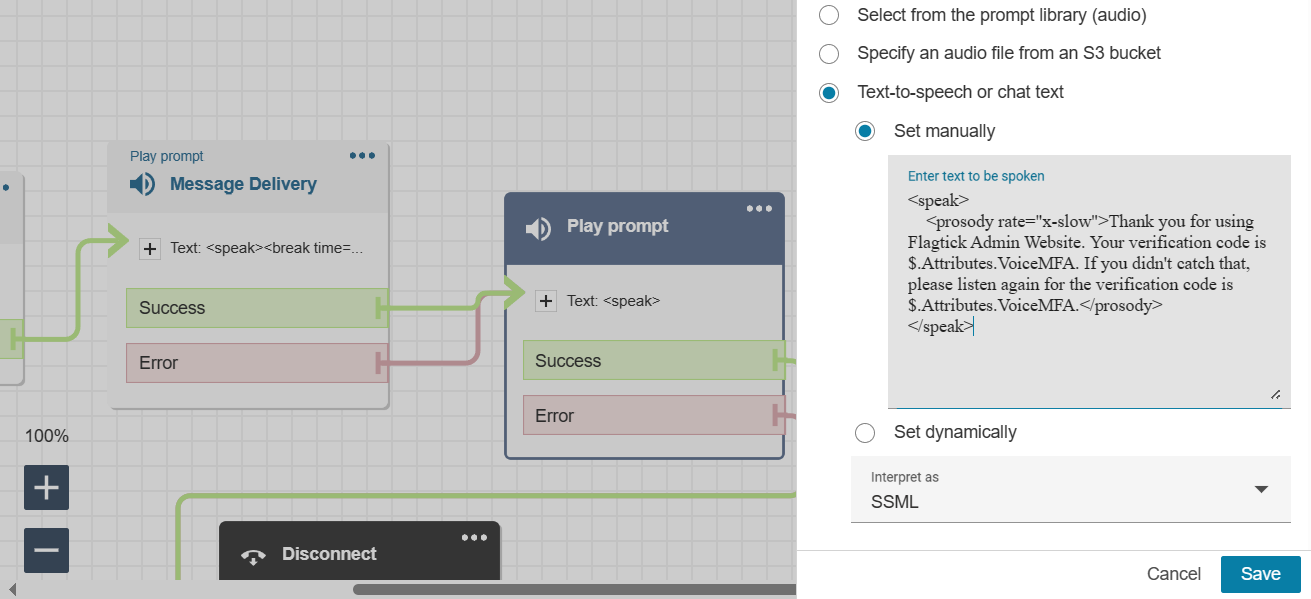
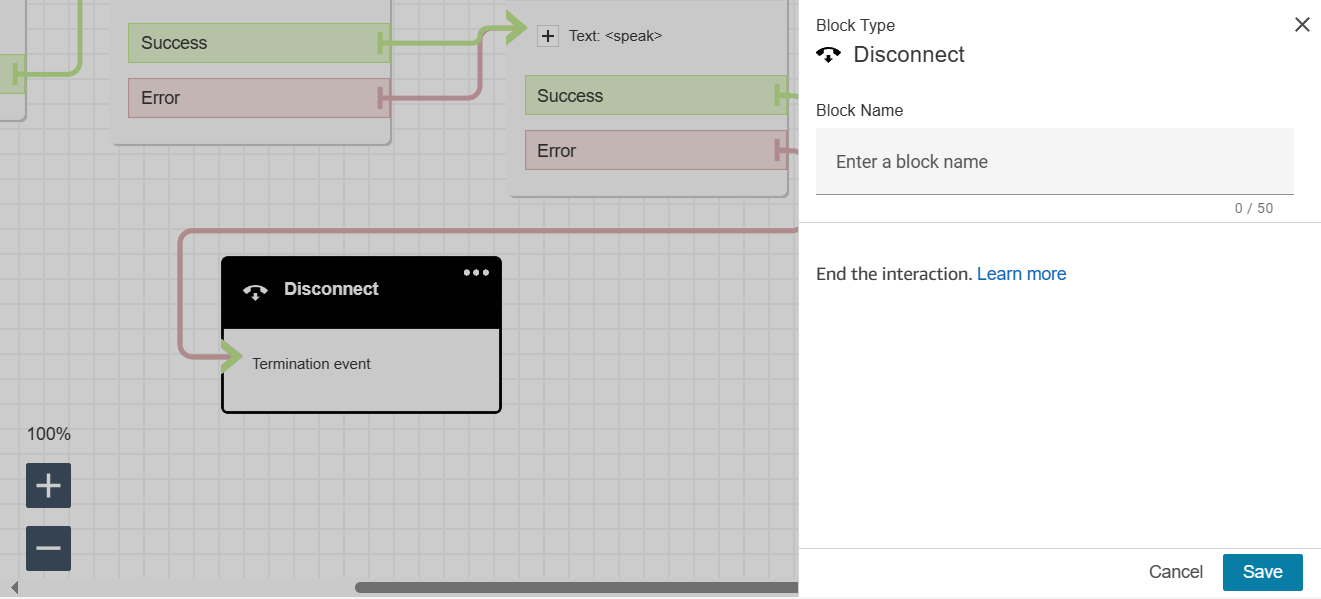
Disconnect — end the call
After contact flow creation, assign phone number used as outbound caller ID.
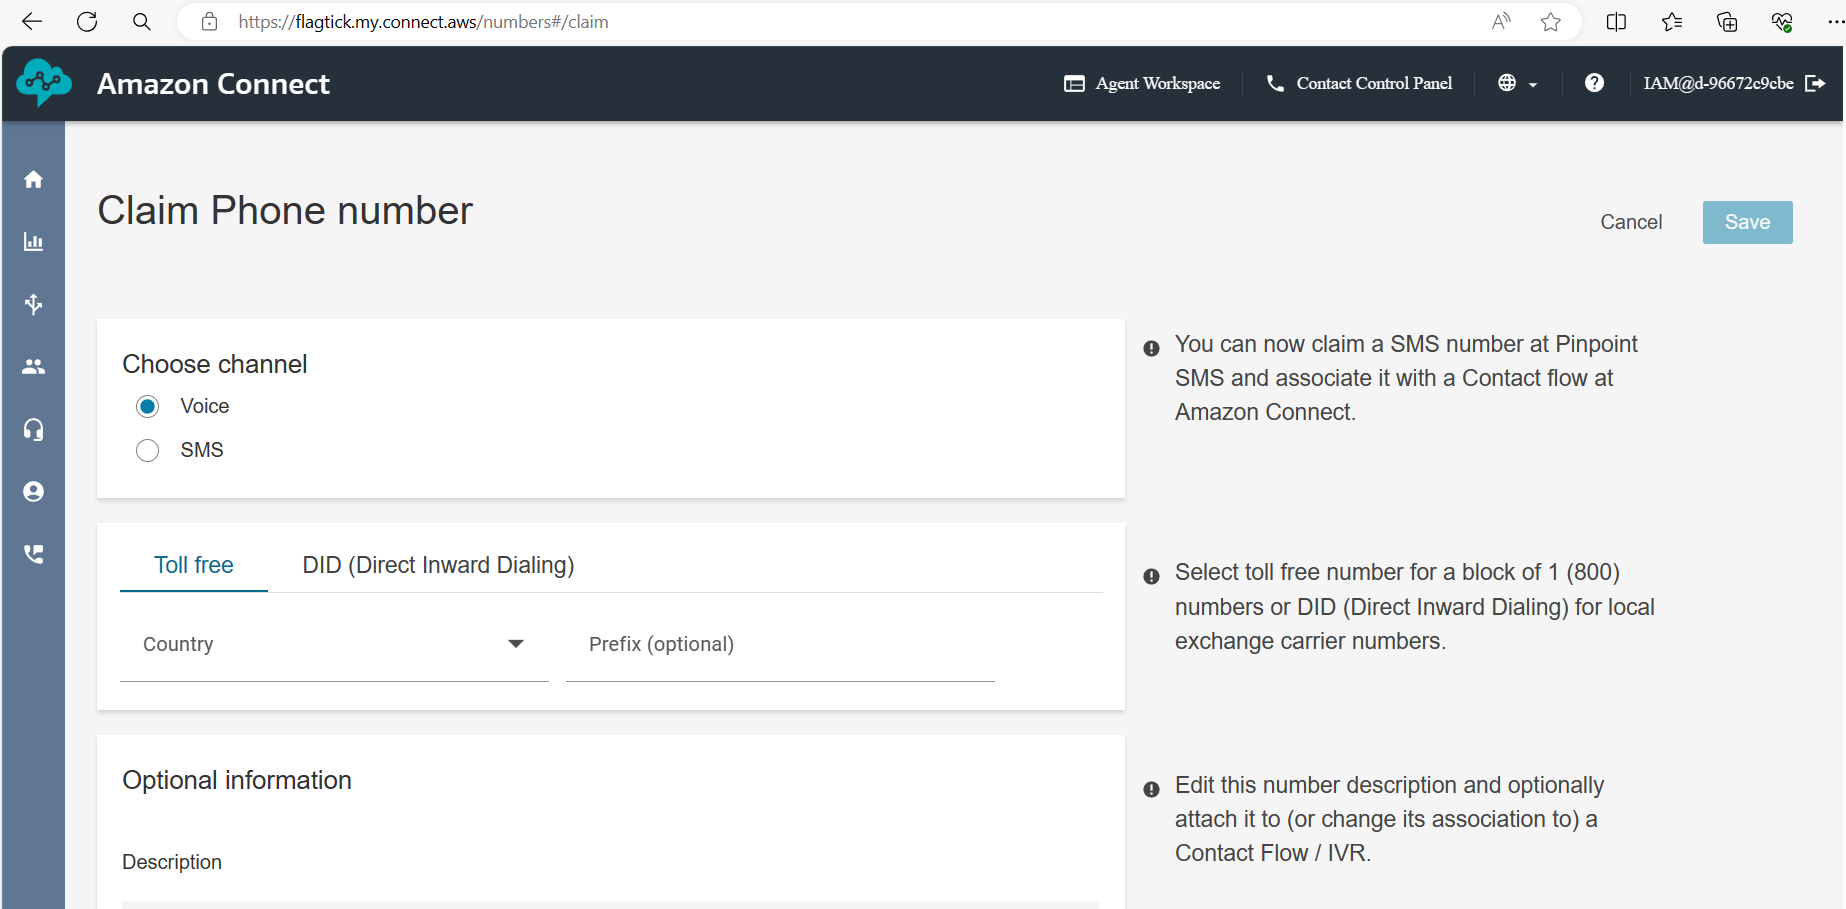
Use this number as:
SourcePhoneNumberAWS Lambda functions with Amazon Connect
With outbound call path defined, Amazon Connect handles call delivery while OTP generation stays in Lambda.
Next part focuses on IAM internals behind ALambda integrates with:
- API Gateway
- Cognito
- Amazon Connect SDK
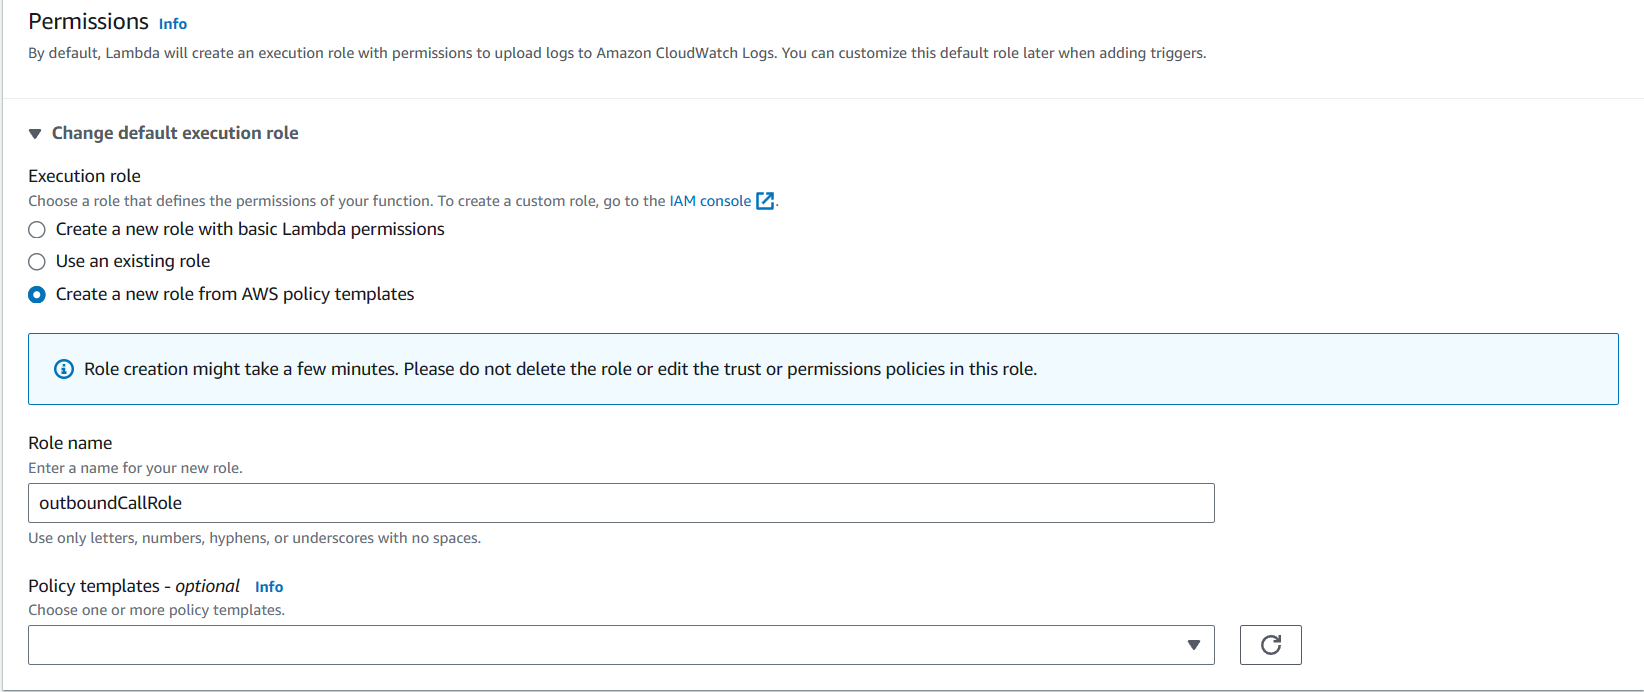
Create Lambda function outboundCallFunc to generate OTP and trigger outbound call.
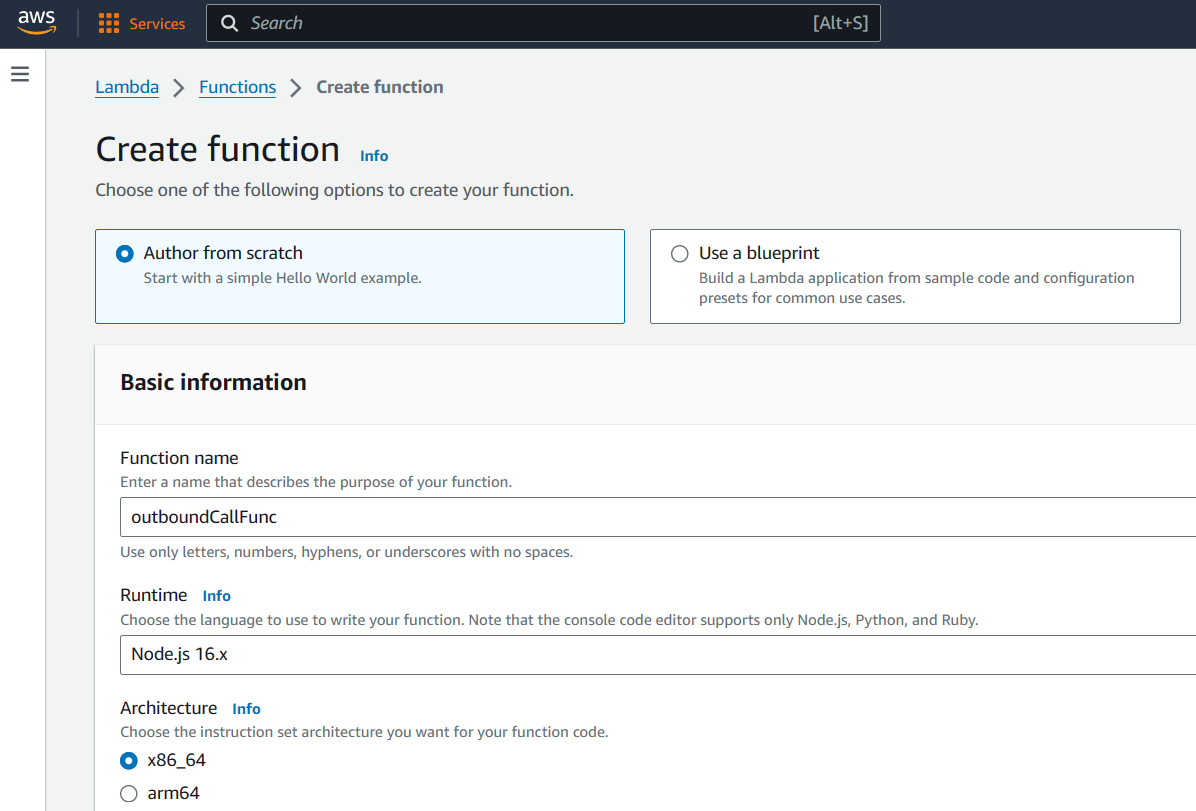
Assign an IAM execution role that allows Connect access.
After creation, note the ARN:
arn:aws:lambda:<region>:<AWS Account ID>:function:outboundCallFuncLambda Code (index.js)
const crypto = require('crypto');
const { outboundVoiceFunc } = require('./MFA.js');

exports.handler = async (event) => {
  const otp = crypto.randomInt(100000, 999999).toString();
  const spacedOtp = otp.split('').join(' ');

  await outboundVoiceFunc({
    phoneNumber: "+12139156465",
    contactFlowId: "fda6f30e-6cbf-4d78-87ca-94164ae2baa4",
    otpCodeStr: spacedOtp
  });

  return event;
};Lambda Code (MFA.js)
const AWS = require('aws-sdk');
AWS.config.update({ region: process.env.region });

const connect = new AWS.Connect();

async function outboundVoiceFunc({ phoneNumber, contactFlowId, otpCodeStr }) {
  const params = {
    DestinationPhoneNumber: phoneNumber,
    ContactFlowId: contactFlowId,
    InstanceId: '8e5bb349-23f0-478a-ac58-e09ba143ec3a',
    SourcePhoneNumber: '<claimed-phone>',
    Attributes: { VoiceMFA: otpCodeStr }
  };

  return connect.startOutboundVoiceContact(params).promise();
}

module.exports = { outboundVoiceFunc };Test Lambda
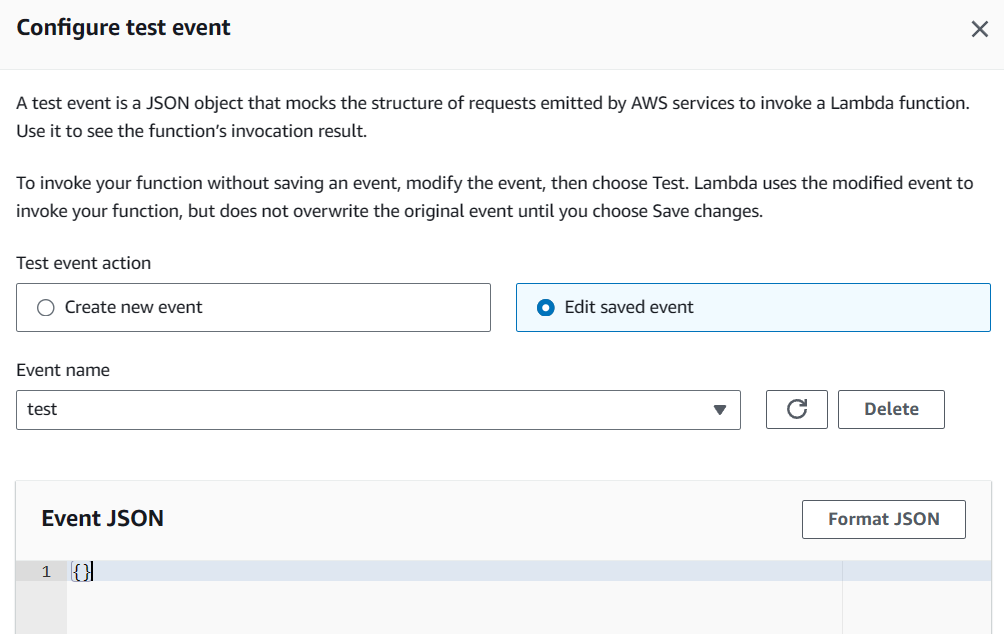
If execution role lacks required permission, Lambda fails with error:
AccessDeniedException: User is not authorized to perform connect:StartOutboundVoiceContactThis error points directly to IAM permission misconfiguration. With Lambda logic defined, deployment proceeds through AWS CLI.
Reference: http://shiftsaas.com/amazon-connect/set-up-iam-policies-for-lambda-using-amazon-connect/
Deploying Lambda Using AWS CLI
Set IAM credentials:
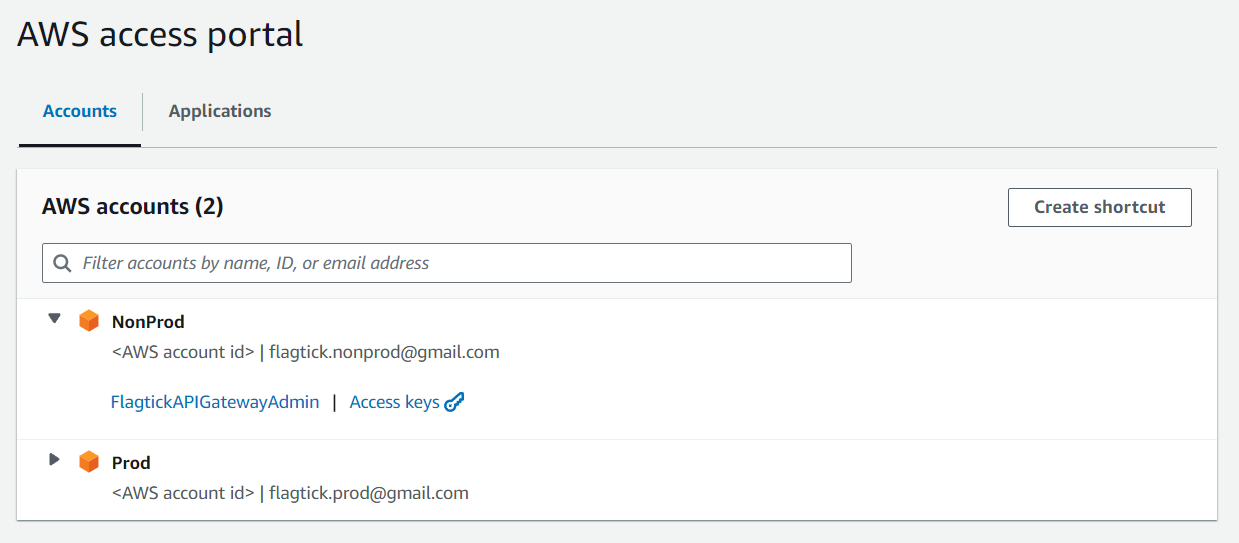
Once access keys are generated in the AWS Access Portal, they need to be set locally as environment variables.
SET AWS_ACCESS_KEY_ID=<Access Key>
SET AWS_SECRET_ACCESS_KEY=<Secret Key>
SET AWS_SESSION_TOKEN=<Session Token>Install & verify:
# install per AWS docs
aws --version
aws configureIAM policy (policy.json):
{
  "Version": "2012-10-17",
  "Statement": [
    {
      "Sid": "Statement2",
      "Effect": "Allow",
      "Action": ["connect:StartOutboundVoiceContact"],
      "Resource": "arn:aws:lambda:ap-southeast-1:<AWS Account ID>:function:outboundCallFunc"
    }
  ]
}Folder structure:
C:\Users\admin\Documents
├── policy.json
├── index.js
└── MFA.jsDeploy:
zip -r function.zip index.js MFA.js

aws lambda create-function \
  --function-name outboundCallFunc \
  --runtime nodejs16.x \
  --handler index.handler \
  --zip-file fileb://function.zip \
--role arn:aws:iam::<AccountID>:role/outboundCallRoleUpdate later:
aws lambda update-function-code \
--function-name outboundCallFunc \
--zip-file fileb://C:/Users/admin/Documents/function.zipIntegrating Voice OTP with Cognito Custom Authentication Flow

Install library:
npm i amazon-cognito-identity-jsClient-Side Cognito Code
import { AuthenticationDetails, CognitoUser, CognitoUserPool } from 'amazon-cognito-identity-js';

const poolData = {
  UserPoolId: 'your_pool_id',
  ClientId: 'your_client_id'
};
const userPool = new CognitoUserPool(poolData);

const user = new CognitoUser({ Username: 'username', Pool: userPool });
user.setAuthenticationFlowType('CUSTOM_AUTH');Authenticate:
const details = new AuthenticationDetails({
  Username: 'username',
  Password: 'password'
});

user.authenticateUser(details, {
  customChallenge: () => {},
  onSuccess: () => {},
  onFailure: () => {}
});On Cognito side, enable custom authentication triggers before executing client flow.
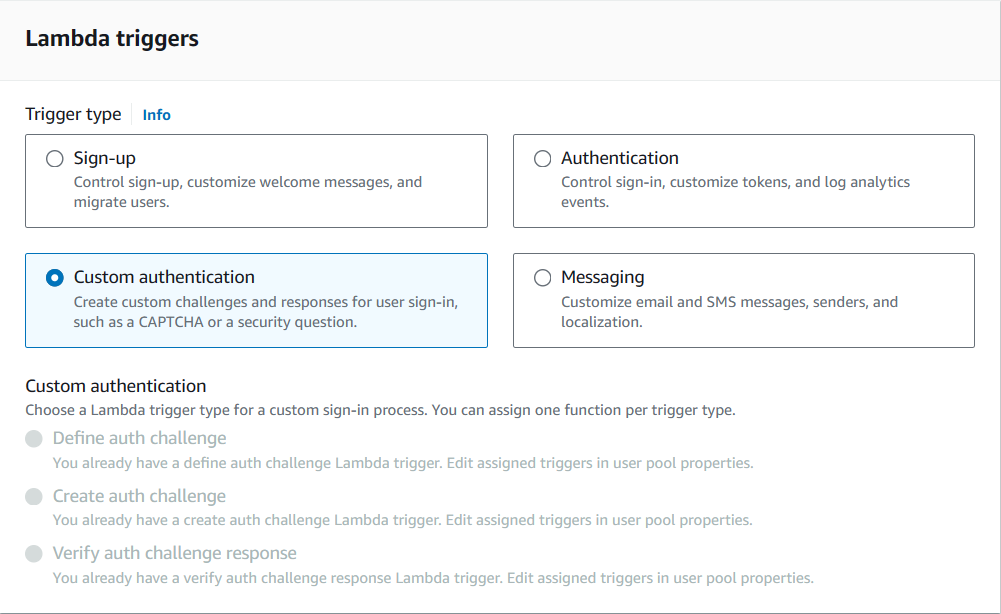
Start by implementing defineAuthChallenge, which decides the next step in the flow and enforces retry rules. Example:
// defineAuthChallenge/index.js
exports.handler = async (event, context) => {

  if (
      event.request.session &&
      event.request.session.length === 1 &&
      event.request.session[0].challengeName === 'SRP_A' &&
      event.request.session[0].challengeResult === true
    ) {
      event.response.issueTokens = false;
      event.response.failAuthentication = false;
      event.response.challengeName = 'PASSWORD_VERIFIER';
    } else if (
      event.request.session &&
      event.request.session.length === 2 &&
      event.request.session[1].challengeName === 'PASSWORD_VERIFIER' &&
      event.request.session[1].challengeResult === true
    ) {
      event.response.issueTokens = false;
      event.response.failAuthentication = false;
      event.response.challengeName = 'CUSTOM_CHALLENGE';
    } else if (
      event.request.session &&
      event.request.session.length >= 5 &&
      event.request.session.slice(-1)[0].challengeName === 'CUSTOM_CHALLENGE' &&
      event.request.session.slice(-1)[0].challengeResult === false
    ) {
      // User has made three unsuccessful attempts to enter the correct OTP
      event.response.issueTokens = false;
      event.response.failAuthentication = true;
    } else if (
      event.request.session &&
      event.request.session.length > 0 &&
      event.request.session.slice(-1)[0].challengeName === 'CUSTOM_CHALLENGE' &&
      event.request.session.slice(-1)[0].challengeResult === true
    ) {
      // User has successfully entered the correct OTP
      event.response.issueTokens = true;
      event.response.failAuthentication = false;
    } else {
      // User has not provided a correct answer yet
      event.response.issueTokens = false;
      event.response.failAuthentication = false;
      event.response.challengeName = 'CUSTOM_CHALLENGE';
    }
    return event;
};Notes:
- The first challenge (
SRP_A) is handled by Cognito;PASSWORD_VERIFIERfollows. - The code uses
session.lengthto track progress; >=5 logic handles repeated failed OTP attempts. - Ensure Cognito’s built-in MFA is disabled for this custom flow scenario (otherwise the flow may conflict).
Next, createAuthChallenge generates OTP and initiates outbound call.
// createAuthChallenge/index.js (Lambda)
const crypto = require('crypto');
const { outboundVoiceFunc } = require('./MFA.js');

exports.handler = async (event) => {
  let otpCode = '';
  let phoneNumber = event.request.userAttributes['custom:YourPhone'];

  try {
    if (event.request.session.length === 2) {
      optCode = crypto.randomInt(100000, 999999).toString();

      await startOutboundVoiceContact({
        phoneNumber: `${phoneNumber}`,
        contactFlowId: '<contact flow id>',
        optCode: optCode,
      });
    } else {
      // Reuse previous code for retries
      const previousChallenge = event.request.session.slice(-1)[0];
      optCode = previousChallenge.challengeMetadata ?? '';
    }

    const expireAt = Date.now() + (15*60_000);
    event.response.privateChallengeParameters = {
      optCode,
      expireAt: expireAt.toString(),
    };
    event.response.challengeMetadata = optCode;
  } catch (error) {
    event.response.issueTokens = false;
    event.response.failAuthentication = true;
  }
  return event;
};Since the main Lambda stays focused on authentication, the OTP and call logic are placed in a helper module, which you can see next.
// createAuthChallenge/MFA.js
const AWS = require('aws-sdk');
AWS.config.update({ region: process.env.region });
const connect = new AWS.Connect();

async function outboundVoiceFunc({ phoneNumber, optCode, contactFlowId }) {
  try {
    const otpCodeStr = optCode.toString().split('').join(' ');
    const connectParams = {
      DestinationPhoneNumber: phoneNumber,
      ContactFlowId: contactFlowId,
      InstanceId: '<instance id>',
      SourcePhoneNumber: '<source phone>',
      Attributes: { 'VoiceMFA': otpCodeStr }
    };
    return await connect.startOutboundVoiceContact(connectParams).promise();
  } catch (error) {
    throw error;
  }
}
module.exports = { outboundVoiceFunc };Final step verifies OTP response through verifyAuthChallenge.
// verifyAuthChallenge
exports.handler = async (event) => {

  const expireAt = event.request.privateChallengeParameters['expireAt'];
  if (expireAt) {
    if (Date.now() > +expireAt) {
      event.response.answerCorrect = false;
      return event;
    }
  }
  const expectedAnswer = event.request.privateChallengeParameters['optCode'];
  event.response.answerCorrect = event.request.challengeAnswer === expectedAnswer;
  return event;
};Wrapping Up
This article covered an AWS-native voice call OTP authentication flow for Amazon Cognito using Custom Authentication Flow, without third-party providers.
Key components used
- Amazon Connect — outbound voice call delivery
- AWS Lambda — OTP generation, formatting, orchestration
- Cognito Custom Auth Flow — OTP challenge and verification
What was implemented
- Amazon Connect setup: instance creation, contact flow design, SSML tuning, outbound caller configuration
- Lambda functions to generate OTP, format digits for TTS clarity, and invoke outbound calls
- Cognito triggers:
defineAuthChallenge— control authentication stepscreateAuthChallenge— generate OTP and initiate callverifyAuthChallenge— validate user response
What’s Next
AccessDeniedException errors often surface during execution, but their root cause lives deeper in IAM and STS mechanics. Lambda does not execute under a static identity—instead, it assumes a temporary role that must be explicitly authorized to call downstream services such as Amazon Connect.
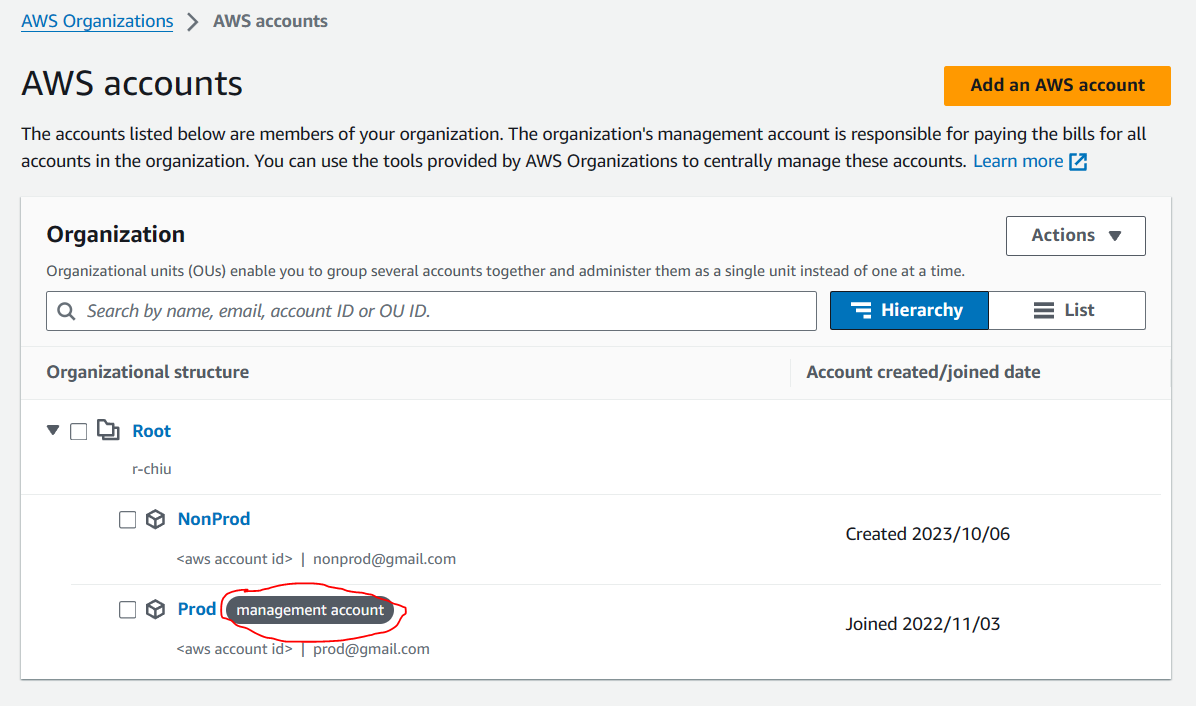
In multi-account environments, this complexity increases further. Permissions may be managed through a management account, delegated via Control Tower permission sets, or constrained by organizational policies that affect role evaluation.
In the next article, we take a deeper look at IAM internals behind assumed roles and Lambda execution, including how role trust policies, permission boundaries, and inline policies interact during runtime.
This follow-up explores:
- How assumed roles work and how Lambda uses them during execution
- Differences between IAM Users, Groups, and Roles, and how they work together
- Inspection of outboundCallRole used by Lambda
- Application of least-privilege inline policies for Amazon Connect access
- Permission review across management accounts and Control Tower–managed identities
👉 Continue with IAM deep dive: Set Up IAM Policies for Lambda When Using Amazon Connect